 |
 |
|
 |
|
| Author |
Message |
Noeland
Community Guide
Joined: 24 Oct 2006
Posts: 1328
|
 Posted: Mon Jan 12, 2009 4:01 pm Post subject: Posted: Mon Jan 12, 2009 4:01 pm Post subject: |
 |
|
I could never do that. My girlfriend would skin me alive if she walked into the kitchen and I was liquifying metal.
Mind you, we have a brand new stove, so . . .

_________________
I don't have enough blasters! |
|
| Back to top |
|
|
|
|
 |
|
 |
|
|
|
|
| Author |
Message |
chew
Community Member
Joined: 01 Dec 2008
Posts: 120
Location: Brooklyn, NY
|
| Posted: Mon Jan 12, 2009 7:30 pm Post subject: |
|
|
Yeah but it probably gets so much hotter so much quicker.
My wife works at a jewelry company she was totally excited about the idea!! 
_________________
I just do eyes. |
|
| Back to top |
|
|
|
|
|
|
|
|
|
|
|
| Author |
Message |
chew
Community Member
Joined: 01 Dec 2008
Posts: 120
Location: Brooklyn, NY
|
| Posted: Mon Jan 12, 2009 7:33 pm Post subject: |
|
|
| BeastMaster wrote: | look forward to seeing that  I got a mate who has a drill press, so might be able to just drill out the hole when done. I got a mate who has a drill press, so might be able to just drill out the hole when done.
did the metal not stick to the aluminium? |
Nope- it peeled right off. just make sure to bury as much of the barrel in sand as possible so it has support!
_________________
I just do eyes. |
|
| Back to top |
|
|
|
|
|
|
|
|
|
|
|
| Author |
Message |
BeastMaster
Community Member

Joined: 19 Jul 2007
Posts: 994
Location: UK
|
| Posted: Tue Jan 13, 2009 10:39 am Post subject: |
|
|
had a go with this just now. works a treat! there are a few gaps that will need filling with the soldering iron but it's pretty much solid.
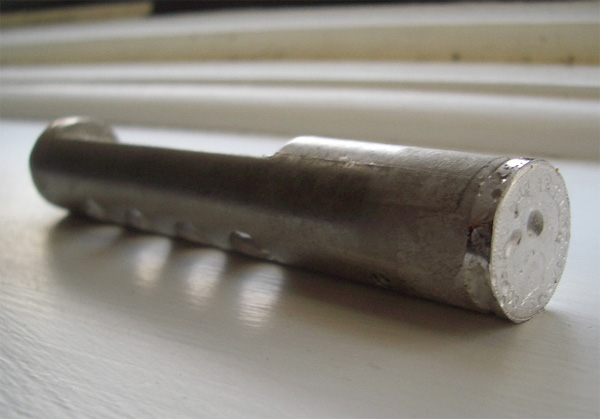
The diameter of the barrel is the same as a one penny, so I used that to flatten out the end.
nice one chew 
_________________
"F*ck it, it's just a movie. Let him worry about it" Harrison Ford |
|
| Back to top |
|
|
|
|
|
|
|
|
|
|
|
| Author |
Message |
chew
Community Member
Joined: 01 Dec 2008
Posts: 120
Location: Brooklyn, NY
|
| Posted: Tue Jan 13, 2009 8:00 pm Post subject: |
|
|
WELL DONE!
That looks so much better than mine did pre-grind. the penny was a great idea!
its crazy how the exterior of the barrel changes color/finish from the heat right?!? You can clearly see how far you filled the end.
What did you use to melt/pour?
_________________
I just do eyes. |
|
| Back to top |
|
|
|
|
|
|
|
|
|
|
|
| Author |
Message |
BeastMaster
Community Member
Joined: 19 Jul 2007
Posts: 994
Location: UK
|
| Posted: Wed Jan 14, 2009 7:02 am Post subject: |
|
|
cheers chew
yeah the metal goes all white and powdery. it was also still super hot for a while after pouring, so had to let it cool a bit. I used a mini ladle to pour, heated on an electric hob.
here it is after the grind
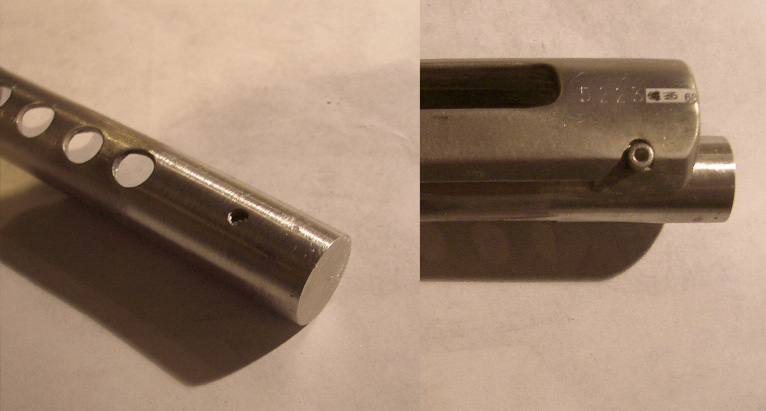
the extra length makes a huge difference to the accuracy. I'm just a bit concerned as to going about the bevel. I was thinking of securing it in a vice to stop it moving up and down and rotate it into the dremel cutter, something like that.
_________________
"F*ck it, it's just a movie. Let him worry about it" Harrison Ford |
|
| Back to top |
|
|
|
|
|
|
|
|
|
|
|
| Author |
Message |
joberg
Community Member
.jpg)
Joined: 06 Oct 2008
Posts: 9447
|
| Posted: Wed Jan 14, 2009 8:16 am Post subject: |
|
|
| It looks very good Beast! |
|
| Back to top |
|
|
|
|
|
|
|
|
|
|
|
| Author |
Message |
Hasenbrau
Community Member

Joined: 02 Dec 2008
Posts: 109
Location: SoCal
|
| Posted: Wed Jan 14, 2009 12:31 pm Post subject: |
|
|
| Great works guys. I can't wait to see you get that bevel in there. |
|
| Back to top |
|
|
|
|
|
|
|
|
|
|
|
| Author |
Message |
BeastMaster
Community Member
Joined: 19 Jul 2007
Posts: 994
Location: UK
|
| Posted: Sun Jan 18, 2009 5:51 pm Post subject: |
|
|
this is pretty much done now. I ended up drilling the hole with a hand drill and filing it out. I tried to dremel the bevel but its really tricky to control, so I filed it by hand.
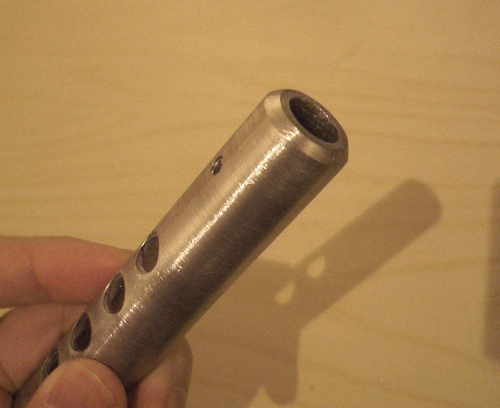
not as neat as I would have liked it to be, but anything other than that "cap gun" barrel as OB likes to call it
_________________
"F*ck it, it's just a movie. Let him worry about it" Harrison Ford |
|
| Back to top |
|
|
|
|
|
|
|
|
|
|
|
| Author |
Message |
chew
Community Member
Joined: 01 Dec 2008
Posts: 120
Location: Brooklyn, NY
|
| Posted: Sun Jan 18, 2009 6:42 pm Post subject: |
|
|
looks great! after seeing yours and feeling I'd ground mine too thin again I re-poured a third time....
what type of drill bit did you you use?
_________________
I just do eyes. |
|
| Back to top |
|
|
|
|
|
|
|
|
|
|
|
| Author |
Message |
Hasenbrau
Community Member
Joined: 02 Dec 2008
Posts: 109
Location: SoCal
|
| Posted: Sun Jan 18, 2009 9:31 pm Post subject: |
|
|
| Very nice work BeastMaster, you can't really tell it was done by hand and like you said; quite the improvement over the stock kit barrel. |
|
| Back to top |
|
|
|
|
|
|
|
|
|
|
|
| Author |
Message |
BeastMaster
Community Member
Joined: 19 Jul 2007
Posts: 994
Location: UK
|
| Posted: Mon Jan 19, 2009 7:09 am Post subject: |
|
|
cheers guys
chew: I think the drill bit I used was around 3/8 or 9.5. It was basically smaller than the hole I wanted as the biggest drill I had was too blunt.
so basically used this drill and filed out the hole until it measured around 11mm in diameter.
_________________
"F*ck it, it's just a movie. Let him worry about it" Harrison Ford |
|
| Back to top |
|
|
|
|
|
|
|
|
|
|
|
| Author |
Message |
joberg
Community Member
Joined: 06 Oct 2008
Posts: 9447
|
| Posted: Mon Jan 19, 2009 8:22 am Post subject: |
|
|
| Love it beast! Very good job. |
|
| Back to top |
|
|
|
|
|
|
|
|
|
|
|
| Author |
Message |
BeastMaster
Community Member
Joined: 19 Jul 2007
Posts: 994
Location: UK
|
| Posted: Mon Jan 19, 2009 11:13 am Post subject: |
|
|
thanks joberg
I am also in the process of modifying other parts of the blaster this way. I'll post some updates in the blog when they're done.
_________________
"F*ck it, it's just a movie. Let him worry about it" Harrison Ford |
|
| Back to top |
|
|
|
|
|
|
|
|
|
|
|
| Author |
Message |
panzerrune
Community Member

Joined: 26 Aug 2008
Posts: 92
|
| Posted: Wed Jan 21, 2009 5:49 pm Post subject: |
|
|
| BeastMaster wrote: | this is pretty much done now. I ended up drilling the hole with a hand drill and filing it out. I tried to dremel the bevel but its really tricky to control, so I filed it by hand.
not as neat as I would have liked it to be, but anything other than that "cap gun" barrel as OB likes to call it |
That looks great! My SIDKIT is competely finished and together, so for me to do that would require taking the kit apart, fixing the barrel, having it refinished and than reassembling. Nice work and you proved it can be done, but it to me is not worth the work of what i would have to do to get it to look like yours. If mine was not assembled yet i would do it as the SIDKIT is really messy when it comes to that area of the gun, sad it was done so sloppy when it came to the barrel.  Considering how much work was put into the rest of the SIDKIT it is weird that nothing was done to recreate the business end of the gun accurately per the WC HP!?!?!?!? Considering how much work was put into the rest of the SIDKIT it is weird that nothing was done to recreate the business end of the gun accurately per the WC HP!?!?!?!?
Thanks! |
|
| Back to top |
|
|
|
|
|
|
|
|
|
|
|
| Author |
Message |
BeastMaster
Community Member
Joined: 19 Jul 2007
Posts: 994
Location: UK
|
| Posted: Thu Jan 22, 2009 10:58 am Post subject: |
|
|
I wish I contributed more feedback when he was documenting his WC kit build. I remember being more pre-occupied with the ammo housing not being plastic and didnt take the barrel into consideration. though I realise now its a crucial asthetic in defining the overall shape of the blaster. it's like putting a different nose on a famous actor! 
_________________
"F*ck it, it's just a movie. Let him worry about it" Harrison Ford |
|
| Back to top |
|
|
|
|
|
|
|
|
|
|
|
|
You cannot post new topics in this forum
You cannot reply to topics in this forum
You cannot edit your posts in this forum
You cannot delete your posts in this forum
You cannot vote in polls in this forum
|
|
|
|
|
|
|
|


