 |
 |
|
 |
|
| Author |
Message |
Mark Sheppard
Community Member

Joined: 18 Apr 2009
Posts: 951
Location: In my office playing golf, pouring drinks, making deals.
|
 Posted: Wed May 13, 2009 12:25 am Post subject: Posted: Wed May 13, 2009 12:25 am Post subject: |
 |
|
Actually Phase Pistol made an amazing enhanced photo of the "umbilicus interface module" that showed a ton of incredible details and piping that actually interface the nostromo's systems to the actual refinery. I could not believe all that was unseen in the movie, and I doubt I will do mine so in depth  The piping and stuff actually appears around the outside of the interlock on top, but actually on this kit, aside from adding ultra detail that cant be done using garage methods, the top lines of this module are very sharp and crisp, and a great base for uberdetail. The piping and stuff actually appears around the outside of the interlock on top, but actually on this kit, aside from adding ultra detail that cant be done using garage methods, the top lines of this module are very sharp and crisp, and a great base for uberdetail. |
|
| Back to top |
|
|
|
|
 |
|
 |
|
|
|
|
| Author |
Message |
Mark Sheppard
Community Member
Joined: 18 Apr 2009
Posts: 951
Location: In my office playing golf, pouring drinks, making deals.
|
| Posted: Thu May 14, 2009 9:15 pm Post subject: |
|
|
in this picture I am centering the docking module for test fit along with the rear corrugated "heat radiator" on the rear of the module. after this part is centered and glued, the rear interior of the module will be finished with more reactor cooling piping, then 2 thrusters, and the flaps. Most of the detail wont be seen, but I will know it is there  The rear edges of the corrugated part must be flush with the edges of the rear bulkhead when the Interlock Module is bonded to the hull. The rear edges of the corrugated part must be flush with the edges of the rear bulkhead when the Interlock Module is bonded to the hull.

 |
|
| Back to top |
|
|
|
|
|
|
|
|
|
|
|
| Author |
Message |
Space Jockey
Community Member

Joined: 13 Apr 2009
Posts: 559
Location: East Tennessee
|
| Posted: Thu May 14, 2009 10:42 pm Post subject: |
|
|
Love the detailing work at the bottom of the pic, that looks amazing.  |
|
| Back to top |
|
|
|
|
|
|
|
|
|
|
|
| Author |
Message |
Mark Sheppard
Community Member
Joined: 18 Apr 2009
Posts: 951
Location: In my office playing golf, pouring drinks, making deals.
|
| Posted: Thu May 14, 2009 11:31 pm Post subject: |
|
|
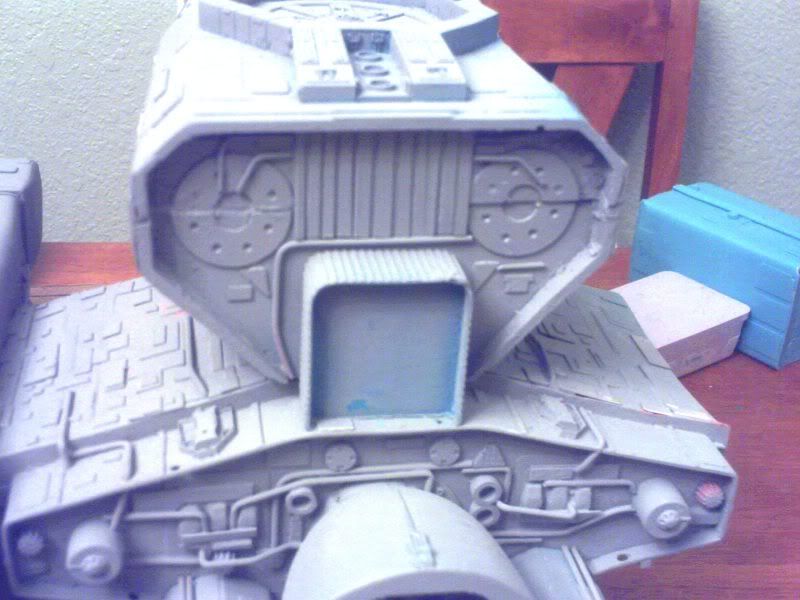
Thank you Space Jockey!
here is a bit of detailing that wont really be seen after I install the thrusters, but it will give others an idea...
 |
|
| Back to top |
|
|
|
|
|
|
|
|
|
|
|
| Author |
Message |
andy
Community Guide

Joined: 01 Nov 2006
Posts: 6237
Location: Rochester, NY
|
| Posted: Fri May 15, 2009 12:40 am Post subject: |
|
|
Looking good 
Andy |
|
| Back to top |
|
|
|
|
|
|
|
|
|
|
|
| Author |
Message |
SKIN JOB 66
Community Member

Joined: 16 Jan 2008
Posts: 2724
Location: FRANCE
|
| Posted: Fri May 15, 2009 4:14 pm Post subject: |
|
|
| jtparker wrote: |
The next kit goes out to Skinjob66 |

Can't wait to see the Professor's pics, too !!!
Fred
_________________
THE FUTURE IS A THING OF THE PAST |
|
| Back to top |
|
|
|
|
|
|
|
|
|
|
|
| Author |
Message |
Mark Sheppard
Community Member
Joined: 18 Apr 2009
Posts: 951
Location: In my office playing golf, pouring drinks, making deals.
|
| Posted: Fri May 15, 2009 9:11 pm Post subject: |
|
|
| Me too! That is always cool to see people build this kit better than me lol! |
|
| Back to top |
|
|
|
|
|
|
|
|
|
|
|
| Author |
Message |
Space Jockey
Community Member
Joined: 13 Apr 2009
Posts: 559
Location: East Tennessee
|
| Posted: Fri May 15, 2009 10:17 pm Post subject: |
|
|
It's nice though to see a kit where a great base is there to work on, and you have to do some research and cool detailing to it and get some enjoyment out of it. I was in the model shop the other day and there were planes which looked superb, but you attach the wings, do a couple of other things and it's done! I don't know how anyone can really develop modelling skills doing those. You don't even have to paint the thing  but this is looking great! but this is looking great! |
|
| Back to top |
|
|
|
|
|
|
|
|
|
|
|
| Author |
Message |
Mark Sheppard
Community Member
Joined: 18 Apr 2009
Posts: 951
Location: In my office playing golf, pouring drinks, making deals.
|
| Posted: Sat May 16, 2009 1:37 am Post subject: |
|
|
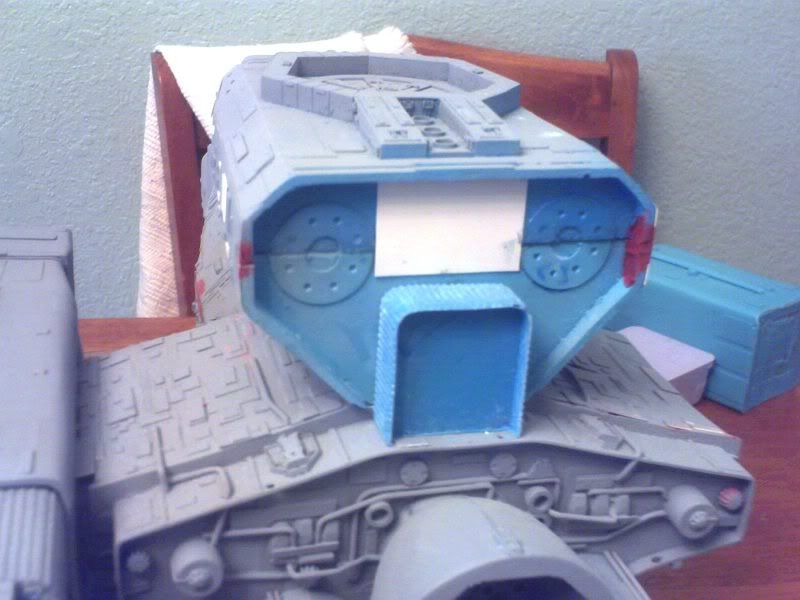
With the docking module still sitting on the hull unattached I fit the rear louvered part and stare at it knowing I am actually making a bit of progress here.
...and now adding the two chemical thrusters to the docking module....
 |
|
| Back to top |
|
|
|
|
|
|
|
|
|
|
|
| Author |
Message |
Mark Sheppard
Community Member
Joined: 18 Apr 2009
Posts: 951
Location: In my office playing golf, pouring drinks, making deals.
|
| Posted: Sat May 16, 2009 2:03 am Post subject: |
|
|
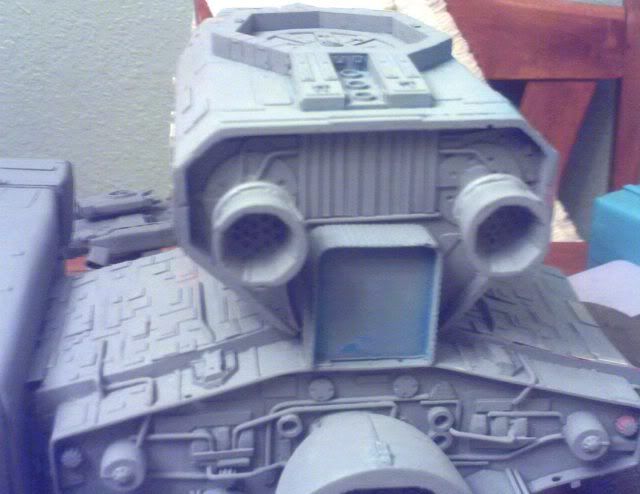
...and now with just adding some preliminary parts, it is starting to look like
the real thing ................
Halcyon, stick this in your Funk & Wagnells

Last edited by Mark Sheppard on Sun May 17, 2009 12:03 am; edited 4 times in total |
|
| Back to top |
|
|
|
|
|
|
|
|
|
|
|
| Author |
Message |
theprofessor
Joined: 02 May 2009
Posts: 4
|
| Posted: Sat May 16, 2009 2:05 am Post subject: |
|
|
| jtparker wrote: | With the docking module still sitting on the hull unattached I fit the rear louvered part and stare at it knowing I am actually making a bit of progress here.
...and now adding the two chemical thrusters to the docking module....
|
Oh Hell yes!!! |
|
| Back to top |
|
|
|
|
|
|
|
|
|
|
|
| Author |
Message |
Mark Sheppard
Community Member
Joined: 18 Apr 2009
Posts: 951
Location: In my office playing golf, pouring drinks, making deals.
|
| Posted: Sat May 16, 2009 2:10 am Post subject: |
|
|
`..Thanks Professor!
The brass and aluminum tubing I supplied with the kit, a cheap pair of needle nose pliers, a few drops of crazy glue makes the reactor piping... I am ruining it for all of the commission builders |
|
| Back to top |
|
|
|
|
|
|
|
|
|
|
|
| Author |
Message |
Mark Sheppard
Community Member
Joined: 18 Apr 2009
Posts: 951
Location: In my office playing golf, pouring drinks, making deals.
|
| Posted: Thu May 21, 2009 11:51 pm Post subject: |
|
|
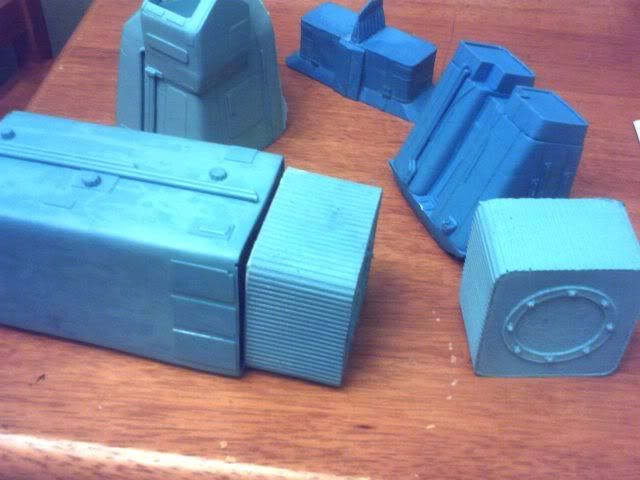
here are a new set of parts, all made from new silicon molds, except for the front nacelles that get re-tooled this weekend, and recast this next week when my new vacuum de-gasser comes in ..Hooray... anyway, the lines are much cleaner now, and I can retire these original 25 year old molds.
These parts pictured include new center nacelle section and corrugated rear nacelles. This off color is simply due to me pouring in 2 different tinted batches of resin while casting the part, so the color is weird, but surface and details are smooth
This first new kit goes out to Skinjob66,, Fred your going to like this one
 |
|
| Back to top |
|
|
|
|
|
|
|
|
|
|
|
| Author |
Message |
SKIN JOB 66
Community Member
Joined: 16 Jan 2008
Posts: 2724
Location: FRANCE
|
| Posted: Fri May 22, 2009 3:13 am Post subject: |
|
|
once more !!!
Fred
_________________
THE FUTURE IS A THING OF THE PAST |
|
| Back to top |
|
|
|
|
|
|
|
|
|
|
|
| Author |
Message |
Mark Sheppard
Community Member
Joined: 18 Apr 2009
Posts: 951
Location: In my office playing golf, pouring drinks, making deals.
|
| Posted: Fri May 22, 2009 9:08 am Post subject: |
|
|
| all that is really left on this kit is the new versions of the upper docking module (top and bottom from the new molds) the front part of the nacelles, and thats it. The front parts I started on last night with the more accurate VTOL angle..the old molds will get retired.. they are 25 year old Polyurethane...I dont know if anybody even uses that material now ?????? |
|
| Back to top |
|
|
|
|
|
|
|
|
|
|
|
| Author |
Message |
Space Jockey
Community Member
Joined: 13 Apr 2009
Posts: 559
Location: East Tennessee
|
| Posted: Fri May 22, 2009 2:10 pm Post subject: |
|
|
That is looking SUPERB. If you turn on the washing machine in that photo with the Nostromo sitting on it, you can re-enact the 'turbulence' scene as they land on the planet.
Hey, is there any chance you could please post a shot of the front of the model, looking down directly from above? I'm trying to get some angles correct for the blueprints...that would be helpful. Thanks. |
|
| Back to top |
|
|
|
|
|
|
|
|
|
|
|
| Author |
Message |
Mark Sheppard
Community Member
Joined: 18 Apr 2009
Posts: 951
Location: In my office playing golf, pouring drinks, making deals.
|
| Posted: Fri May 22, 2009 2:22 pm Post subject: |
|
|
| I have not installed the other engine nacelle yet, bu I can put it all together and you can reverse the image with a mirror effect. Let me find a place where I can get a good front shot with decent lighting. |
|
| Back to top |
|
|
|
|
|
|
|
|
|
|
|
| Author |
Message |
Mark Sheppard
Community Member
Joined: 18 Apr 2009
Posts: 951
Location: In my office playing golf, pouring drinks, making deals.
|
| Posted: Fri May 22, 2009 7:23 pm Post subject: |
|
|
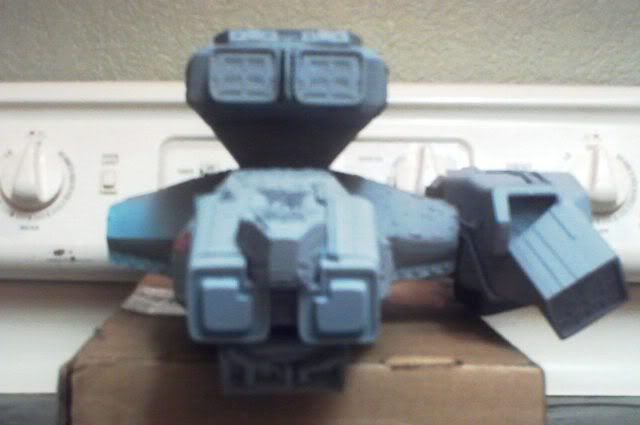
Here is the top half of the Docking module... This is the last casting from the 25 year old Polyurethane molds, They have held up fairly well.
This part as you can see still has crisp detail, but the sides are soft, so with a little repair, this part is ready to be remolded in modern silicon, and the old mold retired.
 |
|
| Back to top |
|
|
|
|
|
|
|
|
|
|
|
| Author |
Message |
Space Jockey
Community Member
Joined: 13 Apr 2009
Posts: 559
Location: East Tennessee
|
| Posted: Fri May 22, 2009 9:36 pm Post subject: |
|
|
| It's really great though that your putting in all this work and keeping the kit alive. Well done indeed. |
|
| Back to top |
|
|
|
|
|
|
|
|
|
|
|
| Author |
Message |
Mark Sheppard
Community Member
Joined: 18 Apr 2009
Posts: 951
Location: In my office playing golf, pouring drinks, making deals.
|
| Posted: Fri May 22, 2009 11:08 pm Post subject: |
|
|
Thanks Graham!
Here is the best pic I could get....even when I get way back and then enlarge, there is still too much depth and perspective, and the nose looks too close, but maybe at least this can help you a bit I hope..
 |
|
| Back to top |
|
|
|
|
|
|
|
|
|
|
|
|
You cannot post new topics in this forum
You cannot reply to topics in this forum
You cannot edit your posts in this forum
You cannot delete your posts in this forum
You cannot vote in polls in this forum
|
|
|
|
|
|
|
|


