 |
 |
|
 |
|
| Author |
Message |
propsjonnyb
Community Member
Joined: 16 Jul 2009
Posts: 476
Location: Helmdon, Northamptonshire UK
|
 Posted: Wed May 12, 2010 10:15 am Post subject: Posted: Wed May 12, 2010 10:15 am Post subject: |
 |
|
On the Sidkit I recently posted, it had a "Blue Wonder" steel barrel and matched 'Pewter Black ' upper reciever, on the LE build pages that's also a 'Blue Wonder' steel barrel but a 'plated upper heavilly weathered to look old and rusty as I wasn't happy with the overall build and look of the gun due to the issues Rich described , so I've completely dismantlled it and am starting again from the ground up , this time electroplating all the metal pieces -leaving the ammobox and shroud covers as they were. Since all the pieces have to be polished to death and plated three times to get to the finish I need to 'blue' This is taking a lot longer to complete than the first build . Electroplating is not for the amateur or hobbyist , the chemicals used are extremely toxic and the process dangerous so I would not recommend it , however there is a kit available through Micromark , that is designed for the hobbyist, which I have personally used and achieved reasonable results with that and is reasonably safe to use with protection and caution - I haven't tried to do a full blaster with it , ( it's complicated ,- but it's the ratio of surface area to chemicals needed to plate successfully, so you need about tripple the quantities supplied with the kit and you need three kits or one kit, and three sets of solutions copper, bronze and nickel each kit costs about $50 dollars retail) I promise I'll post pictures as I progress .
Last edited by propsjonnyb on Wed May 12, 2010 3:37 pm; edited 1 time in total |
|
| Back to top |
|
|
|
|
 |
|
 |
|
|
|
|
| Author |
Message |
jameth
Community Member
Joined: 02 Feb 2010
Posts: 825
|
| Posted: Wed May 12, 2010 12:14 pm Post subject: |
|
|
Is it possible to combine the show off thread, the build thread , and this one into one. We now have 3 different threads for this blaster.
Personally I would love us to have just one that way we don't have to check three different threads.
I personally think show off, progress and questions all go together nicely.
Just a thought
I know it's been discussed but now instead of two we have three and maybe more. |
|
| Back to top |
|
|
|
|
|
|
|
|
|
|
|
| Author |
Message |
andy
Community Guide

Joined: 01 Nov 2006
Posts: 6237
Location: Rochester, NY
|
| Posted: Wed May 12, 2010 12:35 pm Post subject: |
|
|
There is no way to combine threads. I had hoped people would stay on topic, but that never works out. The main problem is that people looking for "building tips" down the road will never find a thread with that topic, they will have to dig through all these almost unrelated threads to find the info. When I get home tonight I may try to separate some of this into another thread, but most of the stuff may have to be pasted back into the new thread. At least then people can choose which threads they wish to read based on the title.
Considering this isn't the RPF with pages of new posts a day, I don't think having a couple separate threads with similar stuff is a problem though. Most of us will read it all anyway, the rest can click each and hit [end] to read the last posts a couple times, and be done in less than a minute  Part of the problem started when a show of thread started before anybody had anything to show off yet. If I turn that one into a building tips thread (which it is mostly) I can separate the show off stuff into a new thread. Either that or everybody who posted show off stuff separately must repost it in the main show off thread and I will delete the extra threads and separate the building tips into a new thread. Part of the problem started when a show of thread started before anybody had anything to show off yet. If I turn that one into a building tips thread (which it is mostly) I can separate the show off stuff into a new thread. Either that or everybody who posted show off stuff separately must repost it in the main show off thread and I will delete the extra threads and separate the building tips into a new thread.
If anybody has any other ideas, I am open to suggestions.
Andy
Andy |
|
| Back to top |
|
|
|
|
|
|
|
|
|
|
|
| Author |
Message |
jameth
Community Member
Joined: 02 Feb 2010
Posts: 825
|
| Posted: Wed May 12, 2010 2:11 pm Post subject: |
|
|
I just wish we could agree to keep it all in one thread and lock off the others.
A show off thread will have lots of tips because people will ask how you did something in a pic they see and that's totally fine. But that's why all of it in one would be nice because they cross over and trying to read and keep track of many different threads can be annoying.
Again just a suggestion.
For my .01 cents worth Lock off two of them and lets just stick to one and not create a seperate show off thread for our individual blasters only.
Lets keep it all in one glorious blaster filled thread.
Again just my .01 cents worth  |
|
| Back to top |
|
|
|
|
|
|
|
|
|
|
|
| Author |
Message |
jameth
Community Member
Joined: 02 Feb 2010
Posts: 825
|
| Posted: Wed May 12, 2010 4:02 pm Post subject: |
|
|
Tip for cylinder opening problems.
If you are having trouble with the cylinder coming out it might be because the screw inside connected to the thumb release for the cylinder is screwed to far in. Not the screw on the outside that holds the thumb release on the frame but the one inside that actual pushes in the cylinder spring tube to release the cylinder.
My thumb release kept getting stuck because the actual srew peg was screwed in to far and would slip out of the hole so when you push the thumb release foward it's hitting under the hole and the cylinder is stuck. Once that is done the only way to get the cylinder out is to take it apart partially so you can manually push it in to release the cylinder.
With the cylinder out unscrew the release screw that is in the hole all the way out and then screw it back in just as little as needed so it's secure but will push the cylinder peg all the way in to release the cylinder.
Okay that took way longer to explain than I meant so I hope it makes sense |
|
| Back to top |
|
|
|
|
|
|
|
|
|
|
|
| Author |
Message |
ironfist
Community Member

Joined: 10 Feb 2009
Posts: 310
Location: East Hartford,CT
|
| Posted: Wed May 12, 2010 4:32 pm Post subject: |
|
|
Glad to see you nutted it out mate! Mine still has a bit of a stick to it,so I'll give this a whirl.
_________________
The other Karl! |
|
| Back to top |
|
|
|
|
|
|
|
|
|
|
|
| Author |
Message |
jameth
Community Member
Joined: 02 Feb 2010
Posts: 825
|
| Posted: Wed May 12, 2010 4:59 pm Post subject: |
|
|
| ironfist wrote: | | Glad to see you nutted it out mate! Mine still has a bit of a stick to it,so I'll give this a whirl. |
It was Rich's suggestion. When all else fails ask the guy who built it.
So far it's worked. The only problem now is it really sticks with the bullets in it so I'm thinking I'll try smoothing the back cylinder wall of the frame??? Maybe that will help??? |
|
| Back to top |
|
|
|
|
|
|
|
|
|
|
|
| Author |
Message |
marsattack
Community Member
Joined: 08 Feb 2009
Posts: 63
Location: Melbourne , Australia
|
| Posted: Thu May 13, 2010 1:31 am Post subject: |
|
|
On the topic of the release button, no pictures on the photobucket pages shows a spring, is this missing intentionally ?or did i miss the page??
if there was a spring to always remain closed would this help??
I figure placing a spring , then screwing the screw, obviously the spring has to be bigger than the hole.
would this help?
Mars |
|
| Back to top |
|
|
|
|
|
|
|
|
|
|
|
| Author |
Message |
propsjonnyb
Community Member
Joined: 16 Jul 2009
Posts: 476
Location: Helmdon, Northamptonshire UK
|
| Posted: Thu May 13, 2010 4:35 am Post subject: |
|
|
| There is a spring supplied in the kit for this , its a little silver spring , Rich didn't post pictures, I've let him know that they are needed, so I'm sure he'll add them , but in the meantime the access hole for the thumb catch needs to be slightly oblong as in the pictures and the thumb catch must travel in both directions freely , Rich 's photos shows placing the catch and how you add and tighten the screw ,but don't show how you put the spring in - the thumb catch is T shaped and had a drill/tapped 43/440 hole in the end where the screw attaches , drop the catch in the hole without the spring and fix the screw as shown, now move the catch right back and rotate it 90 degrees, so the T with the screw is sitting upright - place the spring carefully over the screw and slowly rotate the catch back into it's normal position , you'll have to hold the spring back with a fine screwdriver , until the screw pops into it's hole and you have to hold the catch with your thumb to stop the sping coming off the T bar , now screw the catch in place - not to tight to ensure the catch springs back and then set the final position of the small screw as shown in the photo's so that when you push the thumb catch forward it unlatches the ejector rod . -- job done! |
|
| Back to top |
|
|
|
|
|
|
|
|
|
|
|
| Author |
Message |
marsattack
Community Member
Joined: 08 Feb 2009
Posts: 63
Location: Melbourne , Australia
|
| Posted: Thu May 13, 2010 6:33 am Post subject: |
|
|
ok yes i got that extra spring and understand what you mean, thanks Johnny.
Now a new prob if you dont mind.
I spent all afternoon with the barrel, it seems pewter will never spin freely with pewter , so i bushed the inside of the bullet drum with a brass tube, and as it turns out it spins awesomely!!
Also had to shave the outer sides as the drum touched and shaved also the top of the frame, now for the BUT the bullets do not fit!!
why and what more can i shave??
I shaved either side of the drum to create more room and even the top receiver as it did not line up with the opening.
HELP!!!
this pic took me like 15 shots to get it!!!lol
ALSO , what am i ? the only one building this at THIS time?
[img]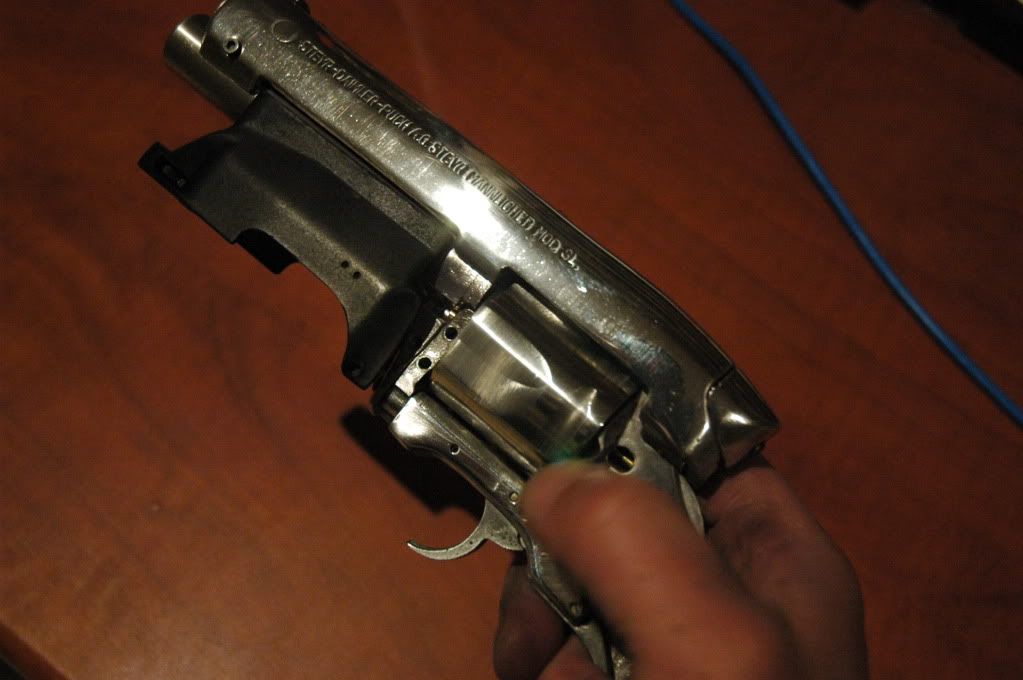
[/img]
Last edited by marsattack on Sat Jun 05, 2010 2:50 am; edited 1 time in total |
|
| Back to top |
|
|
|
|
|
|
|
|
|
|
|
| Author |
Message |
propsjonnyb
Community Member
Joined: 16 Jul 2009
Posts: 476
Location: Helmdon, Northamptonshire UK
|
| Posted: Thu May 13, 2010 10:20 am Post subject: |
|
|
Good idea about the bushing , I was meaning to suggest that to Rich as the drum does stick unless you use a lot of silicon oil, if the bushing you've used hasn't altered the barrel position , do you mean the bullets will not fit into the drum chambers or do you mean when you load the drum with the bullets you'lll see that they sit slighly proud of the barrel and if the position of the barrel isn't right the fit will be off and the drum will not spin free as it will be tight at one end, the bullet cap end ??
Anyway, to fix either problem , first make sure all your bullets are the same length and that the heads do not protrude from the chamber holes, file and sand them to make sure they are all perfectly round and smooth and exactly the same length - a light filing with a round file will ensure the bullets go in the chambers or a sand with a sanding stick or a scrap of sandpaper wrapped round a suitably sized dowel rod.
first problem sorted !
If its the other - if you check the barrel drum, the opposite end as to where the ejector star would normally fit, the central mounting hole where the ejector rod fits , stands slightly proud of the surface, you can see this if you stand the barrel on its end on a flat surface - file that down carefully, each time test fitting it with all the bullets loaded , until you get a perfect fit , give the end a final sand to take off any sharp edges and make sure the barrel revolves free once the drum is loaded and the catch engages . Number two solved - Hopefully that should fix either problem - I'm the other one who's building too btw !
I'd nearly finished the LE build when Rich reported the parts didn't fit right - so I've dismantelled it, stripped it all back to bare metal and am starting again !!
It's just that what I'm doing is taking an additional length of time and I haven't gotten around to taking any more photos yet , but I will do soon !! |
|
| Back to top |
|
|
|
|
|
|
|
|
|
|
|
| Author |
Message |
Staar
Community Member

Joined: 04 Feb 2008
Posts: 757
Location: AUSTRALIA
|
| Posted: Thu May 13, 2010 10:22 am Post subject: |
|
|
| marsattack wrote: |

ALSO , what am i ? the only one building this at THIS time? |
Seriously awesome Mars mate - your skills and years of experience in building superior props is evident in what your'e producing here. Many thanks for sharing..
Your question is certainly valid because aside from propsjonnyb's set of blasters and jameth's post, there is a distinct lack of presence for these kits here..
Where the blasters folks??
Regards
MARK
_________________
 |
|
| Back to top |
|
|
|
|
|
|
|
|
|
|
|
| Author |
Message |
Bwood
Community Member
Joined: 20 Sep 2009
Posts: 843
|
| Posted: Thu May 13, 2010 10:43 am Post subject: |
|
|
Speaking for myself only, I'm waiting for the return of mspaw from NZ so I can get my new barrel before I start building. Hopefully it will be soon.  |
|
| Back to top |
|
|
|
|
|
|
|
|
|
|
|
| Author |
Message |
joberg
Community Member
.jpg)
Joined: 06 Oct 2008
Posts: 9447
|
| Posted: Thu May 13, 2010 12:21 pm Post subject: |
|
|
Keep on trucking Mars (or building in this case  ). Serious stuff indeed and a thanks to you and Propsjohnny for sharing your experience with us newbies (one day before I die, I swear, I'll have a blaster ) ). Serious stuff indeed and a thanks to you and Propsjohnny for sharing your experience with us newbies (one day before I die, I swear, I'll have a blaster ) |
|
| Back to top |
|
|
|
|
|
|
|
|
|
|
|
| Author |
Message |
jameth
Community Member
Joined: 02 Feb 2010
Posts: 825
|
| Posted: Thu May 13, 2010 12:45 pm Post subject: |
|
|
Okay, now I'm confused. My Thumb release that you push to release the cylinder has no spring. The only spring is in the cylinder itself.
Is the spring you are talking about part of the actual thumb release for the cylinder???
Mine does not have one. |
|
| Back to top |
|
|
|
|
|
|
|
|
|
|
|
| Author |
Message |
ironfist
Community Member
Joined: 10 Feb 2009
Posts: 310
Location: East Hartford,CT
|
| Posted: Thu May 13, 2010 12:49 pm Post subject: |
|
|
Yes! Yes you are! And we are all learning. And we thank you. Im in the middle of a move so I wont be able to touch mine for a couple weeks. And its killing me!!!!!!!!!!
_________________
The other Karl! |
|
| Back to top |
|
|
|
|
|
|
|
|
|
|
|
| Author |
Message |
jameth
Community Member
Joined: 02 Feb 2010
Posts: 825
|
| Posted: Thu May 13, 2010 1:28 pm Post subject: |
|
|
| marsattack wrote: | ok yes i got that extra spring and understand what you mean, thanks Johnny.
Now a new prob if you dont mind.
I spent all afternoon with the barrel, it seems pewter will never spin freely with pewter , so i bushed the inside of the bullet drum with a brass tube, and as it turns out it spins awesomely!!
Also had to shave the outer sides as the drum touched and shaved also the top of the frame, now for the BUT the bullets do not fit!!
why and what more can i shave??
I shaved either side of the drum to create more room and even the top receiver as it did not line up with the opening.
HELP!!!
this pic took me like 15 shots to get it!!!lol
ALSO , what am i ? the only one building this at THIS time?

 |
On the spining cylinder I am having the same problem. Can you explain what you did again and maybe show a pic of what you added.
Having same bullet problem as well.
On the bulding I was wondering the same thing. Darn few seem to be being worked on |
|
| Back to top |
|
|
|
|
|
|
|
|
|
|
|
| Author |
Message |
propsjonnyb
Community Member
Joined: 16 Jul 2009
Posts: 476
Location: Helmdon, Northamptonshire UK
|
| Posted: Thu May 13, 2010 4:07 pm Post subject: |
|
|
Jameth, if Rich built your blaster I'm sure the spring is there, already fitted, if you have a thumb catch that springs back when you use it - the spring is fitted properly and is working , I would adjust the screw settings to get a perfect cylinder release, that's both the internal screw and the screw holding the thumb catch to the gun frame - for us kit guys it's a small silver spring about a 1/4 inch long , the first thing I would say if your drums are sticking is check the bullets fit in the drum properly, that is to say - no rim of one is sitting over an other - each bullet should be 38mm long and have a rim edge diameter of 12 mm each drum hole should be 10mm to 11mm dia as this is not a real gun the dia is not that important but you do want the dummy bullets to fit smoothly and not fall out when you pick up the gun so sand and test fit as required , if the drum cylinder is not fitting in the gun frame peoperly adjust the sides by lightly filing or sanding both the gun frame and both ends of the cylinder drum and test fit with the bullets in place - the cylinder should revolve freely when the thumb catch engages the ejector arm this holds the drum in place but allows the drum to revolve . Pressing the thumb catch releases the cylinder , since the ejector rod is fabricated just to hold the cylinder closed in place , there is no ejector 'star' that fits on the end of a normal gun ejector rod that marries up to drum - which catches the rim edge and when you press the ejector rod , ejects all the spent shell's from the gun , now this is important do not file down the centre of the drum at either end too much or you will not have free movement , file or sand the cylinder rims - and as Mars suggested, bushing the hole with a length of thin brass tube will help , I think it's an excellent idea - but make sure it matches in terms of exact size a) to fit the drum and b) to allow the drum to revolve on the ejector rod . That should solve all problems. Oh and Mars, I noticed in the photos that the cylinder drum is sitting just a touch to far forward it needs to come back a fraction ' a milimeter or 2' as it might be catching on the ejector rod arm and the top edge of the gun frame when closing up , thus pushing it back against the back plate of the gun frame, which catches the bullet rims, which stops the drum revolving.
You'll know when youve got it spot on as you'll be able to do " the right hand flick " when you've loaded the bullets which closes the drum and engages the catch - anyone whose loaded a 'rea'l revolver will know exactly what I mean - all others trust me - you'll know !! it's a sharp flick of the wrist !! |
|
| Back to top |
|
|
|
|
|
|
|
|
|
|
|
| Author |
Message |
marsattack
Community Member
Joined: 08 Feb 2009
Posts: 63
Location: Melbourne , Australia
|
| Posted: Thu May 13, 2010 6:02 pm Post subject: |
|
|
what i will do tonight is take a pic of the cylinder and show with a pen what i shaved, also show the brass tube bush.
Johnny , the bullets fit fine inside and the barrel once closed spins beautifully.
It is the gap between the cylinder and the walls on either end that do not allow to load the bullets and close.
Do i have to shave the front part of the cylinder more?
as the back has the ejector built in.
mars
Jameth do your bullets go in no probs??
Mars |
|
| Back to top |
|
|
|
|
|
|
|
|
|
|
|
| Author |
Message |
marsattack
Community Member
Joined: 08 Feb 2009
Posts: 63
Location: Melbourne , Australia
|
| Posted: Thu May 13, 2010 6:03 pm Post subject: |
|
|
lol, reading Marks comments is like opening a HAllmark Card!!!
thanks mate!
Mars |
|
| Back to top |
|
|
|
|
|
|
|
|
|
|
|
|
You cannot post new topics in this forum
You cannot reply to topics in this forum
You cannot edit your posts in this forum
You cannot delete your posts in this forum
You cannot vote in polls in this forum
|
|
|
|
|
|
|
|


