 |
 |
|
 |
|
| Author |
Message |
propsjonnyb
Community Member
Joined: 16 Jul 2009
Posts: 476
Location: Helmdon, Northamptonshire UK
|
 Posted: Mon May 17, 2010 8:23 am Post subject: Posted: Mon May 17, 2010 8:23 am Post subject: |
 |
|
| No problems mate - I'm a regular guy too and a big SCI -Fi fan as well , so I guess I have a foot in both camps . |
|
| Back to top |
|
|
|
|
 |
|
 |
|
|
|
|
| Author |
Message |
racprops
Community Member

Joined: 30 Oct 2006
Posts: 2450
Location: Phoenix AZ
|
| Posted: Mon May 17, 2010 9:37 am Post subject: |
|
|
“And you're not the only one building the kit , I'm building kits - plural - meaning more that one - several in fact and each presents slightly different 'anomalies' - I like that word - 'anomalies' not problems, not issues , but challenges to my modelling skills to fix !.”
PropsjonnyB has said it true, each model and each part has little 'anomalies', I have said over and over again to get a near perfect fit is nearly impossible, so I have made thing fixable, sandable.
Mars I will be watching your try at casting with a two part mold. I have tried them, and found them not the answer for me.
The clear plastic cures fast, giving only a minute to pour and close the pressure tank. A two part mold suffers from the problem of holding it closed and leak proof. It is way too easy to distort the mold with your clamping force, be it clamps or rubber bands.
The best type is a mother mold with a hard shell. With loving care you should be able to make good set and castings. I make and run three pairs of molds at a time, with three pairs for a second pour. Making such molds is too much for what I am doing.
IF things go as they have from me, you may find the grips one size and the grip frame another as plastic casts differently than medal.
And remember, I did not come back here pitching this kit.
I was asked to do this kit by a bunch of you.
And I bussed my A** both retooling to give you guys the newest and most accurate model I could make, and you guys got it first.
I was asked to offer a kit and only this site has gotten it, I stopped people from offering it on other sites; because I felt only real fans could do the work and understand the work needed.
Most of the problems are from builders that want things to be perfect. A spinning cylinder is nice but not needed in a more or less static model, if you can turn it to reload it your fine.
Take a second look at ALL the pictures of the real prop. It is raw, nicked, scratched, rusting, has a broken grip (left side top near the screw) and a cracked side cover and other flaws, holes in the side covers near the screws and others.
The model you get is in much better shape, but a real diehard builder can recreate all of that to make a near perfect copy of the Worldcon prop.
I don’t do a pure Worldcon any more as over the years when I offered all the versions, as found, wires on the outside, etc, people ordered the cleaner version, 9 to 1wanted the near new as issued version with the wires hidden.
And as we found that the weaver knob was NEVER in the film I when back to the flattest round head slotted screw. And I have yet to find a metal version of that screw so you get a plastic copy.
I cannot give you the fit and finish of a large Japanese model company with the million dollar production machines they use.
I can give you a slightly lower prices model made more accurately. All metal where it was metal and a one part Bulldog metal pistol frame. One that will fit a real Bulldog Pistol if you want to put one in.
For a garage kit I feel very proud of my work and model.
Rich
_________________
I never have enough time to do all I want to do! |
|
| Back to top |
|
|
|
|
|
|
|
|
|
|
|
| Author |
Message |
racprops
Community Member
Joined: 30 Oct 2006
Posts: 2450
Location: Phoenix AZ
|
| Posted: Mon May 17, 2010 10:18 am Post subject: |
|
|
Mars: another problem with a two part mold will be the diamond pattern on the grips.
It is hard enough to get bubble free diamonds with they pointed up in a flat open mold, a two part mold will only work if you stand the grips on the edge with the pour point at the bottom edge. This will make getting good diamonds harder.
Also pressure casting can cause size changes.
Been there, Done that, was not worth the trip.
Note I am not saying anything about people recasting parts, A) as long as it is only some parts... and B) I am interested if you CAN improve on the model great and ask if you do, that I get copies or even the loan of your masters to make molds to use with the model.
Rich
_________________
I never have enough time to do all I want to do! |
|
| Back to top |
|
|
|
|
|
|
|
|
|
|
|
| Author |
Message |
propsjonnyb
Community Member
Joined: 16 Jul 2009
Posts: 476
Location: Helmdon, Northamptonshire UK
|
| Posted: Mon May 17, 2010 11:13 am Post subject: |
|
|
| I second all of Rich's comments, particularly the two part mold and 'mother' shells , I myself perfer a hard outer 'mother shell' and I make mine out of fiberglass as it's hard wearing and easy to do - you can use almost anything else that sets hard , resin, plaster of paris, plaster bandages etc just make sure you've 'keyed' the mold so they fit together perfectly and there is no deformity - then cast away ! also when casting try to make sure your mold is as level as it can be ! especially whilst the cast item is cooling so the top surface is flat. |
|
| Back to top |
|
|
|
|
|
|
|
|
|
|
|
| Author |
Message |
jameth
Community Member
Joined: 02 Feb 2010
Posts: 825
|
| Posted: Mon May 17, 2010 1:09 pm Post subject: |
|
|
Marsattacks said:
Guys try and keep to topic on the build or constructive criticism, if the kit has problems, it is not due to the amount of money paid , it is due to the FACT that the kit has a lot of problems. I give a rats a***e (aussie slang) what you should get for your $$$.
That is an odd comment. You may not care. I may not care about something you are talking about here but I'm not going to say you should not discuss it. This is a discussion board and we should discuss what people need to talk about.
I think it helps everyone to discuss every aspect. Not only do we learn from each other but it helps to make future projects better.
If you have no interest in a subject skip the reading but don't tell me what to ask and not ask. If I want to discuss the price I will. If I want to ask about aomething else I will. I read lots I don't care about to find what I do and I skip what I'm sure is not relevant to me.
Everyone seems to keep trying to keep the discussion of this prop to there own little needs or desires and that is not the point.
Price, quality, trouble, sucess, good and bad should all be posted so we all learn.
Example-I was expecting more for my $800. But in discussing with many of you and researching all other props I have now learned it was a good deal and worth it. Someone else may feel the same but after reading all this decide it was worth it as well. Somone else may feel they got a steal at the price. One person thinks the prop kit is garbage other think it is a gift and blessing
Someone may think they are in over their head and decide to sell rather then trash and somone else can buy that missed out. That all comes from this discussion.
Okay I've rambled enough It's just that know one should be telling anyone else what they should or should not ask or post. |
|
| Back to top |
|
|
|
|
|
|
|
|
|
|
|
| Author |
Message |
racprops
Community Member
Joined: 30 Oct 2006
Posts: 2450
Location: Phoenix AZ
|
| Posted: Mon May 17, 2010 1:21 pm Post subject: |
|
|
Flat or level is a nightmare making, tell me, is every table in your shop plumb??
And molds filled to the edge will be low in the center and if sanded end up smaller than planed, so I make the oversized and sand to fit.
Rich
_________________
I never have enough time to do all I want to do! |
|
| Back to top |
|
|
|
|
|
|
|
|
|
|
|
| Author |
Message |
jameth
Community Member
Joined: 02 Feb 2010
Posts: 825
|
| Posted: Mon May 17, 2010 2:22 pm Post subject: |
|
|
Painting Question
Definatly going to Pewter Black the top and cylinder. Don't want to paint that.
On the side Black pieces I have never seen black primer. I have used gray, white, and even a maroon filler primer. Awesome stuff BTW.
Where would I find the black primer????
Also does anyone have any other method that works well for removing paint other than oven cleaner???
It works but it's messy
Thanks
Last edited by jameth on Mon May 17, 2010 2:29 pm; edited 1 time in total |
|
| Back to top |
|
|
|
|
|
|
|
|
|
|
|
| Author |
Message |
jameth
Community Member
Joined: 02 Feb 2010
Posts: 825
|
| Posted: Mon May 17, 2010 2:28 pm Post subject: |
|
|
Cylinder "wiggle"
A small piece of white plastic tubing fitted in the cylinder at the back end inside between the cylinder and the inner spring tube will make the cylinder less wonky and help with the "spinning" should you desire it.
I will measure the tube and give size when I get home.
I wanted to use a brass tube as suggested earlier but I could not find one. My main hobby store closed.
I'll replace with a brass tube when I can but the plastic will work good for now and really forever
For me the "spinning" is more about just perfecting the gun and making it as tight as possible. |
|
| Back to top |
|
|
|
|
|
|
|
|
|
|
|
| Author |
Message |
racprops
Community Member
Joined: 30 Oct 2006
Posts: 2450
Location: Phoenix AZ
|
| Posted: Mon May 17, 2010 3:00 pm Post subject: |
|
|
Acietone works great, will bite plastic.
I have gotten black prime in auto stores.
Rich
| jameth wrote: | Painting Question
Definatly going to Pewter Black the top and cylinder. Don't want to paint that.
On the side Black pieces I have never seen black primer. I have used gray, white, and even a maroon filler primer. Awesome stuff BTW.
Where would I find the black primer????
Also does anyone have any other method that works well for removing paint other than oven cleaner???
It works but it's messy
Thanks |
_________________
I never have enough time to do all I want to do! |
|
| Back to top |
|
|
|
|
|
|
|
|
|
|
|
| Author |
Message |
propsjonnyb
Community Member
Joined: 16 Jul 2009
Posts: 476
Location: Helmdon, Northamptonshire UK
|
| Posted: Mon May 17, 2010 6:21 pm Post subject: |
|
|
Rich - only my drying bench is level and I did that deliberately so I could have one completly 100% level for my casts - mind you it's the only one that is , my work bench has a definite lean to it , but that could be me, leaning on it for support all the time ? 
Yes , black primer is available over the counter at almost all auto stores, I prefer a range called 'Satin Black' which is a 'matt' soft black - try to steer away from gloss black - I sometimes think it's a bit too glossy & shiney and using gloss means you have to 'weather' down again and that's just extra work - but that's my personal opinion use what you prefer , most prop shops use auto store spray paint because of the range and different effects they can produce quickly and easily and the fact that it's inexpensive to buy !!
Don't use acetone for any reason , it will melt most ABS and resin plastics on contact ( only use it for metal as a degreasing agent)
Brake fluid works well , but most hobby stores , or builders supplies will have suitable paint stripper , just check the label to see if the stripper can be used near or on plastics . Another good solvent if you've never come across it , is Superglue acellerator , spray some on a cloth and rub away - that's the best way to use it . |
|
| Back to top |
|
|
|
|
|
|
|
|
|
|
|
| Author |
Message |
propsjonnyb
Community Member
Joined: 16 Jul 2009
Posts: 476
Location: Helmdon, Northamptonshire UK
|
| Posted: Mon May 17, 2010 7:08 pm Post subject: |
|
|
ok Guys, the first shots of the Propsjonnyb electroplating process . the idea being to plate the blaster to a metal finish - that can be 'blued' sucessfully by any 'Gun Blue' agent, here are the first shots of various pieces in various stages , as I complete each phase I'll add more , next phase bronze plating ove the copper !
Each set of photos is with and without flash , the top reciever in the first set is plated after a good polish , but plating will not remove any physical blemishes as you can see , the bottom reciever has been marked with the areas of blemish in grey on the photos, this is why you must have an almost perfect cast and a very high degree of polishing
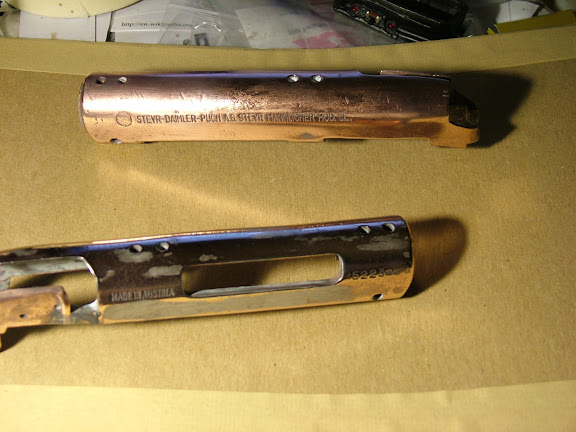
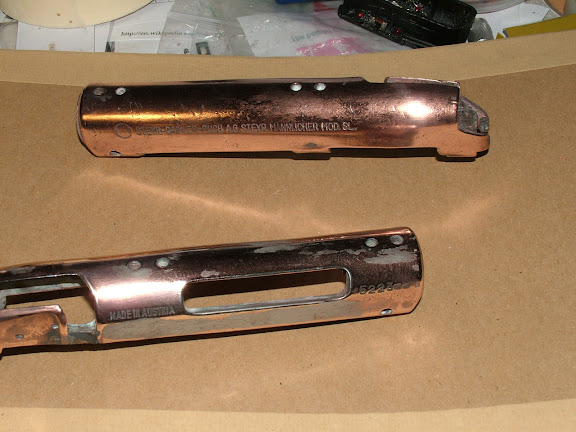
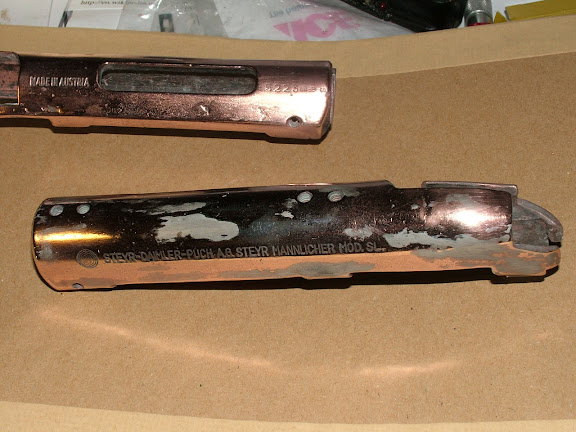
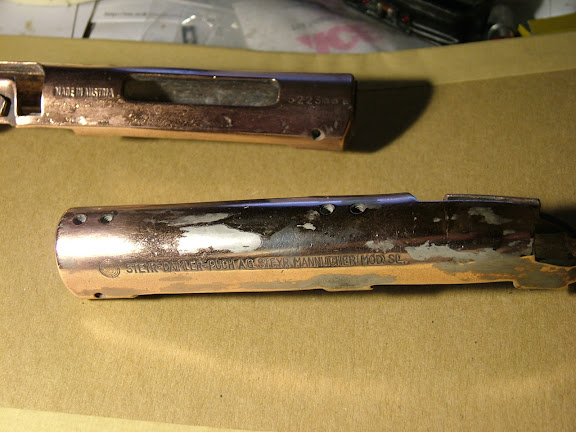
What a perfect polish means when you electroplate - a perfect finish !
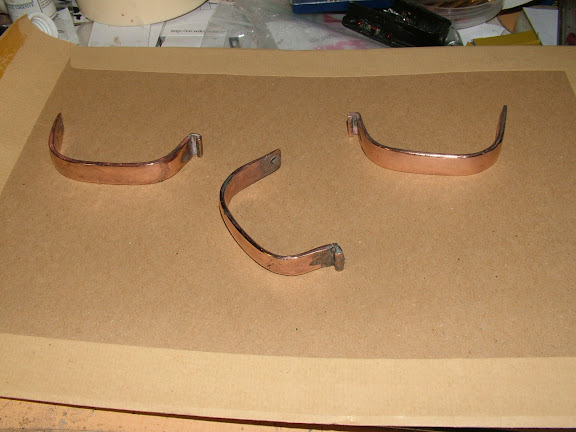
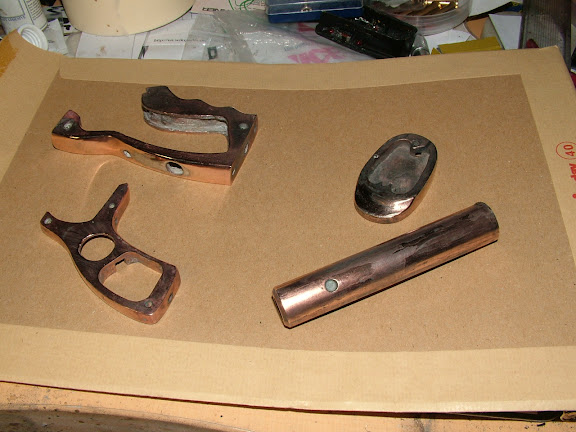
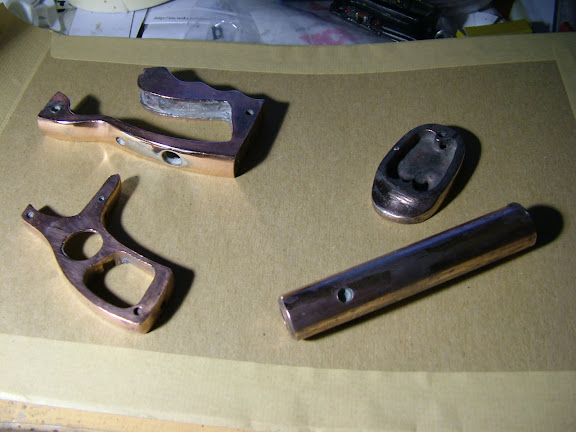
Next set of photos due - phase two in the process , bronzing , ready for the final finish -- nickel plate !! |
|
| Back to top |
|
|
|
|
|
|
|
|
|
|
|
| Author |
Message |
racprops
Community Member
Joined: 30 Oct 2006
Posts: 2450
Location: Phoenix AZ
|
| Posted: Mon May 17, 2010 7:14 pm Post subject: |
|
|
My early run of Sound and light models, the very first metal models, I have plated locally by a plating shop.
Because they had industrial chemical cleaners and thick plating they came out fairly good.
So if some wanted their parts plated I could look into it.
Rich
_________________
I never have enough time to do all I want to do! |
|
| Back to top |
|
|
|
|
|
|
|
|
|
|
|
| Author |
Message |
Staar
Community Member

Joined: 04 Feb 2008
Posts: 757
Location: AUSTRALIA
|
| Posted: Mon May 17, 2010 8:38 pm Post subject: |
|
|

These are both very exciting developments and they sure promise to create authentic interpretations of the RAC blaster.
I'm looking forward to seeing how both you and Mars progress from here because its clear you are both raising the bar as far as builds go.
Bravo and many thanks
Regards
MARK[/img]
_________________
 |
|
| Back to top |
|
|
|
|
|
|
|
|
|
|
|
| Author |
Message |
propsjonnyb
Community Member
Joined: 16 Jul 2009
Posts: 476
Location: Helmdon, Northamptonshire UK
|
| Posted: Tue May 18, 2010 3:13 am Post subject: |
|
|
Thanks Mark, your comments are appreciated, Rich is right a plating shop can plate pewter ,but as it's not an easy alloy to plate ( see photos) and it can work out quite expensive . I am not advocating anyone here try this at home as the chemicals are very toxic , you need to know and understand what you are doing , but there are one or two really good kits, that the experienced hobbyist could use to achive similar effects - please don't believe all the hype that's bandied about that anyone can do it - it's simply not true or we'd see lot's of them about . It's not a cheap process either the metal chemical salts are costly, if I digress a second-you'll understand my comment, electroplating is dependant on a few variables , but the most important one is surface area - as that determines how much chemicals salts you have to have to put an effective coating of metal on your object . Take the upper reciever for example , measure it and do the simple math to determine it's area, remember it's a 3D object - so it's about 30 cubic inches , you need 8oz of fluid salt solution to plate one layer 1 micron thick .
That cost is about $40USD or £25 UKP , to get to a finish you can 'blue' you need at least 2 layers of the base (copper) one layer intermediate ( bronze) and the final finish layer ( nickel ) plus surface preparation and protection at the end, do that for all parts to be plated and it works out to appx $200 USD or about £150 just for the chemicals alone As I said in earlier post, the finish is dependant on the polish , polish it to death , and then polish it again - properly , then you can start to treat the metal to plate.
I am going to offer this service to UK forum member's first and will then include all our world-wide members , I will post details of the service in the Prop Shop forum shortly .
Last edited by propsjonnyb on Tue May 18, 2010 6:55 am; edited 2 times in total |
|
| Back to top |
|
|
|
|
|
|
|
|
|
|
|
| Author |
Message |
joberg
Community Member
.jpg)
Joined: 06 Oct 2008
Posts: 9447
|
| Posted: Tue May 18, 2010 6:21 am Post subject: |
|
|
Love the bronzing effect! Great idea Propsjohnnyb...keep up the good work  |
|
| Back to top |
|
|
|
|
|
|
|
|
|
|
|
| Author |
Message |
propsjonnyb
Community Member
Joined: 16 Jul 2009
Posts: 476
Location: Helmdon, Northamptonshire UK
|
| Posted: Tue May 18, 2010 7:43 am Post subject: |
|
|
| Rich , sorry I didn't pick up on you point about casting the grips you made to Mars , until I re-read the postings , you're using a clear cast in a pressure (vacumum) chamber ? and from what you say it's a very fast acting mix as you said you have only a moment or so to get it inside Have you tried a slower clear cast ?, for example the type of product used for encapsulation eg flowers - bugs etc ? I have used this product for clear casts and coloured casts for years , it's slow air cure cold cast , I normally leave it in a reasonably warm place for a day or so and as it's crystal glass clear - it will take the addition of pigments very well especially amber ! I've also seen kit's here in the UK called Crystal Kraft with Amber pigment for doing the 'old fly' or Mosquito in amber ala Jurassic Park , also another point is the amount of pigment to add allways add a small abount to one of the two part mixes as you can add more if needed , if your casts come out a little light coloured , I tend to paint the insides with Tamiya clear Smoke which darkens pieces quite effectively, I used them in canopy covers , helmet lenses , etc etc , so Mars , you might like to try cold cast for the grips . |
|
| Back to top |
|
|
|
|
|
|
|
|
|
|
|
| Author |
Message |
marsattack
Community Member
Joined: 08 Feb 2009
Posts: 63
Location: Melbourne , Australia
|
| Posted: Tue May 18, 2010 8:23 am Post subject: |
|
|
Hi guys,
Propjohnny , awesome work mate!!
Rich got all that, thank you . I have never used pressure casting and the only clear resin I have used in fact cures in about 8 hours, it is the opposite to the pressure ones,
I have made these before , they were a 2 part mold , so the back are super smooth rather than the pour side if you know what i mean.
I am not sure who i sent them to but did offer these for free with the badge.
The y were a cast of my sidkit and the diamonds came out fine.
I will make the molds and will send you them to experiment , use or whatever ,
If you rather the parts then John can do them for you as I have asked him to cast them already.
Will also prepare the high temp silicon mold of the grip , i will pm you later.
To jameth:
my remark of " i don't care " meant this:
I dont care if I pay $1 or $1000 as long as i know exactly what i am getting and for me a dollar is too much so it is very important that i dont buy rubbish!!
I was also going to mention to you , that your review on the blaster is good for you and the other 3 guys that bought those finished ones and not for the kit ones like this thread is about!!
I suggest you either read properly my posts and state facts or opinions regarding the topic at hand.
I would also suggest not commenting on things you do not own like a sidkit or a COyle kit as part of a review.
You then ramble on about me not caring , when i am the one that started this thread and have offered more advice on troubleshooting than others.
You state this:
Example-I was expecting more for my $800. But in discussing with many of you and researching all other props I have now learned it was a good deal and worth it. Someone else may feel the same but after reading all this decide it was worth it as well. Somone else may feel they got a steal at the price. One person thinks the prop kit is garbage other think it is a gift and blessing
You are describing a totally different blaster and maybe you should start a different thread about it. Not sure where you are going with that also???
Who has said anything about the finished Coyle blaster you bought??
Anyways back to my thread of pics and grips :
[img]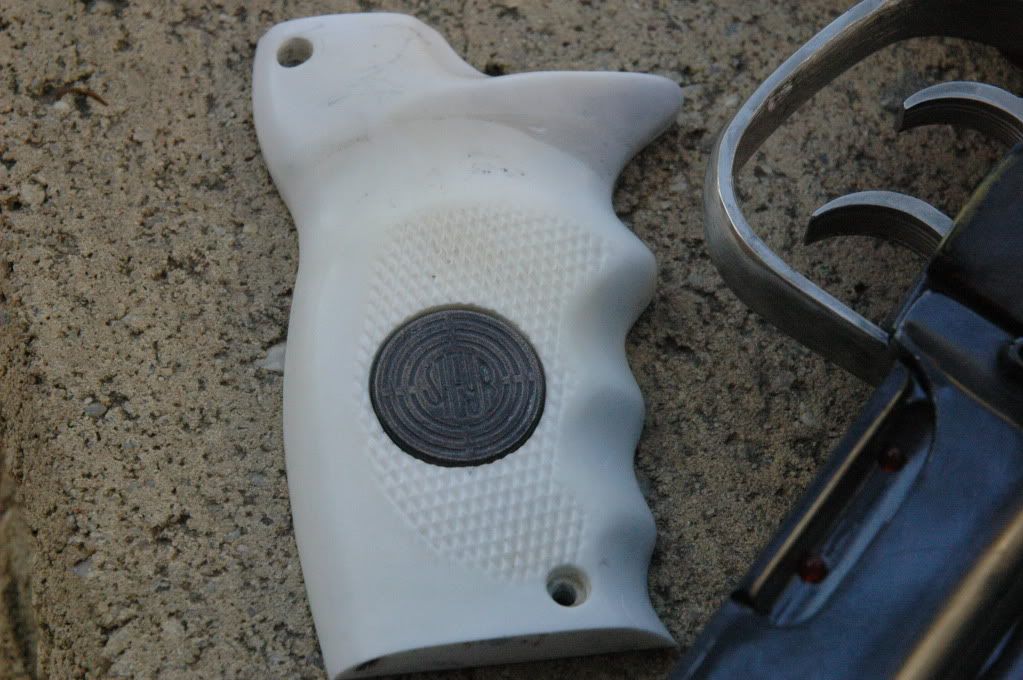
[/img]
Last edited by marsattack on Tue May 18, 2010 10:24 am; edited 1 time in total |
|
| Back to top |
|
|
|
|
|
|
|
|
|
|
|
| Author |
Message |
racprops
Community Member
Joined: 30 Oct 2006
Posts: 2450
Location: Phoenix AZ
|
| Posted: Tue May 18, 2010 9:25 am Post subject: |
|
|
Will look into the amber fly plastic...
I was going to say 8 hours is too long, but to get better parts...
Rich
_________________
I never have enough time to do all I want to do!
Last edited by racprops on Tue May 18, 2010 10:52 am; edited 1 time in total |
|
| Back to top |
|
|
|
|
|
|
|
|
|
|
|
| Author |
Message |
propsjonnyb
Community Member
Joined: 16 Jul 2009
Posts: 476
Location: Helmdon, Northamptonshire UK
|
| Posted: Tue May 18, 2010 10:42 am Post subject: |
|
|
Mars , those are very nice grips I have to say , I particularly like the Styer marksman logo inset , I have a couple of tips regarding producing different types of handles eg wooden effect , on the mold surface use artist's pastels sticks and lay down shades of assorted browns etc like woodgrain ,then pour your resin - the pastels will bond to the resin, a little sanding and a polish and you have wooden grips, marble grips are easy, use clear cast and a very little normal resin base make up the two part clearcast , but prior to mixing split the part A into however many colours you want eg black , white grey and using clear colour pigments thorougly mix the colour into each of the part A's now measure your part B pour the colour mix by volume to match your part A into part B then take a stick or dowel rod and stir a figure eight slowly into the mix slowly mixing the colours together , now pour into the mold - , different effects can be achieved for example by pouring two different colours into the top and bottom of the mold at the sametime and using a cocktail stick swirling them together where they join .
Metal looking grips can be achieved by adding fine metal powders into the resin part A prior to mixing and also dusting the surface of the mold with the powder will bond the particles into the resin as did the pastel colour in the first example, also graphite powder can be used as a mold separating agent, it's used in the precious metals industry as a demoulding agent when casting silver and gold jewelry, for us it adds as it comes out of the mold, a nice gun metal lustre when polished .
That should keep you busy for a week or so ! |
|
| Back to top |
|
|
|
|
|
|
|
|
|
|
|
| Author |
Message |
marsattack
Community Member
Joined: 08 Feb 2009
Posts: 63
Location: Melbourne , Australia
|
| Posted: Tue May 18, 2010 10:50 am Post subject: |
|
|
lol,
the artwork was done by Staar here (MARK) i then cold casted them with bronze . I really cant take credit for the grips as they are a recast
of the sidkits ones i have, it was meerly to show that somehow the silicon mold i used , did produce the grips exactly over and over.
I did offer these for free a little while ago.
The badges were also compliments of Mark and me.
I have prepared Rich's grips to see what happens, give me a day or so!
Mars |
|
| Back to top |
|
|
|
|
|
|
|
|
|
|
|
|
You cannot post new topics in this forum
You cannot reply to topics in this forum
You cannot edit your posts in this forum
You cannot delete your posts in this forum
You cannot vote in polls in this forum
|
|
|
|
|
|
|
|


