|
 |
|
 |
|
| Author |
Message |
The Loyalizer
Community Member

Joined: 08 Oct 2007
Posts: 742
Location: Down in 4th Sector, Chinatown
|
|
| Back to top |
|
|
|
|
 |
|
 |
|
|
|
|
| Author |
Message |
RedArc
Community Member

Joined: 23 Sep 2010
Posts: 73
Location: Austria , Europe
|
 Posted: Fri Dec 10, 2010 2:28 am Post subject: Posted: Fri Dec 10, 2010 2:28 am Post subject: |
 |
|
I was thinking about yesterday how the magazine of your rifle could work right and you gave me an answer today !
Thanks  |
|
| Back to top |
|
|
|
|
|
|
|
|
|
|
|
| Author |
Message |
The Loyalizer
Community Member
Joined: 08 Oct 2007
Posts: 742
Location: Down in 4th Sector, Chinatown
|
| Posted: Fri Dec 10, 2010 7:26 pm Post subject: |
|
|
No new progress worthy of pics today. I added another section of rail to the top to bring it in line with the reference images. I botched the vinyl for the logo by sending it to the printer as RGB instead of CMYK so I had to re-order new stickers, this time with the correct CMYK color code for the Krylon paint I used. Hopefully it'll match the paint well enough to not warrant a third round of design. I've left the current manufacturer markings on there until the new batch arrives.
Here's the revised logo:

Once this project's wrapped up, I'm definitely taking a break, then maybe I'll see about working up something District 9 inspired of my own design.
_________________

"We began to recognize in them a strange obsession..."
http://fcomin.cgsociety.org/gallery/ |
|
| Back to top |
|
|
|
|
|
|
|
|
|
|
|
| Author |
Message |
steevy
Community Member
Joined: 25 Jul 2007
Posts: 389
|
| Posted: Fri Dec 10, 2010 8:20 pm Post subject: |
|
|
| Big difference in the Avatar weapon is that it feeds from the bottom. |
|
| Back to top |
|
|
|
|
|
|
|
|
|
|
|
| Author |
Message |
joberg
Community Member
.jpg)
Joined: 06 Oct 2008
Posts: 9447
|
| Posted: Sat Dec 11, 2010 10:17 am Post subject: |
|
|
I don't see the pic  |
|
| Back to top |
|
|
|
|
|
|
|
|
|
|
|
| Author |
Message |
Bwood
Community Member
Joined: 20 Sep 2009
Posts: 843
|
|
| Back to top |
|
|
|
|
|
|
|
|
|
|
|
| Author |
Message |
The Loyalizer
Community Member
Joined: 08 Oct 2007
Posts: 742
Location: Down in 4th Sector, Chinatown
|
| Posted: Mon Dec 20, 2010 10:14 pm Post subject: |
|
|
Finally got this finished. I wound up having to cast the selector switches myself as the frame's just a bit too wide for the center post to reach the other side. So unfortunately the selectors are dummys. The only moving parts on this are the switches on the scope and the flip up sights on the top rail.
Despite tracking down the actual CMYK color code for the green used on the body, the decal still wound up being slightly off color. The contrast in these pics is atrocious, its much less contrasted in person. I may try hitting one of the spare decals with a flat coat to see if that takes the shine down. The other option is to try scanning the paint on the body, and using that as a base for a new decal. That would also allow me to digitally 'grime' the markings a bit so they're not so factory fresh.
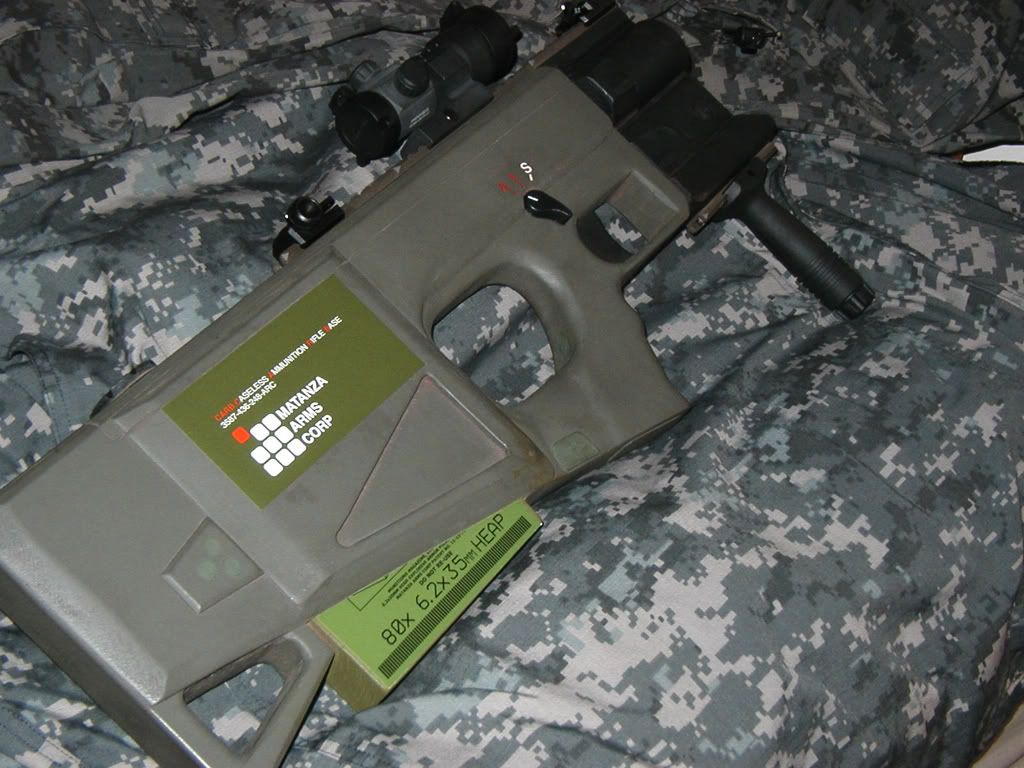

And to give it a bit of scale:

Its pretty sizeable. I think if I were to do another one of these, I may scale the templates down about 3-5%, and I'd go with a darker grey black for the body. Overall with all the attachments, its pretty hefty, but not unreasonably so.
_________________
"We began to recognize in them a strange obsession..."
http://fcomin.cgsociety.org/gallery/ |
|
| Back to top |
|
|
|
|
|
|
|
|
|
|
|
| Author |
Message |
joberg
Community Member
Joined: 06 Oct 2008
Posts: 9447
|
| Posted: Tue Dec 21, 2010 6:37 am Post subject: |
|
|
Looking pretty sharp...just for the decal as you said (nothing wrong with "Fresh-from-the-factory"look  ). All in all a very good result! ). All in all a very good result!
Thanks for the link btw. |
|
| Back to top |
|
|
|
|
|
|
|
|
|
|
|
| Author |
Message |
SKIN JOB 66
Community Member

Joined: 16 Jan 2008
Posts: 2724
Location: FRANCE
|
| Posted: Tue Dec 21, 2010 7:16 pm Post subject: |
|
|
Well done !!!

Fred
_________________
THE FUTURE IS A THING OF THE PAST |
|
| Back to top |
|
|
|
|
|
|
|
|
|
|
|
| Author |
Message |
steevy
Community Member
Joined: 25 Jul 2007
Posts: 389
|
| Posted: Tue Dec 21, 2010 8:26 pm Post subject: |
|
|
Beautiful!  |
|
| Back to top |
|
|
|
|
|
|
|
|
|
|
|
| Author |
Message |
The Loyalizer
Community Member
Joined: 08 Oct 2007
Posts: 742
Location: Down in 4th Sector, Chinatown
|
| Posted: Wed Dec 22, 2010 5:19 am Post subject: |
|
|
Thanks guys! Now if I didn't suck at casting anything larger than those selector switches, I'd look into getting this done up in resin.
_________________
"We began to recognize in them a strange obsession..."
http://fcomin.cgsociety.org/gallery/ |
|
| Back to top |
|
|
|
|
|
|
|
|
|
|
|
| Author |
Message |
skual
Community Member

Joined: 03 Nov 2010
Posts: 24
|
| Posted: Wed Dec 22, 2010 6:54 am Post subject: |
|
|
Awesome work.
 |
|
| Back to top |
|
|
|
|
|
|
|
|
|
|
|
| Author |
Message |
blastmaster
Community Member

Joined: 06 Apr 2011
Posts: 37
Location: VALENCIA CA.
|
| Posted: Sat Apr 16, 2011 2:26 am Post subject: |
|
|
Looks really nice, excellent job!
AL |
|
| Back to top |
|
|
|
|
|
|
|
|
|
|
|
| Author |
Message |
The Loyalizer
Community Member
Joined: 08 Oct 2007
Posts: 742
Location: Down in 4th Sector, Chinatown
|
| Posted: Sat Jul 02, 2011 3:00 am Post subject: |
|
|
I'm currently working on another build of this rifle, a variant. I decided to go with a lighter material this time, and used 2 inch insulation foam. I've got the basic frame cut out and sanded to shape. I'd like to fiberglass this sucker for durability.
Anyone have any tips or suggestions on how I might seal the foam so the resin doesn't dissolve it?
WIP pics as it develops.
_________________
"We began to recognize in them a strange obsession..."
http://fcomin.cgsociety.org/gallery/ |
|
| Back to top |
|
|
|
|
|
|
|
|
|
|
|
| Author |
Message |
joberg
Community Member
Joined: 06 Oct 2008
Posts: 9447
|
| Posted: Sat Jul 02, 2011 9:04 am Post subject: |
|
|
| The resin will disolve the insulation foam I usually use blue insulation foam (R10 insulation value) and glue stuff to it with contact cement...I wanted to use resin with it (well, Bondo+Resin=Rondo) now I'm not so sure; I'll have to test it out to make sure. |
|
| Back to top |
|
|
|
|
|
|
|
|
|
|
|
| Author |
Message |
The Loyalizer
Community Member
Joined: 08 Oct 2007
Posts: 742
Location: Down in 4th Sector, Chinatown
|
| Posted: Sat Jul 02, 2011 10:52 pm Post subject: |
|
|
Yeah I discovered the magic of the alien blood effect when I was a kid and tried to spray paint some styrofoam lol.
I coated the whole thing with a few coats of acrylic gesso to seal off the foam, then when it dried, I gave it a few coats of primer. The gesso did the trick. It only developed a few pits here and there where the gesso was thin. Probably should've tinted the gesso so I could see any missed spots. Shouldn't be a problem to patch up those spots with some acrylic modelling paste though.
After a light sanding I'll be ready to lay in the fiberglass.
_________________
"We began to recognize in them a strange obsession..."
http://fcomin.cgsociety.org/gallery/ |
|
| Back to top |
|
|
|
|
|
|
|
|
|
|
|
| Author |
Message |
joberg
Community Member
Joined: 06 Oct 2008
Posts: 9447
|
| Posted: Sun Jul 03, 2011 5:46 am Post subject: |
|
|
| Coming along well, I think it's going to be another great project! |
|
| Back to top |
|
|
|
|
|
|
|
|
|
|
|
| Author |
Message |
The Loyalizer
Community Member
Joined: 08 Oct 2007
Posts: 742
Location: Down in 4th Sector, Chinatown
|
| Posted: Tue Jul 05, 2011 9:52 pm Post subject: |
|
|
Update: While the gesso did seal off the surface of the foam, the heat from the resin curing softened the foam under the cloth and it wound up sinking into the surface. Decided to scrap the current build and start fresh.
Grabbed one of those planks of that really hard, dense craft foam (haven't been able to find one place in town that carries either the blue or pink foam). Seeing that the craft foam's got a denser core but an open surface, I gave a scrap piece a coat of spackle to seal it off and fill in the surface so it'd be smooth. After it dried, I laid in some resin and a small swatch of fiberglass cloth and it worked like a charm. The resin didn't eat through the spackle and the smooth surface had the cloth laying down nice and smooth.
It'll probably need two layers of cloth and a top layer of resin to really strengthen it, but should come out nice and sturdy. I'll be shaping the new frame tomorrow.
_________________
"We began to recognize in them a strange obsession..."
http://fcomin.cgsociety.org/gallery/ |
|
| Back to top |
|
|
|
|
|
|
|
|
|
|
|
| Author |
Message |
The Loyalizer
Community Member
Joined: 08 Oct 2007
Posts: 742
Location: Down in 4th Sector, Chinatown
|
| Posted: Tue Jul 12, 2011 11:36 pm Post subject: |
|
|
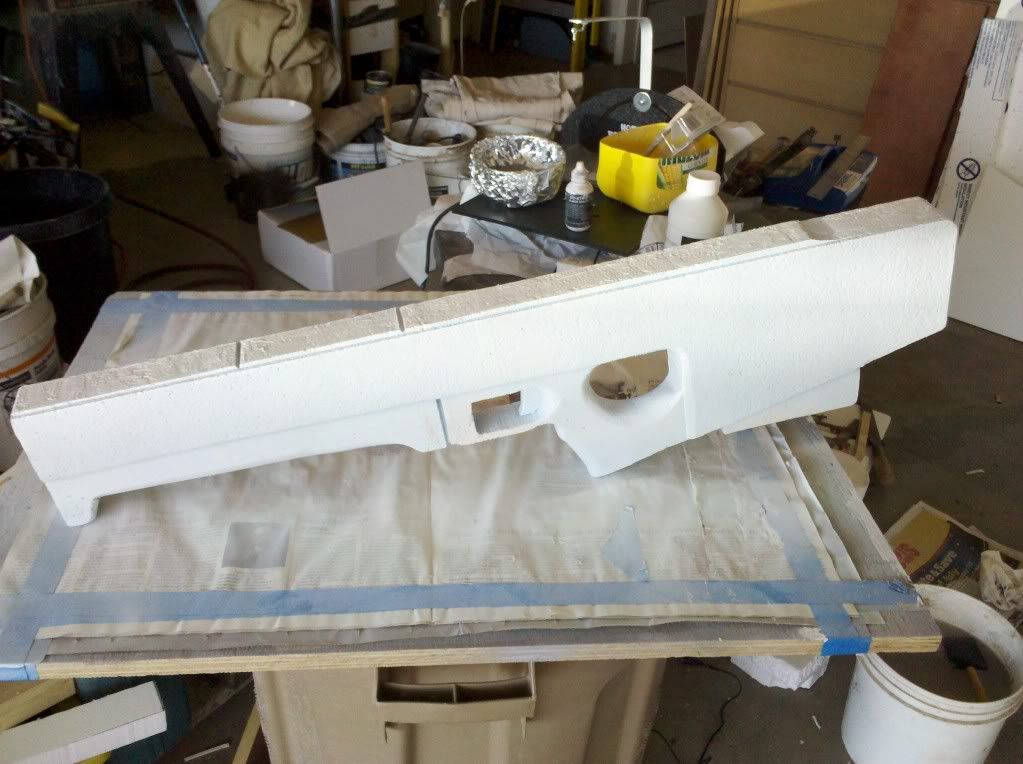
Got the new frame cut and shaped. After the base form was in the correct contours and shapes, I sealed it off using a thinset mortar mix. It sealed up the foam nicely and dried to a hard finish. After sanding it down to smooth it out and take off any high spots, I gave it a layer fiberglass. Then another two layers of just the resin without the cloth, came out nice and solid.
Sealed with thinset:
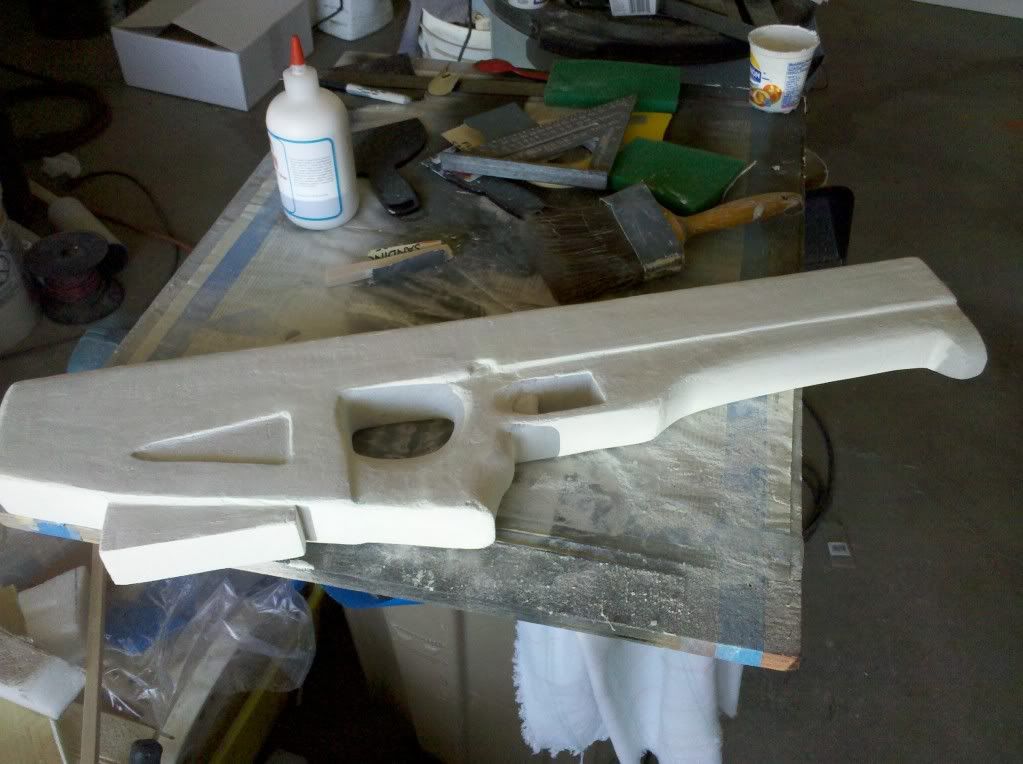
Here it is with the fiberglass. I wasn't too pleased with how the magazine well impressions came out, so I decided to cover them over with sheet styrene with another sheet above it cut out to create the mag well impression. The box magazine didn't maintain enough of its sharp corners, so rather than trying to build them up with bondo, I'll be covering it with styrene sheet instead.
Test fit of the detail pieces, some additional pieces aren't shown here:
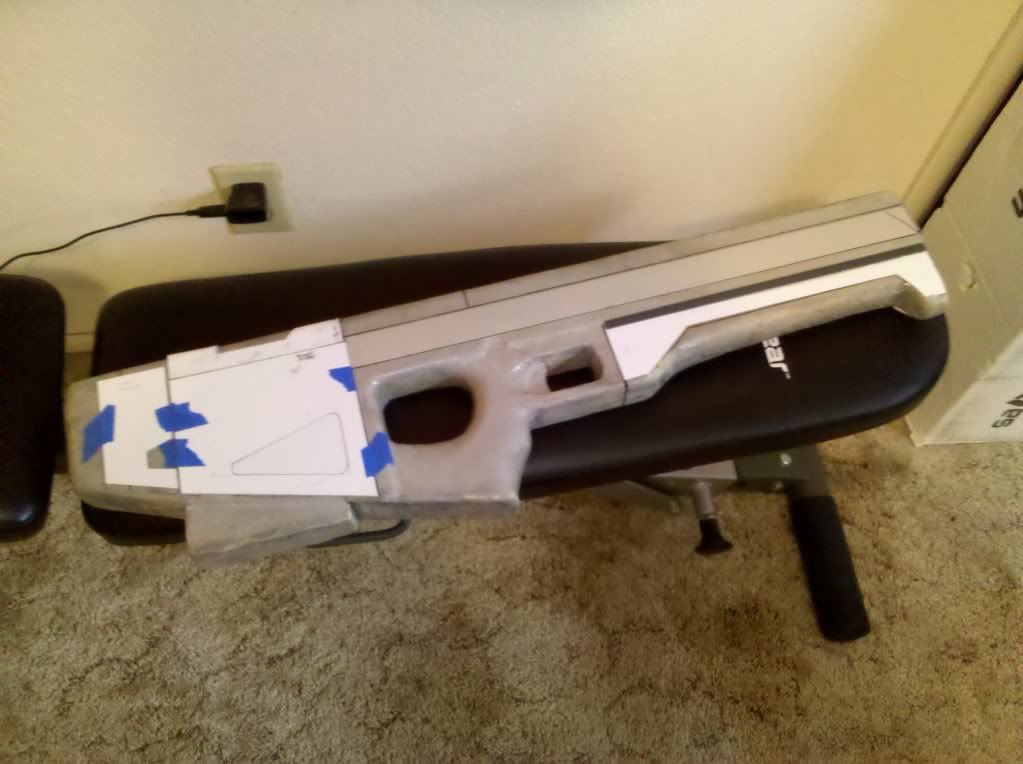
I'm pretty pleased with how the fiberglass turned out. It definitely strengthened the foam and hasn't added a great deal of weight to it. But it was by no means any quicker than tooling it up in wood. I'd say the amount of work time was about equal. Once I get the last of the detail parts attached, it'll be time to prime it. Then I'll have to figure out what kind of color scheme to go with.
_________________
"We began to recognize in them a strange obsession..."
http://fcomin.cgsociety.org/gallery/ |
|
| Back to top |
|
|
|
|
|
|
|
|
|
|
|
| Author |
Message |
joberg
Community Member
Joined: 06 Oct 2008
Posts: 9447
|
| Posted: Wed Jul 13, 2011 7:50 am Post subject: |
|
|
| Looking good...glad to see that sometimes, there's nothing better than MDF and styrene |
|
| Back to top |
|
|
|
|
|
|
|
|
|
|
|
|
You cannot post new topics in this forum
You cannot reply to topics in this forum
You cannot edit your posts in this forum
You cannot delete your posts in this forum
You cannot vote in polls in this forum
|
|
|
|
|
|
|
|