 |
 |
|
 |
|
| Author |
Message |
Pro Mod
Community Member
Joined: 13 Aug 2010
Posts: 108
Location: Manchester, England
|
 Posted: Thu Oct 03, 2013 10:52 am Post subject: Posted: Thu Oct 03, 2013 10:52 am Post subject: |
 |
|
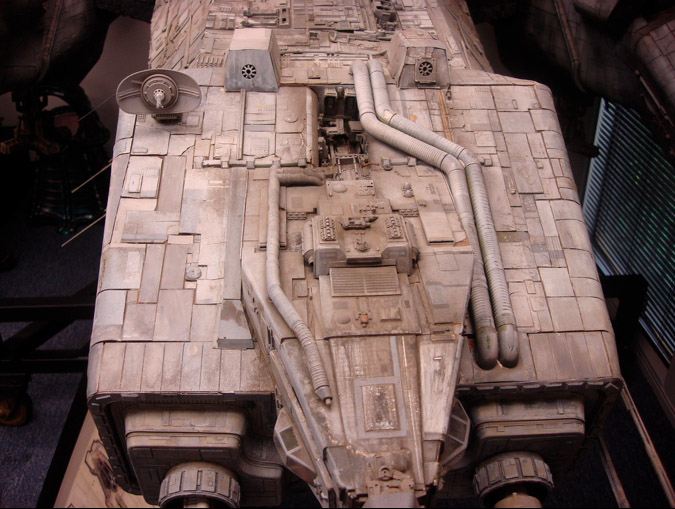
I'm not sure they moulded any of the pipework for the Nostromo.
I pretty sure that it was all EMA tubing that had the grooves created by turning on a lathe.
For those of you who have never done this, it's not the easiest material to use.
EMA tube isn't perfectly round and the wall thickness can vary, and if you’re turning a long length then it tends to bow slightly as well.
All this can result in different depths of cut and grooves which can look a little eccentric.
Fred, I think this is what you may be seeing.
As there was quite a lot of it used I suspect they produced quite a few lengths in different diameters for stock, which we’re then used as required.
On the original Alien Makers video Simon Deering mentions that he was given the task of turning the probes for the Nostromo (one of which was then attached to the flamethrower), so it may well have been him that turned all the rest. |
|
| Back to top |
|
|
|
|
 |
|
 |
|
|
|
|
| Author |
Message |
SKIN JOB 66
Community Member

Joined: 16 Jan 2008
Posts: 2724
Location: FRANCE
|
|
| Back to top |
|
|
|
|
|
|
|
|
|
|
|
| Author |
Message |
joberg
Community Member
.jpg)
Joined: 06 Oct 2008
Posts: 9447
|
| Posted: Thu Oct 03, 2013 5:42 pm Post subject: |
|
|
TFS Proper and Fred...at least there's a constant in the design of those props and model  |
|
| Back to top |
|
|
|
|
|
|
|
|
|
|
|
| Author |
Message |
8th_Passenger
Community Member

Joined: 28 Nov 2009
Posts: 443
Location: Hertfordshire, UK
|
| Posted: Sat Oct 12, 2013 5:43 am Post subject: |
|
|
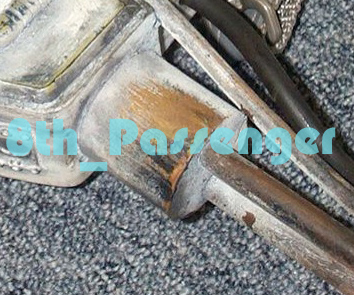
Thanks for the feed back about the pipe.
It had occurred to me that the pipes may have been from the Nostromo. I was about to look down that path when Fred beat me too it. The turned detail on the Nostromo pipes is very similar.
As Pro Mod pointed out Turing EMA tubing can be unsatisfactory. This is why I mentioned I would turn the detail in another material.
I have to admit that the reason I was using EMA bends and tube was that it was easier than fabricating them! I'd always thought that that pipe was from something and made of metal.
I think these are some of the clearest photos of it. The details seems more defined compared to some of the others. These pipes do change in look from unit to unit as we've seen. Maybe quick copies, less detail.
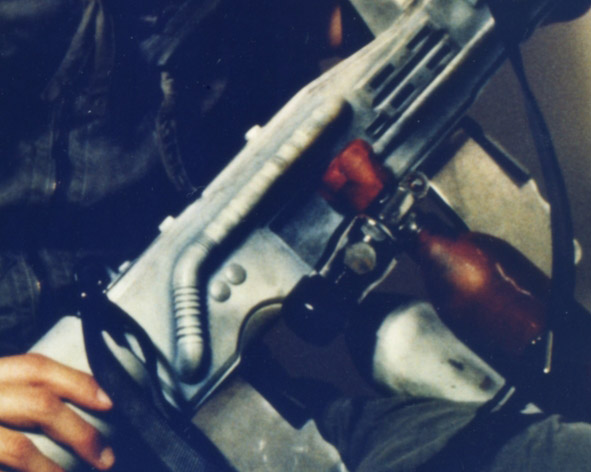

In the two above shots it does look like it's sitting on the surface! But I think the compromise of it slightly recessed will help when it's glued in place. And also keep the overall width down. I thought it would be easier to make the pipe whole and recess it rather than sand the back away. Either way you'd hope to get the same result in the end.
I do think that the pipes could be from the Nostromo. That makes sense.
Colin |
|
| Back to top |
|
|
|
|
|
|
|
|
|
|
|
| Author |
Message |
joberg
Community Member
Joined: 06 Oct 2008
Posts: 9447
|
| Posted: Sat Oct 12, 2013 8:42 pm Post subject: |
|
|
You're right Colin, better recessed than trying to shave the pipe 
They probably produced a lot of those for the movie, so why not dress the flame-thrower with a few of those pipe? |
|
| Back to top |
|
|
|
|
|
|
|
|
|
|
|
| Author |
Message |
SKIN JOB 66
Community Member
Joined: 16 Jan 2008
Posts: 2724
Location: FRANCE
|
| Posted: Thu Oct 17, 2013 2:21 am Post subject: |
|
|
Go Colin, GO !!!
(it looks like they also used the very same pipes on the OUTLAND Refinery model...)
Fred
_________________
THE FUTURE IS A THING OF THE PAST |
|
| Back to top |
|
|
|
|
|
|
|
|
|
|
|
| Author |
Message |
andy
Community Guide

Joined: 01 Nov 2006
Posts: 6237
Location: Rochester, NY
|
| Posted: Thu Oct 17, 2013 1:43 pm Post subject: |
|
|
Some of the ribbing on those pipes seems to me to be painted weathering. all except the short segment.
Andy |
|
| Back to top |
|
|
|
|
|
|
|
|
|
|
|
| Author |
Message |
joberg
Community Member
Joined: 06 Oct 2008
Posts: 9447
|
| Posted: Thu Oct 17, 2013 4:17 pm Post subject: |
|
|
| You're right Andy, airbrushing job for sure |
|
| Back to top |
|
|
|
|
|
|
|
|
|
|
|
| Author |
Message |
8th_Passenger
Community Member
Joined: 28 Nov 2009
Posts: 443
Location: Hertfordshire, UK
|
| Posted: Sun Mar 02, 2014 8:20 am Post subject: |
|
|
The latter posts in this thread seem to have disappeared during the upgrade. Maybe they will turn up. But incase they don't here is a quick recap (over a few posts) of what's gone missing. This will hopefully keep the continuity.
UPDATE 01
I bought some steel bar for the emitter.

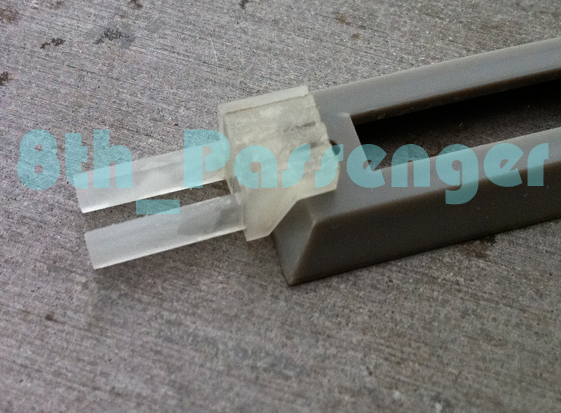
And some brass bar for the cylinder attached to the body - pictured here.
I had some guides laser cut in acrylic to help line up the drill. I super glued them onto the ends of the brass.

Next I drilled the thru holes on the pillar drill.

I've left it slightly over length so I can face it off to the final length later.

I made some tapped brass inserts which I will silver solder into the ends of the steel tubes.

So in the end it will look like this.
Colin |
|
| Back to top |
|
|
|
|
|
|
|
|
|
|
|
| Author |
Message |
8th_Passenger
Community Member
Joined: 28 Nov 2009
Posts: 443
Location: Hertfordshire, UK
|
| Posted: Sun Mar 02, 2014 8:39 am Post subject: |
|
|
UPDATE 02
I made a card template of the grip and then cut the shape in 12mm MDF to see how it felt. After making a few alterations I re cut the template and cut the grip from 12mm Alumimium.

I then filed a radius on the edges.

It felt pretty good.
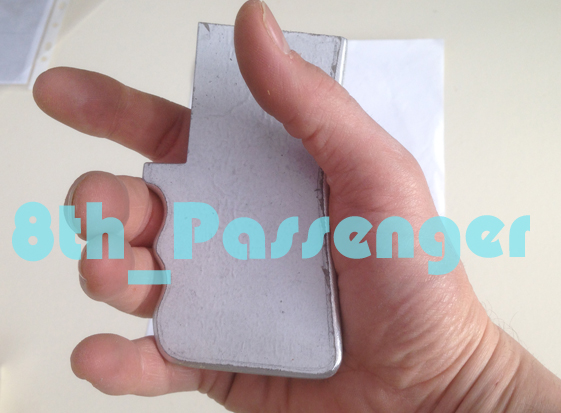
Next I drilled and tapped the grips and put the thru holes in the steelwork and fitted it together.

The grip frame assembly fits into the body like this. Held in place by the bolts in the top.
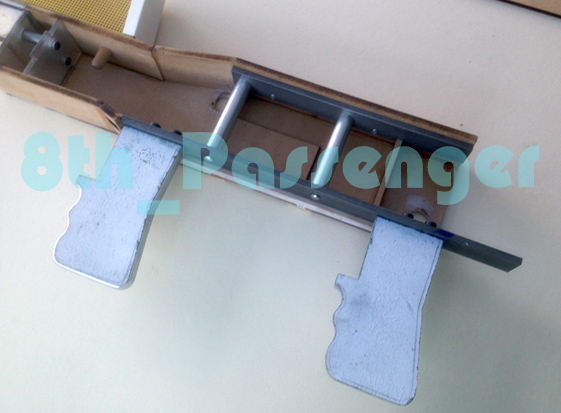
Colin |
|
| Back to top |
|
|
|
|
|
|
|
|
|
|
|
| Author |
Message |
8th_Passenger
Community Member
Joined: 28 Nov 2009
Posts: 443
Location: Hertfordshire, UK
|
| Posted: Sun Mar 02, 2014 12:43 pm Post subject: |
|
|
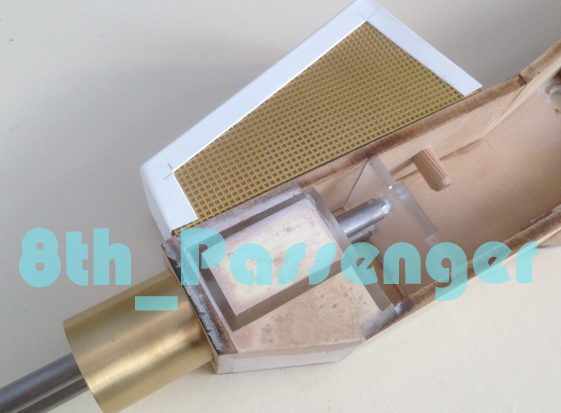
UPDATE 03
This update will bring you up to date with my flamethrower build. I have only made a small bit of progress while Propsummit has been down. Though I have been planning the next stage of the build. So hopefully in the coming weeks there will be better progress.
Due to all the metal I needed to 'beef Up' the interal structure of the body. So I cut some urethane modelboard into centimeter long sections and fitted them into place.

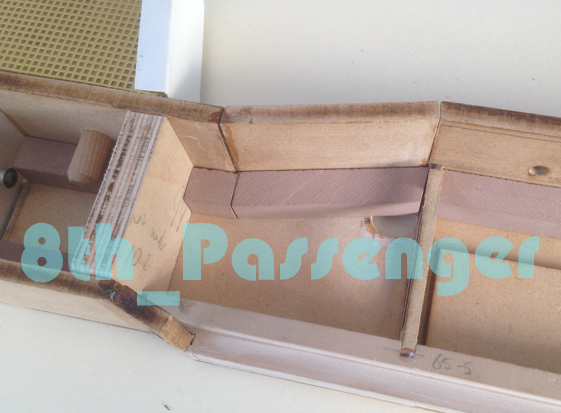

At the same time I fitted the left side bulkheads in position along with the bottom rail that keeps the steelwork in place!

It was now time to cut out the opening in the rear right side of the body to allow the gas valve to protrude through. I marked up the body and the side panel separately and used a razor saw to remove the material.


So together they look like this.
After sanding sealing the angled edges on the left and right panels I glued them in position.
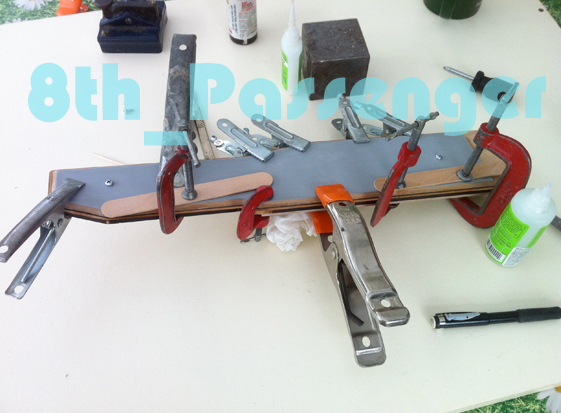

So the bottle and valve fit well. The acrylic tube is a stand-in at the moment until I get some 3" steel tube for the rear. Though if the 3" steel is too small I may have to resort to the acrylic tube.
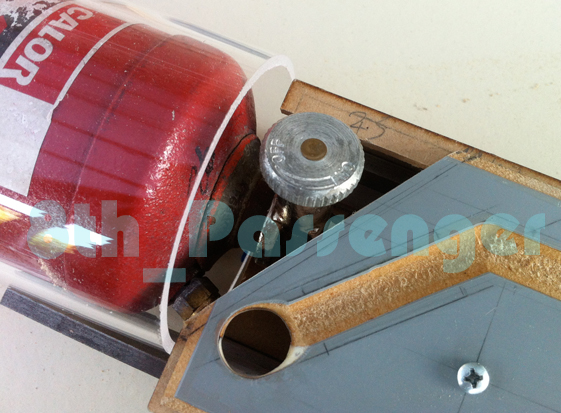
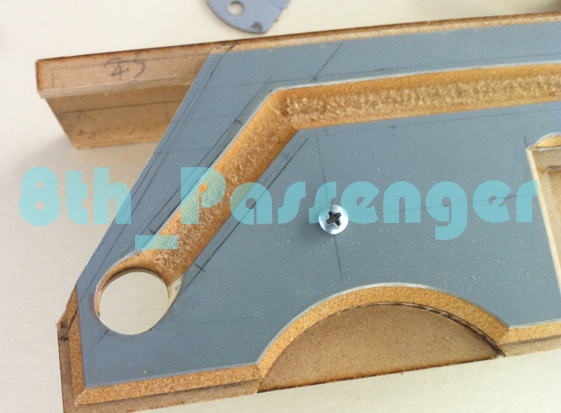
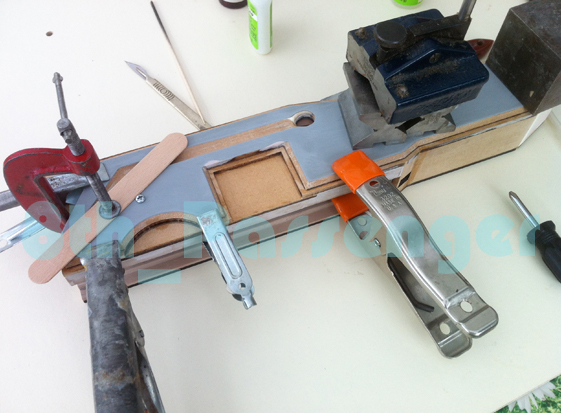
I'd bought two sizes of pad eye for the top of the vent. The smaller one looked best.

Using some ABS I added the extra srtip detail to the top of the vent, along with a diamond shaped plate to sit under the pad eye.
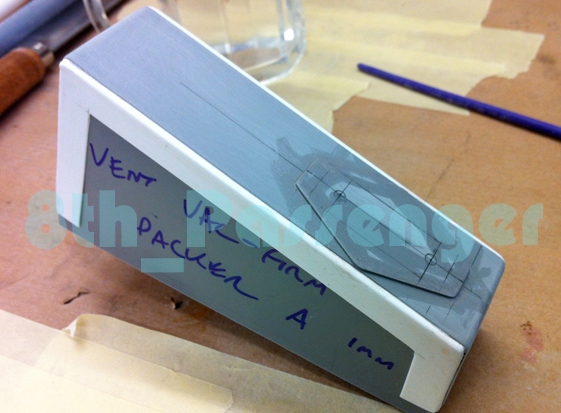
Like so.
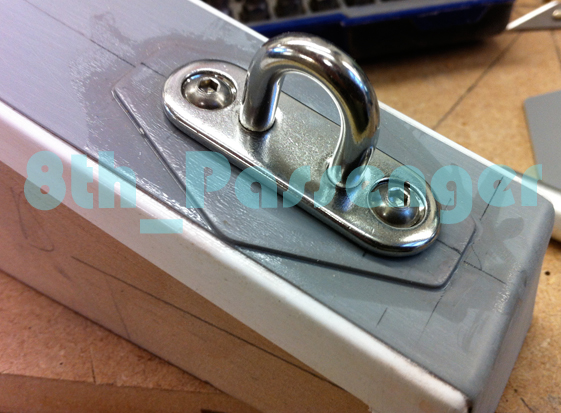
Here it is primed with the etched brass in position

So that's where I'm at. Hopefully more progress soon.
Colin |
|
| Back to top |
|
|
|
|
|
|
|
|
|
|
|
| Author |
Message |
joberg
Community Member
Joined: 06 Oct 2008
Posts: 9447
|
| Posted: Sun Mar 02, 2014 1:32 pm Post subject: |
|
|
Glad to see you're back on with the A.F.T. yeah, I see why you're adding more support to the structure (using foam to reduce weight at the same time...that baby is going to weigh a lot when finished).
It's looking good so far and eager to see the rest |
|
| Back to top |
|
|
|
|
|
|
|
|
|
|
|
| Author |
Message |
8th_Passenger
Community Member
Joined: 28 Nov 2009
Posts: 443
Location: Hertfordshire, UK
|
| Posted: Sun Apr 27, 2014 4:31 pm Post subject: |
|
|
I've finally found a bit of time to do more work on the flamethrower.
I've been concentrating on some of the left and right side details.
This is the image I'm using as the 'hero' reference for my left side.

I drew up some cutting paths of various shapes and had them laser cut in 2mm MDF and Acrylic. I had some of the details engraved in.
Laid out here in more of an order.

Here's some later shots (not so washed out). I've started to work on individual parts. Gluing up some of the laser cut parts and fabricating others.

Some close-ups.
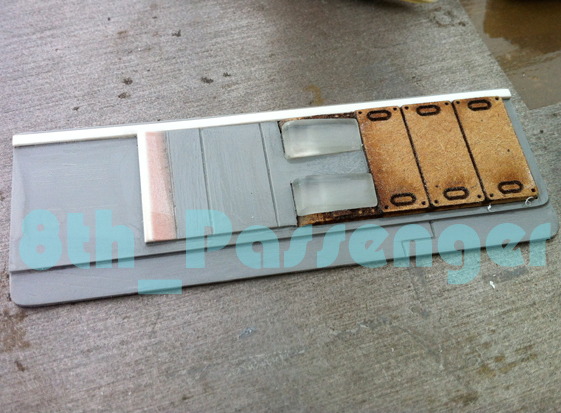


These all all works in progress. I have lots more details to add. But they lay out on the side like this so far.

And on the right.

More soon...
Colin |
|
| Back to top |
|
|
|
|
|
|
|
|
|
|
|
| Author |
Message |
joberg
Community Member
Joined: 06 Oct 2008
Posts: 9447
|
| Posted: Sun Apr 27, 2014 7:49 pm Post subject: |
|
|
What an update mate  Super pumped seeing these greeblies taking shape. Love it Super pumped seeing these greeblies taking shape. Love it |
|
| Back to top |
|
|
|
|
|
|
|
|
|
|
|
| Author |
Message |
8th_Passenger
Community Member
Joined: 28 Nov 2009
Posts: 443
Location: Hertfordshire, UK
|
| Posted: Mon Apr 28, 2014 4:27 pm Post subject: |
|
|
| Thanks Joberg. |
|
| Back to top |
|
|
|
|
|
|
|
|
|
|
|
| Author |
Message |
joberg
Community Member
Joined: 06 Oct 2008
Posts: 9447
|
| Posted: Mon Apr 28, 2014 5:40 pm Post subject: |
|
|
You're welcome  |
|
| Back to top |
|
|
|
|
|
|
|
|
|
|
|
| Author |
Message |
SKIN JOB 66
Community Member
Joined: 16 Jan 2008
Posts: 2724
Location: FRANCE
|
| Posted: Sat May 31, 2014 3:53 pm Post subject: |
|
|
Hey Colin... Any update soon on this A W E S O M E project ?
Cheers,
Fred
_________________
THE FUTURE IS A THING OF THE PAST |
|
| Back to top |
|
|
|
|
|
|
|
|
|
|
|
| Author |
Message |
8th_Passenger
Community Member
Joined: 28 Nov 2009
Posts: 443
Location: Hertfordshire, UK
|
| Posted: Sun Jun 01, 2014 5:00 am Post subject: |
|
|
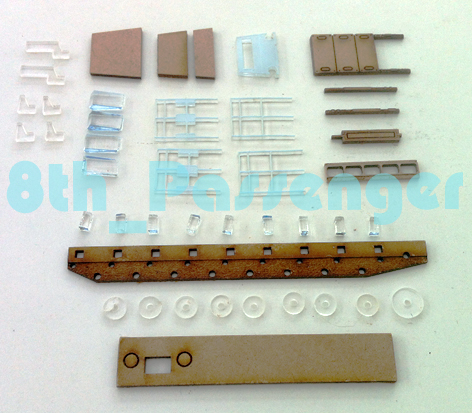
Hi Fred. Thanks for asking about the flamethrower.
There is not much to report. I'm still really busy at work and I have little time to do anything. Everyday I try and think of how I can move it on.
However, Pro Mod kindly sent me the kit parts he identified on the left side of the unit. So I now have a few more pieces of the puzzle.
My next move is to buy some silicone rubber and fast-cast resin and mould and cast all the various parts I have been making for the left side.
I too would like to see this project finished.
Colin |
|
| Back to top |
|
|
|
|
|
|
|
|
|
|
|
| Author |
Message |
joberg
Community Member
Joined: 06 Oct 2008
Posts: 9447
|
| Posted: Sun Jun 01, 2014 2:58 pm Post subject: |
|
|
Yeah...real life, who needs it  Glad to hear that that project is still alive and kicking. Believe me when I say that I'll be all over your next update on that one Glad to hear that that project is still alive and kicking. Believe me when I say that I'll be all over your next update on that one |
|
| Back to top |
|
|
|
|
|
|
|
|
|
|
|
| Author |
Message |
SKIN JOB 66
Community Member
Joined: 16 Jan 2008
Posts: 2724
Location: FRANCE
|
| Posted: Sun Jun 15, 2014 4:43 pm Post subject: |
|
|
Good to hear from you Colin !
If you need help in order to buy more kit parts just let me know...

This is one of the projects I love the most here, so take all the time you'll need to complete it, anyhow I'll never be tired to look at your older updates while waiting for the next one... as I'm sure the end result will be PERFECT !
Take care and let us know when you're back on it !
Fred
_________________
THE FUTURE IS A THING OF THE PAST |
|
| Back to top |
|
|
|
|
|
|
|
|
|
|
|
|
You cannot post new topics in this forum
You cannot reply to topics in this forum
You cannot edit your posts in this forum
You cannot delete your posts in this forum
You cannot vote in polls in this forum
|
|
|
|
|
|
|
|


.jpg)