 |
 |
|
 |
|
| Author |
Message |
SSB
Community Member
Joined: 15 Apr 2007
Posts: 175
Location: Florida, USA
|
 Posted: Mon Feb 08, 2016 1:12 am Post subject: Posted: Mon Feb 08, 2016 1:12 am Post subject: |
 |
|
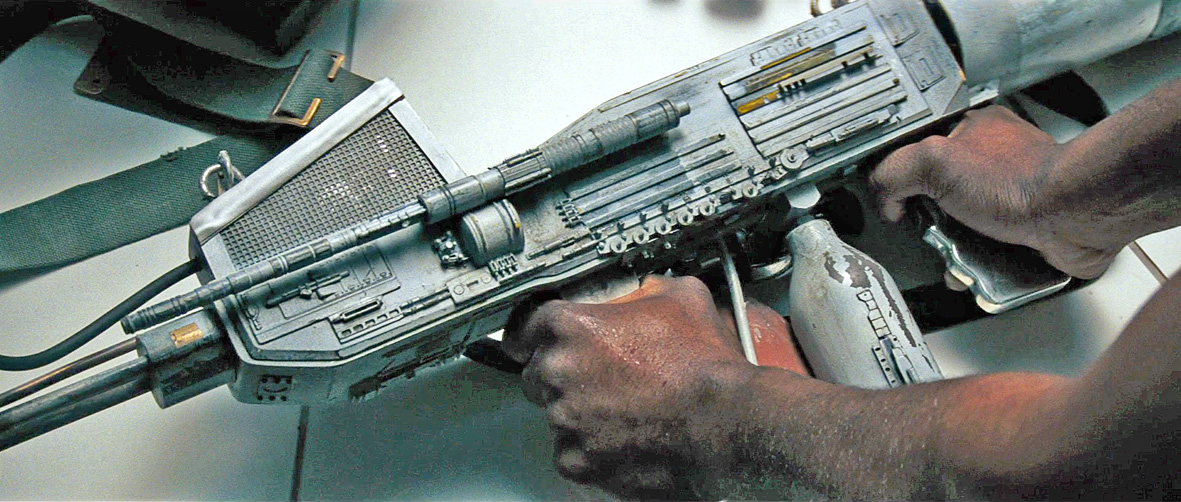
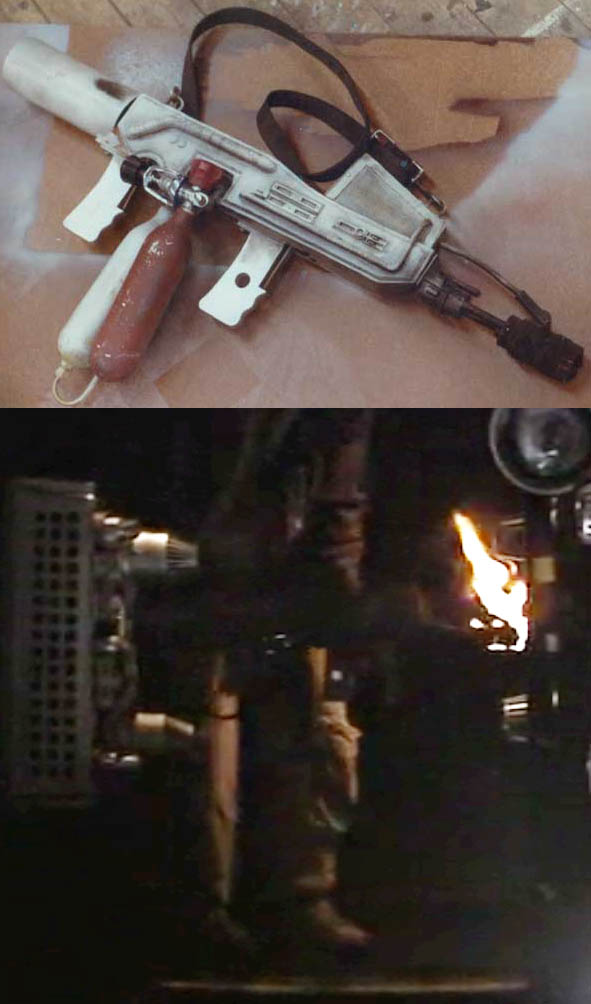
It occurs to me that the 'beauty shot' of Parker slamming the flamethrower down on the table MAY have been a second unit shot, perhaps done after principal photography had wrapped and without the principal actors. IF SO, it would explain the missing pieces and damage as having accumulated during shooting and never being repaired. Though that prop appears to have been finished (at least originally) to a high standard, we do not know if it functioned, either.
-MJ |
|
| Back to top |
|
|
|
|
 |
|
 |
|
|
|
|
| Author |
Message |
SKIN JOB 66
Community Member

Joined: 16 Jan 2008
Posts: 2724
Location: FRANCE
|
| Posted: Mon Feb 08, 2016 3:31 pm Post subject: |
|
|
| 8th_Passenger wrote: |
The paint reference for the left side will be this shot from the film. I especially like the paint work on the tanks.
Colin |
Colin, something hit me while looking at your latest post...
Could it be that the antenna affixed on the side of the flamer featured in the beauty shot previously appeared (without widgets) in the film as one of the medical tools used to track the facehugger in the infirmary...
It even looks like there's a switch button at its bottom, see what I mean ?
It's also very similar to the antennas seen on the Nostromo and refinery models...

Fred
PS : Love that flame and the latest progress on your build !

_________________
THE FUTURE IS A THING OF THE PAST |
|
| Back to top |
|
|
|
|
|
|
|
|
|
|
|
| Author |
Message |
8th_Passenger
Community Member

Joined: 28 Nov 2009
Posts: 443
Location: Hertfordshire, UK
|
| Posted: Mon Feb 08, 2016 5:50 pm Post subject: |
|
|
SSB, yes I think the shot on the table was dressed only for that shot. The antenna being the main addition with a few extra kit bits. To me parts were dropping off all the time and not always stuck back on!
Fred I see what you are saying but I think Ash's light wand is different. I will take a closer look just to rule it out. I feel I have read or heard that it was from the Nostromo. Martin Bower perhaps.
I got these spark-plug pieces today from somebody I work with.
I'm not sure if they are the right size. Spark-plugs come in more than one size! These have an M14 thread and ones with an M12 thread may look better and be slightly smaller. My knowledge of cars is limited. But I've got to start somewhere.

Against the emitter the plug looks a bit too big.

I'll try mocking something up as I don't want to drill the M14 hole and find out it need to be M12.
Colin
_________________
Ripley: What's it key on?
Ash: Micro changes in air density. |
|
| Back to top |
|
|
|
|
|
|
|
|
|
|
|
| Author |
Message |
joberg
Community Member
.jpg)
Joined: 06 Oct 2008
Posts: 9447
|
| Posted: Mon Feb 08, 2016 6:55 pm Post subject: |
|
|
Looking good and yes, don't drill anything before making sure it's the right size 
Fred: those medic light tools are easy to make, it's just that I've never, once, seen an original one for sale  |
|
| Back to top |
|
|
|
|
|
|
|
|
|
|
|
| Author |
Message |
8th_Passenger
Community Member
Joined: 28 Nov 2009
Posts: 443
Location: Hertfordshire, UK
|
| Posted: Fri Feb 19, 2016 5:21 pm Post subject: |
|
|
The only thing I have remaining on the flamethrower to plan out is the emitter (I think).
I have the basic shape already turned up which I'm happy with but now I have to add the details.
There are some holes around the emitter which I assume are to let air in.
They can be clearly seen in the two photos below.

And again in this photo SKIN JOB 66 kindly sent me. This photo is particularly interesting as you can see what I think is nozzle/burner for the pilot feed in the end of the emitter (hole nearest the camera!).

In this photo of one of the units you can see the main burner.

Possibly something like this.

So using this reference I plan on creating something along the lines of the cut away images below.
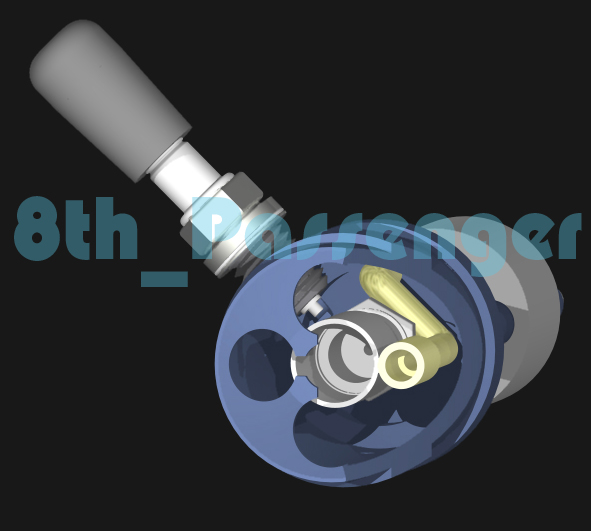

Then capped of with this end piece turned and milled out of steel.

More build progress soon.
Colin
_________________
Ripley: What's it key on?
Ash: Micro changes in air density. |
|
| Back to top |
|
|
|
|
|
|
|
|
|
|
|
| Author |
Message |
joberg
Community Member
Joined: 06 Oct 2008
Posts: 9447
|
| Posted: Sun Feb 21, 2016 10:23 am Post subject: |
|
|
It might just work Colin! I'm all excited to see that pilot light working  |
|
| Back to top |
|
|
|
|
|
|
|
|
|
|
|
| Author |
Message |
8th_Passenger
Community Member
Joined: 28 Nov 2009
Posts: 443
Location: Hertfordshire, UK
|
| Posted: Sat Feb 27, 2016 5:53 pm Post subject: |
|
|
Time for another update.
I'm chipping away at all the remaining build stuff.
First off I got hold of some more spark plugs. I got a slightly smaller one (middle) but it still had an M14 thread. But then my friend found one with an M12 thread (left).

I had to buy the specific tap.
Just to be sure I'd bought the right tap I tapped a bit of hex brass first.

Here it is screwed in position. I tapped the hole at 45 degrees. I'll need a spacer on the exterior to lock it at the correct depth.

In position here, using my my hex brass nut as a spacer!
The lead is a bit loose because its for the bigger spark plug. I may try find one that fits but I could always pack out the ceramic part with some electrical shrink wrap!!!

I finally glued on the parts which Pro Mod sent me.

This now means that I have no more details to add to the body.
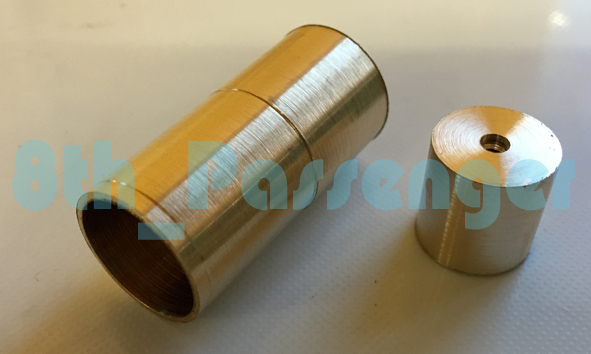
I turned up some brass for the end of the pilot feed. This is to enlarge the final exit hole and hopefully give me a slightly bigger pilot flame. Hopefully i might have time to test it tomorrow.
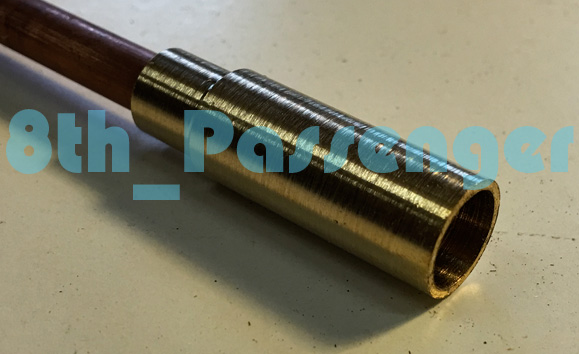
The main burner within the emitter I decided to make as its purely cosmetic and has to fit a specific depth. so I turned up a shape for the rear. Also you wont really see it when the front is on the emitter.

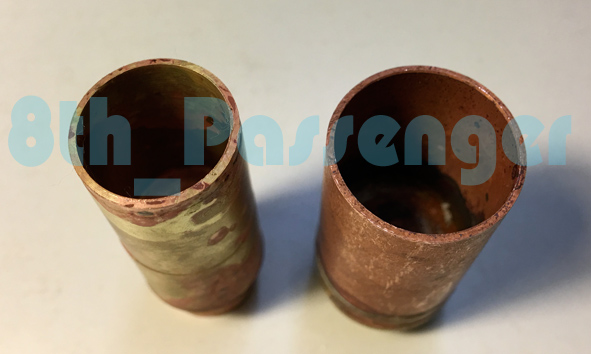
For the front I used some copper plumbing tube. I'll solder the two together.

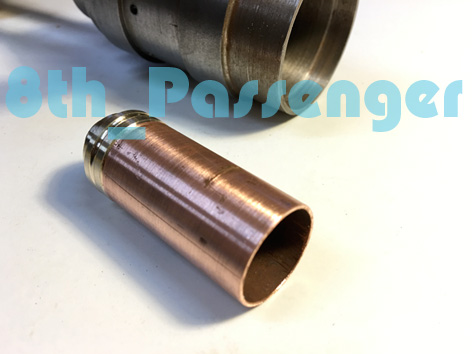
This week I'll tap the emitter and bolt the burner to the inside.
So here it is assembled. I glued and pegged the slider blocks to the brass cylinder.
I drilled five vent holes in the emitter leaving the one next to the spark plug undrilled and also the ones at the top and bottom.

So moving in the right direction to getting this finished!
Colin
_________________
Ripley: What's it key on?
Ash: Micro changes in air density. |
|
| Back to top |
|
|
|
|
|
|
|
|
|
|
|
| Author |
Message |
8th_Passenger
Community Member
Joined: 28 Nov 2009
Posts: 443
Location: Hertfordshire, UK
|
| Posted: Sun Feb 28, 2016 9:43 am Post subject: |
|
|
Just a quick update.
I fitted my new burner nozzle to the end of the pilot feed.
The larger bore made a big difference.
Scared me a bit!
But it gave a more attractive bigger flame!!!

I'm not sure what will happen when the pilot feed is inside the main emitter.
Will the main emitter fill up with gas and produce an even bigger flame, like the bottom picture below where the whole emitter is alight.
Hopefully I will have enough control to make it safe to photograph.
Colin
_________________
Ripley: What's it key on?
Ash: Micro changes in air density. |
|
| Back to top |
|
|
|
|
|
|
|
|
|
|
|
| Author |
Message |
SSB
Community Member
Joined: 15 Apr 2007
Posts: 175
Location: Florida, USA
|
| Posted: Sun Feb 28, 2016 3:03 pm Post subject: |
|
|
| Awesome! |
|
| Back to top |
|
|
|
|
|
|
|
|
|
|
|
| Author |
Message |
8th_Passenger
Community Member
Joined: 28 Nov 2009
Posts: 443
Location: Hertfordshire, UK
|
| Posted: Sun Feb 28, 2016 5:00 pm Post subject: |
|
|
Thank-you SSB.
Colin
_________________
Ripley: What's it key on?
Ash: Micro changes in air density. |
|
| Back to top |
|
|
|
|
|
|
|
|
|
|
|
| Author |
Message |
SKIN JOB 66
Community Member
Joined: 16 Jan 2008
Posts: 2724
Location: FRANCE
|
| Posted: Mon Feb 29, 2016 3:13 pm Post subject: |
|
|
wow... simply WOW... Awesome work Colin...
(speechless) Fred
_________________
THE FUTURE IS A THING OF THE PAST |
|
| Back to top |
|
|
|
|
|
|
|
|
|
|
|
| Author |
Message |
8th_Passenger
Community Member
Joined: 28 Nov 2009
Posts: 443
Location: Hertfordshire, UK
|
| Posted: Tue Mar 01, 2016 2:27 pm Post subject: |
|
|
Thank you Fred.
_________________
Ripley: What's it key on?
Ash: Micro changes in air density. |
|
| Back to top |
|
|
|
|
|
|
|
|
|
|
|
| Author |
Message |
nickdaring
Community Member

Joined: 16 Dec 2006
Posts: 261
|
| Posted: Wed Mar 02, 2016 2:35 pm Post subject: |
|
|
| So close to completion! Looking soooo good. |
|
| Back to top |
|
|
|
|
|
|
|
|
|
|
|
| Author |
Message |
joberg
Community Member
Joined: 06 Oct 2008
Posts: 9447
|
| Posted: Thu Mar 03, 2016 6:07 pm Post subject: |
|
|
Fire, flame, what else could you ask for  Perfect mate! You may be right about the gases inside: more flame for sure. Not to photograph on a windy day for sure!! Perfect mate! You may be right about the gases inside: more flame for sure. Not to photograph on a windy day for sure!! |
|
| Back to top |
|
|
|
|
|
|
|
|
|
|
|
| Author |
Message |
8th_Passenger
Community Member
Joined: 28 Nov 2009
Posts: 443
Location: Hertfordshire, UK
|
| Posted: Sun Mar 06, 2016 3:01 pm Post subject: |
|
|
Thanks for your comments Nick.
Yes I'm getting closer. Lets hope I can keep up the momentum.
At some point I may have to stop posting so I can do a final reveal!
Photographing it outside with the flame will be a safe option joberg but it would be nice to try get some images in a more Nostromo interior environment. What that interior would be I'm not quite sure!
So here's how I've got on with the build this week.
I bolted the burner into the emitter.

It looked pretty good until I tried to fit the brass pilot light end in the space between the burner and inside of the emitter. It didn't fit.
What's that saying? measure twice, cut once!
I have to admit I didn't measure at all.
So I had to remake both bits.
Here's the parts for the new smaller burner. I was short on brass so had to do it in two parts.
In fact its probably better than the first attempt. Looking at the reference my first was a little too big (New one on the left below).
I had to make the pilot end smaller too. The newer one is the one with the long grub screw in.

This week I started one of the jobs I've been putting off. The end of the emitter.
I did a test first in fast cast to work out how I was going to machine it.

I then repeated it using steel.

This is the first stage. The internal shape.

This week I hope to drill the remaining four holes and mill the cross slots. Then turn the same angle on the outside.
As I'm getting closer to finishing I'm starting to look at the shoulder strap.
There are two takes on this.
One made of webbing.

And one made of leather. Looking very much like a belt!

Both have a similar sprung swivel clip. Like this one.
The 70's version being a little more squarer along the bottom section.

.jpg)
I bought a cheap webbing rifle sling to get an idea of size. The clips don't swivel and are not chrome. So not really usable.

Fitted here on the top vent they are about the right size.

I think I'll have to buy some fitttings and webbing and make my own. Probably black webbing.
I'll have to do a bit more searching if I go for a leather one. But again nothing that can't be fabricatred from scratch.
Colin
_________________
Ripley: What's it key on?
Ash: Micro changes in air density. |
|
| Back to top |
|
|
|
|
|
|
|
|
|
|
|
| Author |
Message |
joberg
Community Member
Joined: 06 Oct 2008
Posts: 9447
|
| Posted: Sun Mar 06, 2016 6:51 pm Post subject: |
|
|
I certainly like the webbed one rather than the leather one (more Sci-Fi)
The new nozzle looks good for sure and as for a photo shoot in a "Nostromo Environment"...well, my guess is a good as yours Colin. |
|
| Back to top |
|
|
|
|
|
|
|
|
|
|
|
| Author |
Message |
SSB
Community Member
Joined: 15 Apr 2007
Posts: 175
Location: Florida, USA
|
| Posted: Tue Mar 08, 2016 12:42 am Post subject: |
|
|
| Basement? Boiler room? Abandoned power plant? |
|
| Back to top |
|
|
|
|
|
|
|
|
|
|
|
| Author |
Message |
joberg
Community Member
Joined: 06 Oct 2008
Posts: 9447
|
| Posted: Tue Mar 08, 2016 5:17 pm Post subject: |
|
|
| Power plant should do (remember Aliens?) As for a basement looking like the Nostromo sets...very unlikely; then again, you never know |
|
| Back to top |
|
|
|
|
|
|
|
|
|
|
|
| Author |
Message |
Mr Webber
Community Member

Joined: 13 Apr 2008
Posts: 1824
Location: Terra Australis
|
| Posted: Tue Mar 08, 2016 8:01 pm Post subject: |
|
|
You could google image some high res pictures of the nostromo interiors or from the Alien Isolation game and have them photo shopped in the background
possibly. Or a lime stone cave, that's what the Dallas/Brett scene reminds me of.
_________________
Formerly offworld66 |
|
| Back to top |
|
|
|
|
|
|
|
|
|
|
|
| Author |
Message |
SSB
Community Member
Joined: 15 Apr 2007
Posts: 175
Location: Florida, USA
|
| Posted: Tue Mar 08, 2016 11:53 pm Post subject: |
|
|
| joberg wrote: | | As for a basement looking like the Nostromo sets...very unlikely; then again, you never know |
Just don't show the brick walls or the concrete floor  |
|
| Back to top |
|
|
|
|
|
|
|
|
|
|
|
|
You cannot post new topics in this forum
You cannot reply to topics in this forum
You cannot edit your posts in this forum
You cannot delete your posts in this forum
You cannot vote in polls in this forum
|
|
|
|
|
|
|
|


