 |
 |
|
 |
|
| Author |
Message |
eltee
Community Member
Joined: 31 Oct 2006
Posts: 437
Location: West Coast USA
|
 Posted: Tue Apr 19, 2016 12:18 pm Post subject: Building ANOTHER Shooter Posted: Tue Apr 19, 2016 12:18 pm Post subject: Building ANOTHER Shooter |
 |
|
OK, so my last "shooter" was a fun but time consuming project. With much help from Rich Coyle I was safely able to assemble a Bladerunner Blaster using a real Charter Arms .44 special Bulldog that I kept in firing condition.
AGAIN, kids do not do this at home, we are "trained professionals." Seriously, I have been a licensed firearms dealer and maker for over 25 years and a police and civilian firearms instructor for about the same amount of time. My machinist and I (legally) build semi auto guns out of blocks (billets) of metal. This is not something that you can do with a drill and a Dremel.
Yes, I am building a second shooter but this time I'll be using a Steyr SL receiver and bolt assembly from the correct model .222 rifle instead of an RAC replica receiver.
Since the Steyr is hard, gunmetal and needs extensive milling and drilling and tapping and countersinking, etc. it's going to be a slow, careful process. We've even gone so far as to 3D print some vice jaw covers to protect the pieces. We're using an industrial Lagun mill with a Kurt vice, CNC lathes, etc.
The first shooter we built turned out great because once we got the Bulldog configured properly Rich Coyle fitted one of his newest uppers to it and it looked beautiful. The Bulldog functioned perfectly. This will be more of a challenge. This is far from the first Bulldog/Steyr replica as others have already done this.
I'll post pics as we progress.
Last edited by eltee on Wed Apr 20, 2016 11:21 am; edited 1 time in total |
|
| Back to top |
|
|
|
|
 |
|
 |
|
|
|
|
| Author |
Message |
hirohawa
Community Member

Joined: 18 May 2006
Posts: 1067
|
| Posted: Tue Apr 19, 2016 8:50 pm Post subject: |
|
|
| Can't wait to see this unfold. |
|
| Back to top |
|
|
|
|
|
|
|
|
|
|
|
| Author |
Message |
Buch
Community Member

Joined: 27 Feb 2014
Posts: 1184
Location: Copenhagen, Denmark
|
| Posted: Wed Apr 20, 2016 8:52 am Post subject: |
|
|
Now this is something to look forward to!
_________________
Monsieur, azonnal kövessen engem bitte |
|
| Back to top |
|
|
|
|
|
|
|
|
|
|
|
| Author |
Message |
eltee
Community Member
Joined: 31 Oct 2006
Posts: 437
Location: West Coast USA
|
| Posted: Wed Apr 20, 2016 1:25 pm Post subject: |
|
|
Steyr Receiver and stripped Bulldog
 |
|
| Back to top |
|
|
|
|
|
|
|
|
|
|
|
| Author |
Message |
eltee
Community Member
Joined: 31 Oct 2006
Posts: 437
Location: West Coast USA
|
| Posted: Wed Apr 20, 2016 1:27 pm Post subject: |
|
|
The problem with milling off metal is that once removed ... gone forever. So we will be making multiple passes, taking off a LITTLE metal at a time.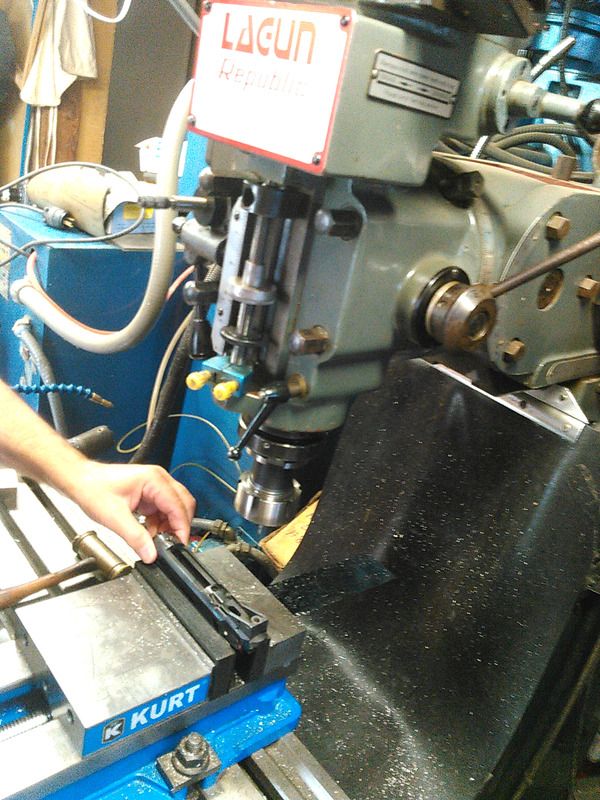 |
|
| Back to top |
|
|
|
|
|
|
|
|
|
|
|
| Author |
Message |
mugatu
Community Member
Joined: 06 Mar 2015
Posts: 31
|
| Posted: Wed Apr 20, 2016 2:10 pm Post subject: |
|
|
| Awesome, eltee! |
|
| Back to top |
|
|
|
|
|
|
|
|
|
|
|
| Author |
Message |
Bwood
Community Member
Joined: 20 Sep 2009
Posts: 843
|
| Posted: Wed Apr 20, 2016 8:19 pm Post subject: |
|
|
| "A Thing of Beauty is a Joy Forever." Keats |
|
| Back to top |
|
|
|
|
|
|
|
|
|
|
|
| Author |
Message |
Nexus7
Community Member

Joined: 13 Sep 2014
Posts: 440
Location: New York Metro Area
|
| Posted: Wed Apr 20, 2016 8:23 pm Post subject: |
|
|
| Really looking forward to this! |
|
| Back to top |
|
|
|
|
|
|
|
|
|
|
|
| Author |
Message |
Buch
Community Member
Joined: 27 Feb 2014
Posts: 1184
Location: Copenhagen, Denmark
|
| Posted: Thu Apr 21, 2016 3:19 am Post subject: |
|
|
Beautiful!!
_________________
Monsieur, azonnal kövessen engem bitte |
|
| Back to top |
|
|
|
|
|
|
|
|
|
|
|
| Author |
Message |
hirohawa
Community Member
Joined: 18 May 2006
Posts: 1067
|
| Posted: Thu Apr 21, 2016 12:12 pm Post subject: |
|
|
What are you going to do for the Side covers?
Are they going to be aluminum?
Very curious as to how you will fabricate these. |
|
| Back to top |
|
|
|
|
|
|
|
|
|
|
|
| Author |
Message |
joberg
Community Member
.jpg)
Joined: 06 Oct 2008
Posts: 9447
|
| Posted: Sat Apr 23, 2016 7:17 am Post subject: |
|
|
Excellent news and I see that the machine in the pic is certainly not made for an amateur  |
|
| Back to top |
|
|
|
|
|
|
|
|
|
|
|
| Author |
Message |
eltee
Community Member
Joined: 31 Oct 2006
Posts: 437
Location: West Coast USA
|
| Posted: Sat Apr 23, 2016 1:27 pm Post subject: |
|
|
| joberg wrote: | | Excellent news and I see that the machine in the pic is certainly not made for an amateur |
Hence my reliance on my shooting buddy who is a master machinist. I don't even know how to turn that thing on! |
|
| Back to top |
|
|
|
|
|
|
|
|
|
|
|
| Author |
Message |
mugatu
Community Member
Joined: 06 Mar 2015
Posts: 31
|
| Posted: Sun Apr 24, 2016 5:47 pm Post subject: |
|
|
| eltee wrote: | | Hence my reliance on my shooting buddy who is a master machinist. I don't even know how to turn that thing on! |
Once your buddy does yours, ask him much for him to do mine;) |
|
| Back to top |
|
|
|
|
|
|
|
|
|
|
|
| Author |
Message |
eltee
Community Member
Joined: 31 Oct 2006
Posts: 437
Location: West Coast USA
|
| Posted: Wed Apr 27, 2016 6:25 pm Post subject: |
|
|
| hirohawa wrote: | What are you going to do for the Side covers?
Are they going to be aluminum?
Very curious as to how you will fabricate these. |
I may use two sets, one out of thin aluminum for display and a separate set for shooting to accommodate heat and gas from the flash gap. Undecided at this point. |
|
| Back to top |
|
|
|
|
|
|
|
|
|
|
|
| Author |
Message |
eltee
Community Member
Joined: 31 Oct 2006
Posts: 437
Location: West Coast USA
|
| Posted: Wed Apr 27, 2016 6:39 pm Post subject: |
|
|
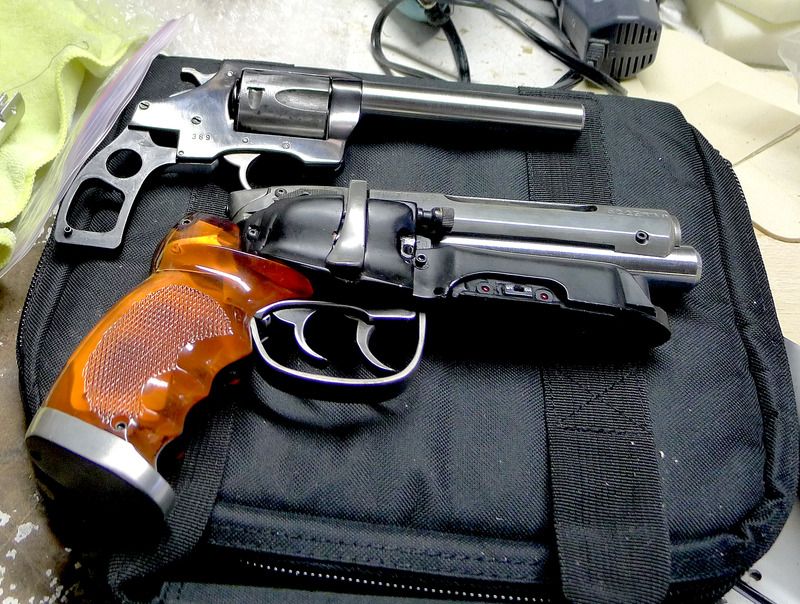
Here is the close to finished Bulldog. Added the new barrel, made out of rifled barrel stock which was cut, turned, crowned, and threaded. The proper torque, lede, and flashgap applied.
I still need to bob the hammer.
Below it is my first shooter. Built on another Charter Arms Bulldog but using a Coyle replica Steyr upper.
 |
|
| Back to top |
|
|
|
|
|
|
|
|
|
|
|
| Author |
Message |
eltee
Community Member
Joined: 31 Oct 2006
Posts: 437
Location: West Coast USA
|
| Posted: Wed Apr 27, 2016 6:41 pm Post subject: |
|
|
Here is a photo of the complete Steyr SL .222 short action bolt. Pretty much the original plans called for only using the end cap and the lever but there MAY be a way to save it. We'll see.
 |
|
| Back to top |
|
|
|
|
|
|
|
|
|
|
|
| Author |
Message |
eltee
Community Member
Joined: 31 Oct 2006
Posts: 437
Location: West Coast USA
|
| Posted: Thu Apr 28, 2016 12:07 pm Post subject: |
|
|
| mugatu wrote: | | eltee wrote: | | Hence my reliance on my shooting buddy who is a master machinist. I don't even know how to turn that thing on! |
Once your buddy does yours, ask him much for him to do mine;) |
Let's see if we survive and are successful with mine! This MAY be so time consuming that the shop hours billing may be very, very high. Luckily, for me, he and I are long time friends and we've built real guns together. For a commission job it might be costly.
I did tell him to keep track of the process just in case he wants to do more on a commission basis. We are going slow on mine as it is all unchartered waters to us. We have had a lot of guidance from Rich Coyle and even Adam Savage gave me some hints. We think that if we get mine done properly, any subsequent builds will be faster and easier and if we have to 3D print a filler piece to keep the receiver stable in the vice it can be used again. |
|
| Back to top |
|
|
|
|
|
|
|
|
|
|
|
| Author |
Message |
hirohawa
Community Member
Joined: 18 May 2006
Posts: 1067
|
| Posted: Thu Apr 28, 2016 1:20 pm Post subject: |
|
|
| Looking good! |
|
| Back to top |
|
|
|
|
|
|
|
|
|
|
|
| Author |
Message |
joberg
Community Member
Joined: 06 Oct 2008
Posts: 9447
|
| Posted: Thu Apr 28, 2016 6:54 pm Post subject: |
|
|
| Pro-Job for sure on that piece for sure...eager to see the rest! |
|
| Back to top |
|
|
|
|
|
|
|
|
|
|
|
| Author |
Message |
eltee
Community Member
Joined: 31 Oct 2006
Posts: 437
Location: West Coast USA
|
| Posted: Tue May 03, 2016 2:05 pm Post subject: |
|
|
Warning for do-it-yourselfers ... the steel that they use for the Steyr is hardened, VERY hardened high grade steel. Even with a giant, industrial mill the cuts are slow going, measured in thousandths of an inch per pass. The front of the receiver took almost 4 hours to open up and that was the easy end of the receiver, the back end requires much more complex cutting and shaping.
At least the front end is done. The machinist said we might need to get a specialized cutter to make life easier.
We would normally have a completed AR15 / AR10 receiver done by now, starting with a billet (block) of aluminum. |
|
| Back to top |
|
|
|
|
|
|
|
|
|
|
|
|
You cannot post new topics in this forum
You cannot reply to topics in this forum
You cannot edit your posts in this forum
You cannot delete your posts in this forum
You cannot vote in polls in this forum
|
|
|
|
|
|
|
|


