 |
 |
|
 |
|
| Author |
Message |
acemonstertoys
Community Member
Joined: 22 Nov 2017
Posts: 18
|
 Posted: Fri Jan 26, 2018 2:49 am Post subject: VOIGHT KAMPFF Project COMPLETED! Posted: Fri Jan 26, 2018 2:49 am Post subject: VOIGHT KAMPFF Project COMPLETED! |
 |
|
HI Guys. I think I've chatted with a couple of you privately about this project but here it is FINALLY complete. I've been scratch-buiding a Voight Kampff machine for several months. The reference material on this site was of great importance during my build! Thanks to all the contributors here!! Especially Joberg, 8th passenger and LBM.
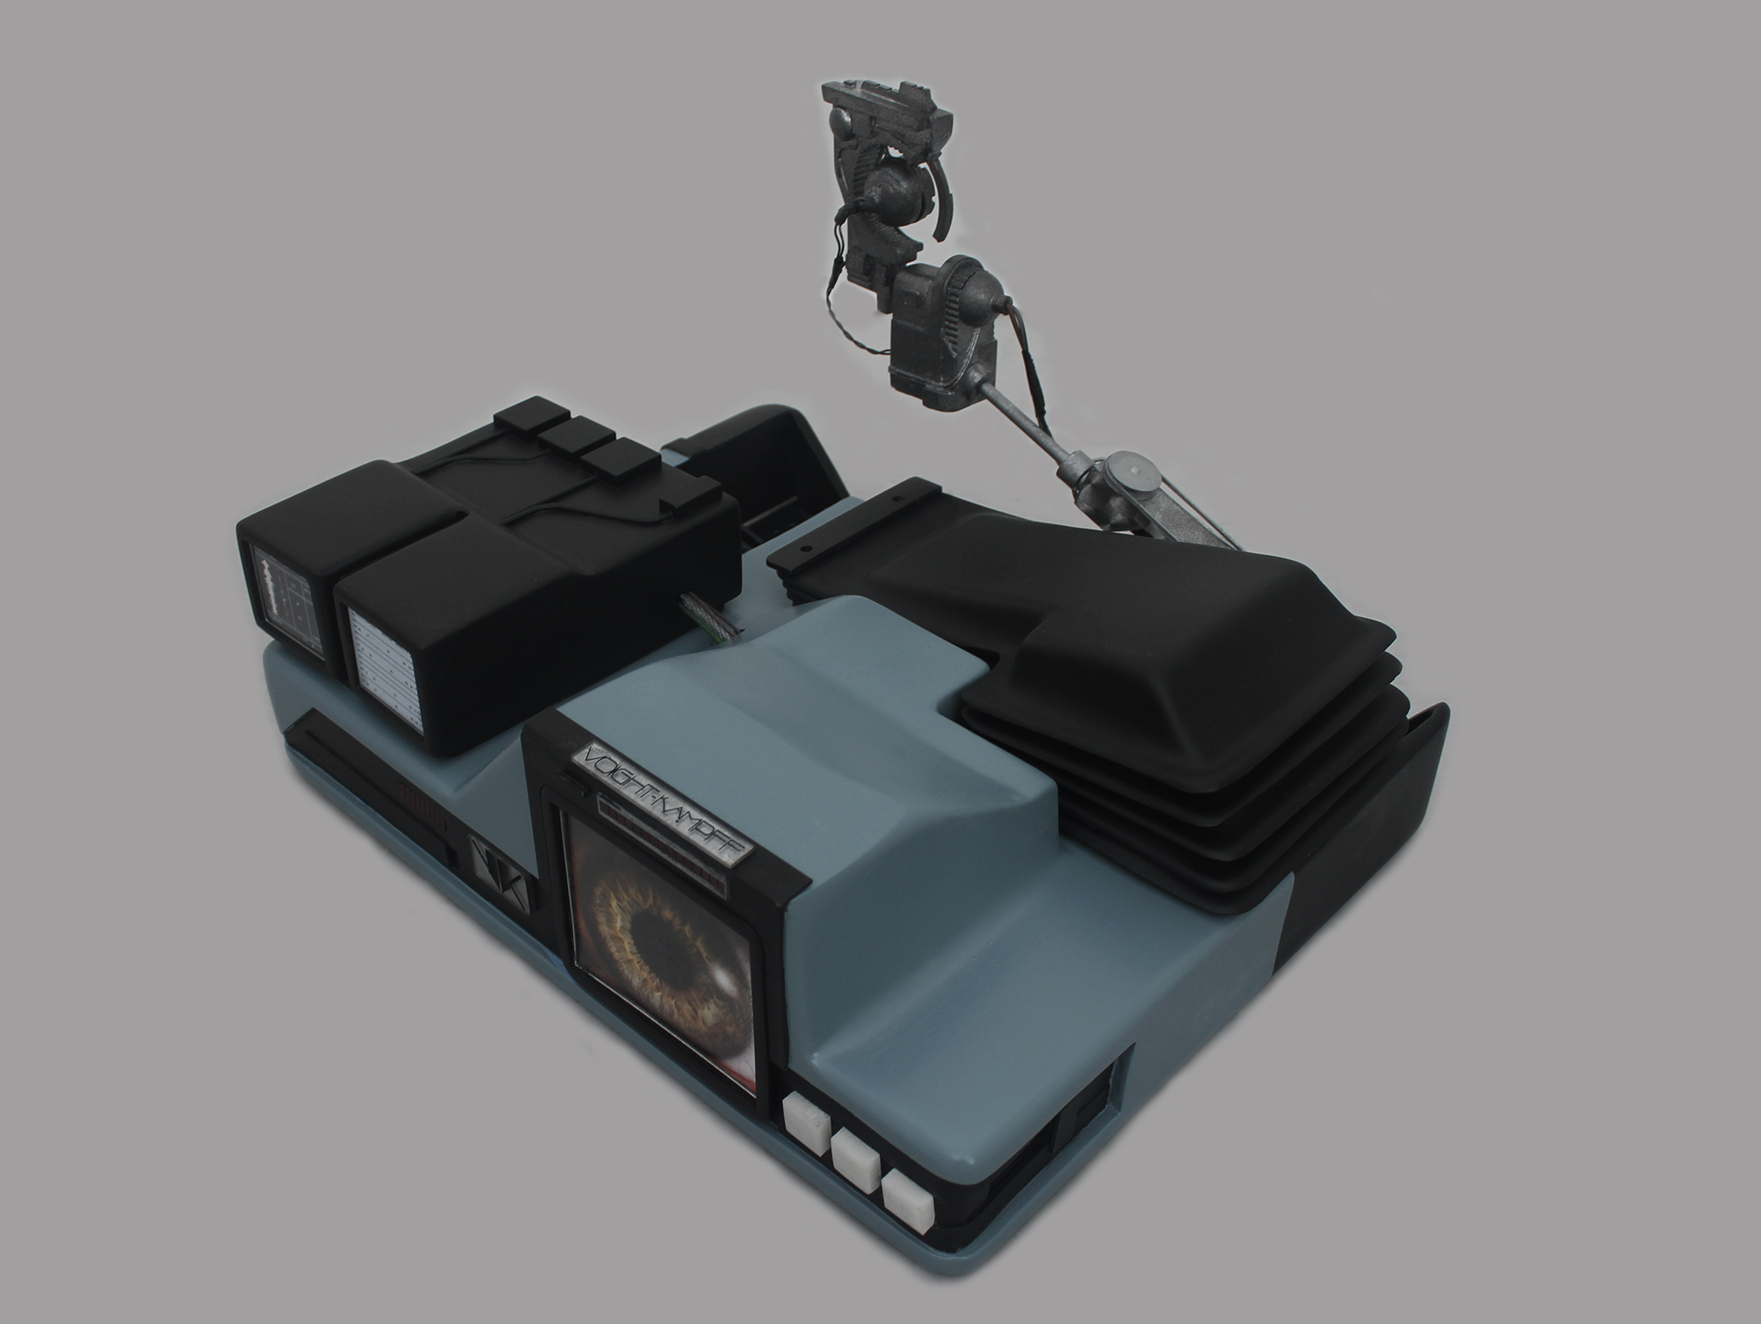
I started by drafting the entire model in autocad (exploded topography style) and rendered the main shapes in 1/4" MDF, 1/8" acrylic and various thicknesses of plastic (all on a laser cutter). Careful assembly, and thousands of hours of applying bondo and sanding resulted in the master patterns you see here. Everything was molded and cast in more manageable materials (alowing for hollow shells for electronics and possibly vacuformed versions later down the road)
This is the first build up of the castings set. I'm calling this the "STUNT VERSION" buildup, as I didn't incorprate any lights or animation and I rushed the build in 3 days due to other pressing projects on the bench. I hope you like this proof of concept model. I'm open to suggestions on improving it for our hero buidup we're working on shortly. Joberg has already suggested a couple changes I've incorporated into this stunt build, but I think I can push it even further before we embark on the hero build. I think I'm still a little stumped on how to mount the baffles.
It seems like they should not be resting on the surface but should be sunk into the body a bit? Voodoo fx is working on a hero build that has moving bellows, animated lighting effects, and sounds. All accurization suggestions welcome. Thanks!
http://propsummit.com/upload/3180/combosaturation1.jpg
http://propsummit.com/upload/3180/vkdone3.jpg
http://propsummit.com/upload/3180/vkphone2.jpg
http://propsummit.com/upload/3180/vkdone3a.jpg
http://propsummit.com/upload/3180/vkitting4.jpg
http://propsummit.com/upload/3180/vkphonescale1.jpg
p.s. can someone show me how to embed photos in the body of these posts? I've tried he img code a dozen times but it's not working.
Last edited by acemonstertoys on Wed Jan 31, 2018 11:42 am; edited 5 times in total |
|
| Back to top |
|
|
|
|
 |
|
 |
|
|
|
|
| Author |
Message |
joberg
Community Member
.jpg)
Joined: 06 Oct 2008
Posts: 9447
|
| Posted: Fri Jan 26, 2018 7:52 am Post subject: |
|
|
Very well made for a 3 day project 
Yes, the bellows should rest on the top of the prop. The rectangular bar should then put on top of the 5 bellows and the screw heads should be protruding from that piece (no counter sinking).
I see that you've put the small fins at the bottom of the trench; the bar going through shouldn't be there.
The aluminium arm has "swirls" in the original prop: the ones you have are too big. Each swirl should be no more than 10 mm wide.
Pulleys on the arm are tricky also...don't forget, the one near the servo box is with a small rounded top + a extra round piece off center.
Keep up the good work! |
|
| Back to top |
|
|
|
|
|
|
|
|
|
|
|
| Author |
Message |
acemonstertoys
Community Member
Joined: 22 Nov 2017
Posts: 18
|
| Posted: Fri Jan 26, 2018 11:50 am Post subject: |
|
|
Thanks, Joberg. I smoothed both pullies at the tops and put a small nut shaped thing on the front pulley. Does anyone know that specific nut they used? I'll see if I can find some metallic tape with smaller diameter swirls. I think I actually have some in a box somewhere.
http://propsummit.com/upload/3180/vkdonearm1.jpg |
|
| Back to top |
|
|
|
|
|
|
|
|
|
|
|
| Author |
Message |
acemonstertoys
Community Member
Joined: 22 Nov 2017
Posts: 18
|
| Posted: Fri Jan 26, 2018 12:54 pm Post subject: |
|
|
Also, what do you guys think of the color? I struggled wtih the blue, and finally ended up with using two colors mixed - spa blue and french blue (home depot rattle cans).
In some pics it looks totally blue. On screen it looks grey. In other pics it looks like a desaturated blue. Any experts here on the color? I desaturated a few of my pics to see the difference:
but perhaps it's still too blue?
http://propsummit.com/upload/3180/combosaturation1.jpg
http://propsummit.com/upload/3180/combosaturation2.jpg |
|
| Back to top |
|
|
|
|
|
|
|
|
|
|
|
| Author |
Message |
Mr Webber
Community Member

Joined: 13 Apr 2008
Posts: 1824
Location: Terra Australis
|
| Posted: Fri Jan 26, 2018 4:47 pm Post subject: |
|
|
Great job, really looks spectacular.
The colour looks a little too blue to me but getting a match to any colour seen on screen is far from an exact science and has been a thorn in all makers sides since forever.
To get your pictures up, first use the upload tab at the top right of the page.
_________________
Formerly offworld66 |
|
| Back to top |
|
|
|
|
|
|
|
|
|
|
|
| Author |
Message |
acemonstertoys
Community Member
Joined: 22 Nov 2017
Posts: 18
|
| Posted: Fri Jan 26, 2018 5:24 pm Post subject: |
|
|
Thanks, Mr. Webber. That color is a tough nut to crack! I did some fooling around in photoshop this am and came up with these RGB/CMYK values:
http://propsummit.com/upload/3180/experiment3darker.jpg
p.s. I upload my photos to propsummit and post the .jpg link but it's ultimately just a link.
I've also tried the common <img src= http:/www.thelink.jpg etc. copied from the html data from other posts on this forum:.... but that doesn't work etiher. Is there a different html code we need to use to embed photos?
Cris |
|
| Back to top |
|
|
|
|
|
|
|
|
|
|
|
| Author |
Message |
andy
Community Guide

Joined: 01 Nov 2006
Posts: 6237
Location: Rochester, NY
|
| Posted: Sat Jan 27, 2018 4:32 am Post subject: |
|
|
I can't remember if it was Tom Southwell, or Stephen Dane who said that it was coated with a graphite to give it a gun metal look.They said that it had to be constantly reapplied because they couldn't coat it without ruining the look, and if it got touched, people left finger prints. Now days you can find the paint in any hobby shop. Funny how many products came out with the same look years later. Basically a dark grey metallic. The blue look was probably the cool grey primer before they applied the final finish.
Andy |
|
| Back to top |
|
|
|
|
|
|
|
|
|
|
|
| Author |
Message |
8th_Passenger
Community Member

Joined: 28 Nov 2009
Posts: 443
Location: Hertfordshire, UK
|
| Posted: Sat Jan 27, 2018 5:05 am Post subject: |
|
|
Looking good acemonstertoys.
I think you can definitely improve on your 'Stunt build' if you sharpen up some of the details/edges and look into adding the details which joberg mentioned.
The overall look and proportions you have come up with look pretty good to me.
As far as the colour goes I'm with andy on the 'graphite'. I don't know where that blue comes from in the Mark Stetson photos but it's not the final colour.
Probably the best reference is the photo in the Stephen Dane documentary.
Along time ago I had a job fixing pianos. Part of that job was lubricating the backs of the hammer actions. I used to use a brush on liquid graphite for this. You would paint it on and buff it up. So if they painted it in something like that you wouldn't want to touch it, as finger prints would show.
Colin
_________________
Ripley: What's it key on?
Ash: Micro changes in air density. |
|
| Back to top |
|
|
|
|
|
|
|
|
|
|
|
| Author |
Message |
joberg
Community Member
Joined: 06 Oct 2008
Posts: 9447
|
| Posted: Sat Jan 27, 2018 10:17 am Post subject: |
|
|
Yes, Colin is right in saying that the whole eye part: servo + eye piece could use more sharpness. It seems that you also forgot the wire coming from the eye and going to the servo (back of the eye piece).
.jpg)
Here's a better pic of the swirls on the arm:
 .jpg" border="0" /> .jpg" border="0" /> |
|
| Back to top |
|
|
|
|
|
|
|
|
|
|
|
| Author |
Message |
joberg
Community Member
Joined: 06 Oct 2008
Posts: 9447
|
| Posted: Sat Jan 27, 2018 10:20 am Post subject: |
|
|
Oops...didn't work.
Here's the pic showing the swirls on the aluminium arm
.jpg)
and the color:
.jpg) |
|
| Back to top |
|
|
|
|
|
|
|
|
|
|
|
| Author |
Message |
acemonstertoys
Community Member
Joined: 22 Nov 2017
Posts: 18
|
|
| Back to top |
|
|
|
|
|
|
|
|
|
|
|
| Author |
Message |
8th_Passenger
Community Member
Joined: 28 Nov 2009
Posts: 443
Location: Hertfordshire, UK
|
| Posted: Sat Jan 27, 2018 12:49 pm Post subject: |
|
|
acemonstertoys, to get your images to show you copy and paste from your upload manager. Then re-select it so its highlighted. Then click on Img. If you then click Preview you can see if its working before you post.
If that doesn't work then I dont know.
Hope that helps.
Colin
_________________
Ripley: What's it key on?
Ash: Micro changes in air density. |
|
| Back to top |
|
|
|
|
|
|
|
|
|
|
|
| Author |
Message |
Bwood
Community Member
Joined: 20 Sep 2009
Posts: 843
|
|
| Back to top |
|
|
|
|
|
|
|
|
|
|
|
| Author |
Message |
acemonstertoys
Community Member
Joined: 22 Nov 2017
Posts: 18
|
| Posted: Wed Jan 31, 2018 11:43 am Post subject: |
|
|
Got it to work, thanks fellas!
 |
|
| Back to top |
|
|
|
|
|
|
|
|
|
|
|
| Author |
Message |
joberg
Community Member
Joined: 06 Oct 2008
Posts: 9447
|
| Posted: Thu Feb 01, 2018 7:45 am Post subject: |
|
|
Much better color for sure  |
|
| Back to top |
|
|
|
|
|
|
|
|
|
|
|
| Author |
Message |
acemonstertoys
Community Member
Joined: 22 Nov 2017
Posts: 18
|
|
| Back to top |
|
|
|
|
|
|
|
|
|
|
|
| Author |
Message |
DVD Connoisseur
Community Member
Joined: 25 Nov 2007
Posts: 230
Location: UK
|
| Posted: Sat Feb 03, 2018 3:00 pm Post subject: |
|
|
| I'd be in for a complete kit or built model! Beautiful! |
|
| Back to top |
|
|
|
|
|
|
|
|
|
|
|
| Author |
Message |
acemonstertoys
Community Member
Joined: 22 Nov 2017
Posts: 18
|
|
| Back to top |
|
|
|
|
|
|
|
|
|
|
|
| Author |
Message |
DVD Connoisseur
Community Member
Joined: 25 Nov 2007
Posts: 230
Location: UK
|
| Posted: Sat Feb 03, 2018 6:00 pm Post subject: |
|
|
Cheers, my e-mither is on its way through the cyber sphere! |
|
| Back to top |
|
|
|
|
|
|
|
|
|
|
|
| Author |
Message |
circa1964
Joined: 27 Feb 2018
Posts: 1
|
| Posted: Fri Mar 02, 2018 1:14 pm Post subject: |
|
|
| This is really great! I have watched a lot of these builds over the years that had varing degrees of success. But this one is real nice. There is a group in Canada that occasionally releases limited runs of the electric lights for this as a finished thing on Ebay. Might be a way to go. Great work! |
|
| Back to top |
|
|
|
|
|
|
|
|
|
|
|
|
You cannot post new topics in this forum
You cannot reply to topics in this forum
You cannot edit your posts in this forum
You cannot delete your posts in this forum
You cannot vote in polls in this forum
|
|
|
|
|
|
|
|


