 |
 |
|
 |
|
| Author |
Message |
phase pistol
Community Member
Joined: 04 Nov 2006
Posts: 1147
|
 Posted: Mon Oct 06, 2014 10:13 pm Post subject: Posted: Mon Oct 06, 2014 10:13 pm Post subject: |
 |
|
Looking good, Freak! 
k |
|
| Back to top |
|
|
|
|
 |
|
 |
|
|
|
|
| Author |
Message |
Staar
Community Member

Joined: 04 Feb 2008
Posts: 757
Location: AUSTRALIA
|
| Posted: Tue Oct 07, 2014 12:17 am Post subject: |
|
|

A great result VFX Freak and probably one of the best - slightly worn - versions I've seen.
Great job sir.
High regards
MARK
_________________
 |
|
| Back to top |
|
|
|
|
|
|
|
|
|
|
|
| Author |
Message |
Buch
Community Member

Joined: 27 Feb 2014
Posts: 1184
Location: Copenhagen, Denmark
|
| Posted: Tue Oct 07, 2014 1:59 pm Post subject: |
|
|
IT HAS ARRIVED!!!
Is off to do some research on build and bluing... Some very frustrated posts will probably surface the next many weeks  Read the triggers should be a pain in the....... Read the triggers should be a pain in the.......
.jpg)
_________________
Monsieur, azonnal kövessen engem bitte |
|
| Back to top |
|
|
|
|
|
|
|
|
|
|
|
| Author |
Message |
racprops
Community Member

Joined: 30 Oct 2006
Posts: 2450
Location: Phoenix AZ
|
| Posted: Tue Oct 07, 2014 2:14 pm Post subject: |
|
|
Someone has a thread on DOING those triggers...somewhere...
Rich
_________________
I never have enough time to do all I want to do! |
|
| Back to top |
|
|
|
|
|
|
|
|
|
|
|
| Author |
Message |
Buch
Community Member
Joined: 27 Feb 2014
Posts: 1184
Location: Copenhagen, Denmark
|
| Posted: Tue Oct 07, 2014 2:35 pm Post subject: |
|
|
Oh! Thanks, Rich. If anybody knows the thread please post or PM 
_________________
Monsieur, azonnal kövessen engem bitte |
|
| Back to top |
|
|
|
|
|
|
|
|
|
|
|
| Author |
Message |
stonedog7563
Community Member

Joined: 19 Apr 2007
Posts: 66
Location: Norfolk UK
|
| Posted: Tue Oct 07, 2014 4:56 pm Post subject: |
|
|
Congrats Anders  |
|
| Back to top |
|
|
|
|
|
|
|
|
|
|
|
| Author |
Message |
hirohawa
Community Member

Joined: 18 May 2006
Posts: 1067
|
|
| Back to top |
|
|
|
|
|
|
|
|
|
|
|
| Author |
Message |
joberg
Community Member
.jpg)
Joined: 06 Oct 2008
Posts: 9447
|
| Posted: Tue Oct 07, 2014 6:11 pm Post subject: |
|
|
TFS VFX Freak! Very good job on the gun  |
|
| Back to top |
|
|
|
|
|
|
|
|
|
|
|
| Author |
Message |
Buch
Community Member
Joined: 27 Feb 2014
Posts: 1184
Location: Copenhagen, Denmark
|
| Posted: Wed Oct 08, 2014 1:41 am Post subject: |
|
|
Thanks, hirohawa, exactly what I was looking for
And thanks, Stonedog, I'm SO happy it's finally here!
_________________
Monsieur, azonnal kövessen engem bitte |
|
| Back to top |
|
|
|
|
|
|
|
|
|
|
|
| Author |
Message |
hirohawa
Community Member
Joined: 18 May 2006
Posts: 1067
|
| Posted: Wed Oct 08, 2014 3:07 am Post subject: |
|
|
| VFX Freak wrote: | For anyone tackling this blaster for the first time, it can be daunting if you've never blued zinc before. I built the previous Tomenosuke Pro kit and after a lot of trial and error I was happy with the results. It can be done but it's all about prep and technique. I still haven't weathered mine. Here's what it looks like:
|
Looks fantastic! |
|
| Back to top |
|
|
|
|
|
|
|
|
|
|
|
| Author |
Message |
Pierre990429
Community Member
Joined: 06 Dec 2012
Posts: 194
Location: France
|
| Posted: Wed Oct 08, 2014 11:34 am Post subject: |
|
|
Beautiful, VFX Freak!
I think there should be a precise "manifest" of all the parts (like : "1 bag with X*screws type A, Y*screws type B", "1 bag with 1 big spring and two little ones", etc...), so we know that there's no missing screw or tiny part before we start to assemble the blaster (I haven't started yet) |
|
| Back to top |
|
|
|
|
|
|
|
|
|
|
|
| Author |
Message |
Buch
Community Member
Joined: 27 Feb 2014
Posts: 1184
Location: Copenhagen, Denmark
|
| Posted: Wed Oct 08, 2014 11:49 am Post subject: |
|
|
Have you decided how to go about the bluing, Pierre?
_________________
Monsieur, azonnal kövessen engem bitte |
|
| Back to top |
|
|
|
|
|
|
|
|
|
|
|
| Author |
Message |
Pierre990429
Community Member
Joined: 06 Dec 2012
Posts: 194
Location: France
|
| Posted: Wed Oct 08, 2014 1:49 pm Post subject: |
|
|
I will either
a) not paint anything
b) or only paint (not "blue") the 2 cylinder covers with black gloss paint... (which paint should I use ? I have some "Citadel undercoat black") As I said, I've never done such thing before.
The sight rod looks cool in "metal", so I'll not touch it. |
|
| Back to top |
|
|
|
|
|
|
|
|
|
|
|
| Author |
Message |
stonedog7563
Community Member
Joined: 19 Apr 2007
Posts: 66
Location: Norfolk UK
|
| Posted: Wed Oct 08, 2014 3:20 pm Post subject: |
|
|
After stripping the bluing off mine (Aluminum black to be precise) I noticed thousands of tiny pinhole sized pitting in the surface of the zinc  I've now decided to give any chemical treatment of this a miss, the results are just not predictable enough, plus I'm not after a blued look anyway, I want the Steyr parts to look like bare steel so am now looking into paint I've now decided to give any chemical treatment of this a miss, the results are just not predictable enough, plus I'm not after a blued look anyway, I want the Steyr parts to look like bare steel so am now looking into paint  |
|
| Back to top |
|
|
|
|
|
|
|
|
|
|
|
| Author |
Message |
spinner 44
Community Member

Joined: 06 Nov 2006
Posts: 202
Location: Madrid, Spain
|
| Posted: Thu Oct 09, 2014 2:50 am Post subject: |
|
|
Best finish EVER. IMO, that's it of course.
Not only elegant, clean, but also movie accurate, as it was just released for the factory.
You just made my favourite blaster and will serve as inspitation, thank you 
| VFX Freak wrote: | For anyone tackling this blaster for the first time, it can be daunting if you've never blued zinc before. I built the previous Tomenosuke Pro kit and after a lot of trial and error I was happy with the results. It can be done but it's all about prep and technique. I still haven't weathered mine. Here's what it looks like:
Any color variations you see are more due to reflections in the surface than inconsistencies in the finish. Also notice how light the receiver looks in the 2nd photo. This is also due to reflections as the finish is pretty dark. I think this is a good representation of the finish seen in the movie, minus the weathering of course.
|
|
|
| Back to top |
|
|
|
|
|
|
|
|
|
|
|
| Author |
Message |
Buch
Community Member
Joined: 27 Feb 2014
Posts: 1184
Location: Copenhagen, Denmark
|
| Posted: Thu Oct 09, 2014 3:30 am Post subject: |
|
|
Did you use Birchwood Casey aluminium black? And on the new Tomen kit?? From what you write it sounds like the bluing corroded your the metal parts?! I know that bluing is a type of controlled corrosion, but it shouldn't "meld" holes in the metal... Should it? Has anybody else experienced this? Now I'm getting a bit anxious myself 
| stonedog7563 wrote: | | After stripping the bluing off mine (Aluminum black to be precise) I noticed thousands of tiny pinhole sized pitting in the surface of the zinc I've now decided to give any chemical treatment of this a miss, the results are just not predictable enough, plus I'm not after a blued look anyway, I want the Steyr parts to look like bare steel so am now looking into paint |
_________________
Monsieur, azonnal kövessen engem bitte |
|
| Back to top |
|
|
|
|
|
|
|
|
|
|
|
| Author |
Message |
stonedog7563
Community Member
Joined: 19 Apr 2007
Posts: 66
Location: Norfolk UK
|
| Posted: Thu Oct 09, 2014 5:07 am Post subject: |
|
|
I used it on the last kit (pro) the holes are tiny and not very deep, I sanded them out back to smooth metal and they have all gone, was just a bit scarey. yes I used Birchwood Casey Aluminum Black.
I've been sanding this thing so much now it looks more like a Deringer |
|
| Back to top |
|
|
|
|
|
|
|
|
|
|
|
| Author |
Message |
racprops
Community Member
Joined: 30 Oct 2006
Posts: 2450
Location: Phoenix AZ
|
| Posted: Thu Oct 09, 2014 5:44 am Post subject: |
|
|
A black finish can hide lots of defects and sanding off a black finish can show all of them...
In fact I often use this to help make a cleaner model: a coat of paint then wet sand it, the paint will then show the low spots and defects and pits as you cannot sand them off without more sanding to level it off and get to these spots.
Most metal castings will have some defects..a dual or flat black hides these very well.
Also paint can also FILL these small holes.
When I switched from Paint to polished and chemically treated finish I ran into these very problems...
I would gladly stayed with paint, it hides MANY things...
BUT it is inaccurate and thus wrong...
Rich
_________________
I never have enough time to do all I want to do! |
|
| Back to top |
|
|
|
|
|
|
|
|
|
|
|
| Author |
Message |
stonedog7563
Community Member
Joined: 19 Apr 2007
Posts: 66
Location: Norfolk UK
|
| Posted: Thu Oct 09, 2014 6:18 am Post subject: |
|
|
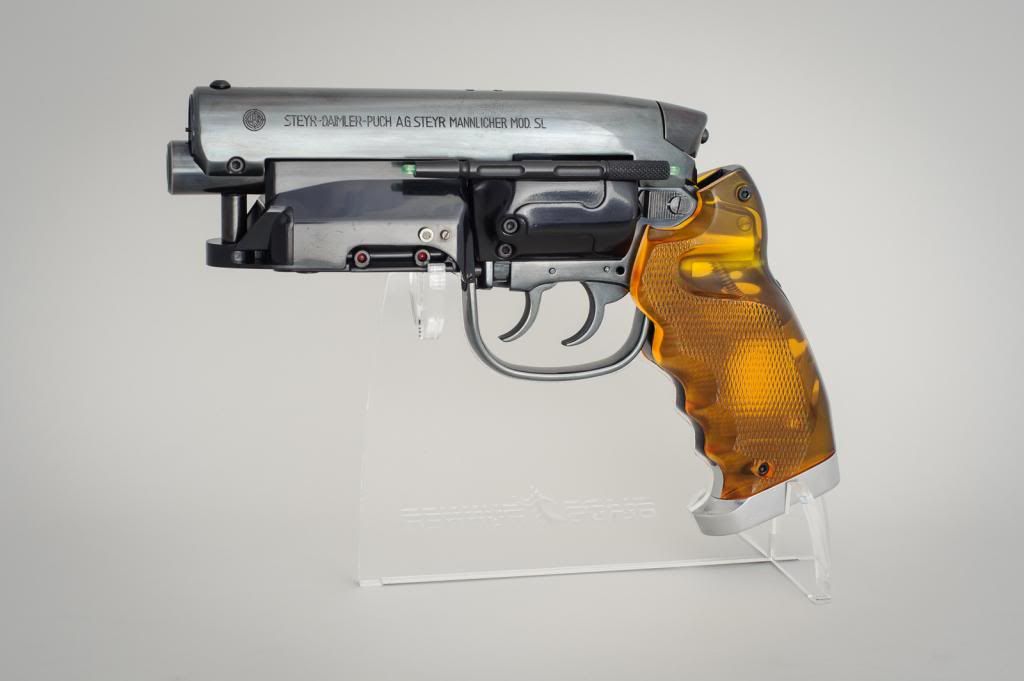
Sort of look/finish I'm after on mine is as pics below, problem I'm having though is making zinc look like bare steel  as it sits it has a high polished look (nice but not what I'm after) I might even knock the shine back a little and see how it dulls naturally. as it sits it has a high polished look (nice but not what I'm after) I might even knock the shine back a little and see how it dulls naturally.

 |
|
| Back to top |
|
|
|
|
|
|
|
|
|
|
|
| Author |
Message |
racprops
Community Member
Joined: 30 Oct 2006
Posts: 2450
Location: Phoenix AZ
|
| Posted: Thu Oct 09, 2014 8:13 am Post subject: |
|
|
I find the small things very interesting…it's my JOB…
I just spotted another small detail that they got wrong…The pin does not float above the barrel it rested right on it.
And the center spike is too long and the detail around the hole the pin comes out is also incorrect...
How they did that wrong with one (or two) of my models on hand and with the same photos we all had I cannot figure...At lease these are not caused my manufacture needs like the moved grip frame pin used to hold the grip frame AND the rear of the trigger guard was done. (also incorrect...)
And yes I Am Nickpicking Ahole...
Rich

PS My model this is correct...it IS my JOB...
_________________
I never have enough time to do all I want to do!
Last edited by racprops on Thu Oct 09, 2014 10:01 am; edited 1 time in total |
|
| Back to top |
|
|
|
|
|
|
|
|
|
|
|
|
You cannot post new topics in this forum
You cannot reply to topics in this forum
You cannot edit your posts in this forum
You cannot delete your posts in this forum
You cannot vote in polls in this forum
|
|
|
|
|
|
|
|


