 |
 |
|
 |
|
| Author |
Message |
racprops
Community Member

Joined: 30 Oct 2006
Posts: 2450
Location: Phoenix AZ
|
 Posted: Thu Apr 08, 2010 9:41 am Post subject: Posted: Thu Apr 08, 2010 9:41 am Post subject: |
 |
|
That maybe true for normal pewter.
I use an alloy that is 98% TIN, and I machine the barrels on a lathe and other parts.
They come out great.
IF you feel the tap may cut too deeply, just start it in a little and back out.
And I put these models together and take them apart a lot, test fitting and blending parts with no notable problems with any threads.
I really worked hard to find a good metal, yes it can have some minor pits, but 89 to 98% of these clean out, and if you do get a part that you cannot clean up, nor live with I will either fix it for you or replace it.
Rich
_________________
I never have enough time to do all I want to do! |
|
| Back to top |
|
|
|
|
 |
|
 |
|
|
|
|
| Author |
Message |
andy
Community Guide

Joined: 01 Nov 2006
Posts: 6237
Location: Rochester, NY
|
| Posted: Thu Apr 08, 2010 10:26 am Post subject: |
|
|
| marsattack wrote: | If I may add, pewter is made up of a combination of alloy ,zinc and antimony . Very soft and unturnable, only good for casting.
Screws will more than likely cross thread prior to tightening.
I found that if the holes are drilled correctly , the actual screw may be used for tapping the hole as the tap may loosen the thread.
Try not to screw and unscrew these screws, test fit and leave it alone.
Also noticed that super glue or cyanoacrylate based glues will fuse this material , so if cross threading occurs dot the screw with super glue prior to screwing......however this will secure the screw in place, making it harder to remove later on.
Hope this helps and great help thread BTW
Marcel |
Actually from what I have learned, most pewters are 85% - 95% tin. Other metals and such are added to keep it from disintigrating into a powder including copper, antimony, bismuth and lead. Antimony isn't even really a metal and also expands as it cools. It is used now to replace lead in most solders and pewters. Zinc was often called "spelter", which "pewter" may be a derivation of.
Andy |
|
| Back to top |
|
|
|
|
|
|
|
|
|
|
|
| Author |
Message |
propsjonnyb
Community Member
Joined: 16 Jul 2009
Posts: 476
Location: Helmdon, Northamptonshire UK
|
| Posted: Thu Apr 08, 2010 2:49 pm Post subject: |
|
|
| If you really want to be accurate copper is the next percentage wise and that's the metal that reacts best to the oxidation process when applying 'Pewter Black' or any other antiqueing product , most are toxic so use protection gloves, mask and eyes - always follow the instructions and have copious amounts of water available. I coat my pieces in layers letting each coat react and repeating the washing drying coating process until I build up the level of 'blackness' I want , I say 'blackness' but since Rich 's alloy has a good copper content the first coat always goes coppery then starts to darken with each subsequent coat , once you've reached the desired level , wash & degrease the piece and allow to dry completely, before sealing the finish , I use a wash of five parts white spirit, to two parts dark brown and one part black acyrillic, mixed and washed over the piece , wipe off with a cotton cloth or rag any excess , the stain sets in the crevices as the white spirit evaporates giving an aged weathered appearance and effectively 'seals' the piece from further darkening. |
|
| Back to top |
|
|
|
|
|
|
|
|
|
|
|
| Author |
Message |
marsattack
Community Member
Joined: 08 Feb 2009
Posts: 63
Location: Melbourne , Australia
|
| Posted: Thu Apr 08, 2010 5:05 pm Post subject: |
|
|
well there you go then!
i should haved googled it and read WIKIPEDIA |
|
| Back to top |
|
|
|
|
|
|
|
|
|
|
|
| Author |
Message |
jameth
Community Member
Joined: 02 Feb 2010
Posts: 825
|
| Posted: Thu Apr 08, 2010 5:11 pm Post subject: |
|
|
What about just painting the pieces. The Hero prop looks like it has a gun metal finish on it.
Would Gun Metal spray paint work???? |
|
| Back to top |
|
|
|
|
|
|
|
|
|
|
|
| Author |
Message |
racprops
Community Member
Joined: 30 Oct 2006
Posts: 2450
Location: Phoenix AZ
|
| Posted: Thu Apr 08, 2010 5:15 pm Post subject: |
|
|
It should, any paint will work.
I do paint the black parts. And with paint you can use fillers and bondo and primer to get a near perfict finish.
It just is there is no paint that will give the textured look of real stained metal.
So the parts that was raw steel I try to treat them with a blacking agent that gives pewter which looks too sliver a more steel look.
Rich
_________________
I never have enough time to do all I want to do! |
|
| Back to top |
|
|
|
|
|
|
|
|
|
|
|
| Author |
Message |
andy
Community Guide
Joined: 01 Nov 2006
Posts: 6237
Location: Rochester, NY
|
| Posted: Thu Apr 08, 2010 5:43 pm Post subject: |
|
|
| marsattack wrote: | well there you go then!
i should haved googled it and read WIKIPEDIA |

Andy |
|
| Back to top |
|
|
|
|
|
|
|
|
|
|
|
| Author |
Message |
propsjonnyb
Community Member
Joined: 16 Jul 2009
Posts: 476
Location: Helmdon, Northamptonshire UK
|
| Posted: Fri Apr 09, 2010 4:44 am Post subject: |
|
|
The trick is of course 'weathering' the pewter black afterwards , I think I've tried every and all combinations listed on this forum at one time or another and I've built a lot of blasters, not so many as Rich but more than most . All are considered good effects - it s a matter of personal taste which one you choose, but ultimately it depends on the effect you want to achieve .
You can spray with a gunmetal metalcoat , but you must use an airbrush set on a finemist spray , then a very soft polish to burnish the finish and then a final coat of clear lacquer
The lead pencil graphite rub is a good one, followed closely by the black boot polish , but I would then seal the graphite with a blast of spray mount and let it dry completely, before using the polish sparingly . |
|
| Back to top |
|
|
|
|
|
|
|
|
|
|
|
| Author |
Message |
Michael
Community Member
Joined: 09 Apr 2010
Posts: 15
|
| Posted: Fri Apr 09, 2010 7:49 pm Post subject: Newbe |
|
|
Ok,
Got my kit this week, and I'm completely new at this. I've got hands on experience with wood, painting and drawing, so I'm not completely intimidated by this. I also have access to a machine shop, they make everything from folding chairs to high precision parts for gov contractors, so I'm sure they have everything I'd need.
While the parts in the kit itself are a little rough, its way better than I thought it would be, given some of the warnings in the propshop thread.
I'd like to screw up as little as possible, although I'm sure I'll so something stupid at some point in the process.
Any of the serious work i can do at the shop, but I also don't want to impose on my friend too much. So much of the work I'd like to do at home by hand.
What's a good basic set of tools I would need to do a good job?
From propsjohnnyb's post I figure a pin vice
What bits and tap sizes would I need?
What range of sand paper?
What kind of polishing compound?
Any other advise
Thanks,
Michael
Last edited by Michael on Fri Apr 09, 2010 7:58 pm; edited 2 times in total |
|
| Back to top |
|
|
|
|
|
|
|
|
|
|
|
| Author |
Message |
Michael
Community Member
Joined: 09 Apr 2010
Posts: 15
|
| Posted: Fri Apr 09, 2010 7:56 pm Post subject: Another Newbe questions |
|
|
Ok,
Another newbe question
I'm trying to get a sense of the order I should approach the various tasks,
This is my question
1 Sand (all parts, apply filler to the painted parts)
2 Polish
3 Drill and tap
4 test fit
5 modify parts
6 test fit
repeat 5 and 6 as necessary
7 final finish
8 final assembly
I know its wont be that cut and dry, but I'm looking for the general order of things
For instance I'm not sure when I should drill and tap, I could also see that happening between the sand and polish steps
Thanks |
|
| Back to top |
|
|
|
|
|
|
|
|
|
|
|
| Author |
Message |
racprops
Community Member
Joined: 30 Oct 2006
Posts: 2450
Location: Phoenix AZ
|
| Posted: Fri Apr 09, 2010 9:07 pm Post subject: |
|
|
1 Sand Yes, mainly remove flash.
2 Drill and tap yes
3 test fit yes
4 modify parts if needed yes
5 Do all of the major sandings now, apply filler to the painted parts.
6 test fit yes
repeat 3,4,5 and 6 as necessary
7 final finish Paint
8 Polish now
9 Metal finish
10 final assembly
For instance I'm not sure when I should drill and tap, I could also see that happening between the sand and polish steps
I would drill and tap first, that way if you slip and did a part, or break off a drill or tap, it will not with hours and hours of work in the part.
Rich
For instance I'm not sure when I should drill and tap, I could also see that happening between the sand and polish steps
I would drill and tap first, that way if you slip and divot a part, or break off a drill or tap, it will not have hours and hours of work in the part.
Rich
_________________
I never have enough time to do all I want to do!
Last edited by racprops on Fri Apr 09, 2010 10:25 pm; edited 1 time in total |
|
| Back to top |
|
|
|
|
|
|
|
|
|
|
|
| Author |
Message |
steevy
Community Member
Joined: 25 Jul 2007
Posts: 389
|
| Posted: Fri Apr 09, 2010 9:45 pm Post subject: |
|
|
| I'm anxious to see what some of the builds come out like.Some guys on this site do great builds. |
|
| Back to top |
|
|
|
|
|
|
|
|
|
|
|
| Author |
Message |
propsjonnyb
Community Member
Joined: 16 Jul 2009
Posts: 476
Location: Helmdon, Northamptonshire UK
|
| Posted: Sat Apr 10, 2010 8:23 am Post subject: |
|
|
I would agree generally with Rich , it nice to have a shop with all the tools to hand but you don't need many , a set of riffer files, screwdrivers , access to a drill, a sander , allen keys ( supplied with the kit ) a soldering iron, a table vice and a few handyman tools will suffice. The drill bits and taps needed, Rich has listed on his photoalbum which shows all stages of a build up and is a very good example to follow .
You want a bottle of degreasser ( white spirit , acetone are two good examples or a degreasing agent from any good motor accessory shop) copioius amounts of water , protective gloves dust masks and eye protection is an absolute - Must Have!! A bottle of 'Pewter Black' available via internet , mail order or any good hobby shop ) A tin of automotive spray primer and a tin of matt black paint.
I was and am continuing to give a working brief and suggestions , as we go through the build stages here, it not a full tutorial but it will explain some of the professional tricks we use to create a successful replica of a film prop and since we are building using an accurately created cast kit by Rich we are going to have some of the best blasters ever when we finish !
I would certainly prep and clean all the flash first , then first pass, sand all the parts smooth , then drill and tap each piece in turn , then sand to polish stage - that 's putting a mirror finish on all parts with 240/440 grit - I tend to use the belt sander for most straight flat surfaces the free belt for curved pieces , then sanding block's
(various grades C,M,F, VF) and sanding sheets, again say course 180, medium 200/220, and fine 240 . When drilling and tapping ensure you clean and deburr the holes as you go.
Then onto polishing , I prefer to use proper polishing compounds which can be bought at most metalwork , hobbyshops or biker build shops, using a bench grinder fitted with polishing mops - but you can buy car auto polish in kits that are equally as good just follow the instructions. I like to start with grey or brown as a first pass, set the grinder going , hold the bar of compound against the spinning wheel for 2 seconds to charge it and then using protective gloves give the piece a good polish - then Green or Yellow on another mop, finishing off with Pink or Blue on a soft cotton mop , the different compounds contain different types of grit and also give a factor of polish finish 9 being the highest ( Pink or Blue)
Vienna Lime Powder ( Yes it does get technical! - actually it is very, very fine chalk powder ) it's used on a cloth as a final clean up to remove and grease marks - don't use too much polish as it'll leave grease streaks on you piece - a sure sign you've used too much compound , the secret is little and often , I some time polish a piece two or three times - before I'm happy with it . If you haven't got a bench polisher a dremmel tool with three different mop heads will do the same job and if you haven't got a dremmel - then a huge amount of fine sanding by hand - will ultimately give you a reasonable result.
Then onto 'pewter blacking' all the parts you want to look like a 'blued' real steel gun ) described above already) then metal finishing, assembly, final weathering and finished !! |
|
| Back to top |
|
|
|
|
|
|
|
|
|
|
|
| Author |
Message |
andy
Community Guide
Joined: 01 Nov 2006
Posts: 6237
Location: Rochester, NY
|
|
| Back to top |
|
|
|
|
|
|
|
|
|
|
|
| Author |
Message |
racprops
Community Member
Joined: 30 Oct 2006
Posts: 2450
Location: Phoenix AZ
|
| Posted: Sat Apr 10, 2010 9:57 am Post subject: |
|
|
When it comes to working on a model the classic saying is measure three times cut once.
I don’t mind the questions and answers if it saves one model even one part from being messed up.
Rich
_________________
I never have enough time to do all I want to do! |
|
| Back to top |
|
|
|
|
|
|
|
|
|
|
|
| Author |
Message |
propsjonnyb
Community Member
Joined: 16 Jul 2009
Posts: 476
Location: Helmdon, Northamptonshire UK
|
| Posted: Wed Apr 14, 2010 5:44 am Post subject: |
|
|
ok Back to the photos , here' s a few shots showing the current level of progress
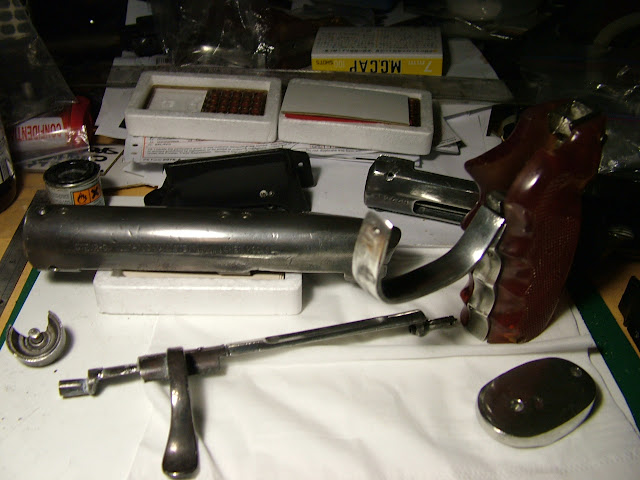
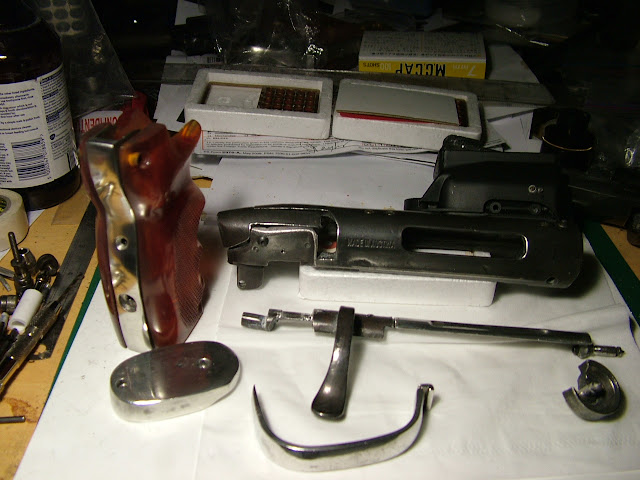
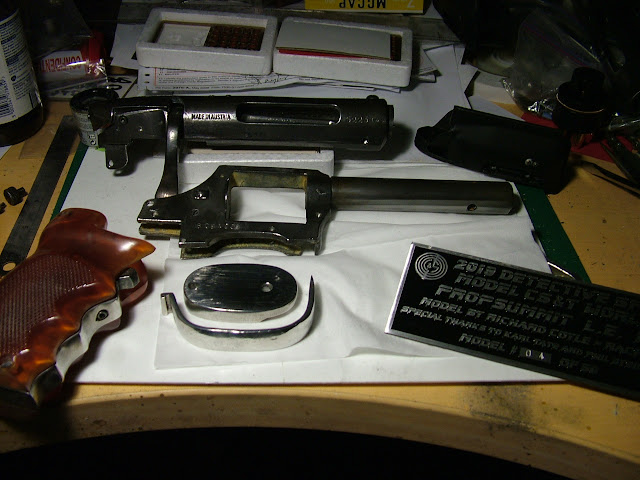
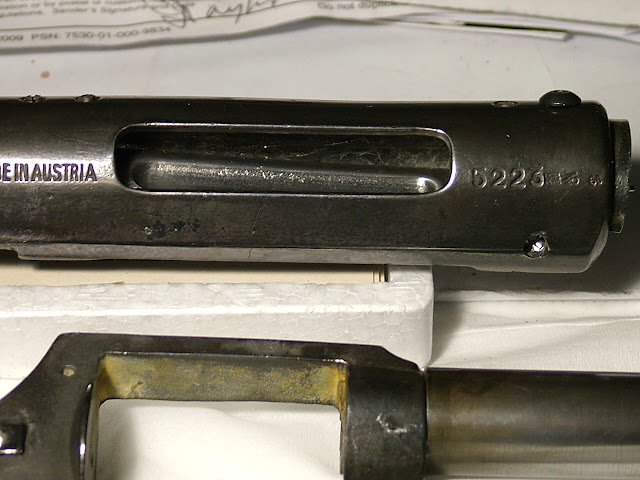
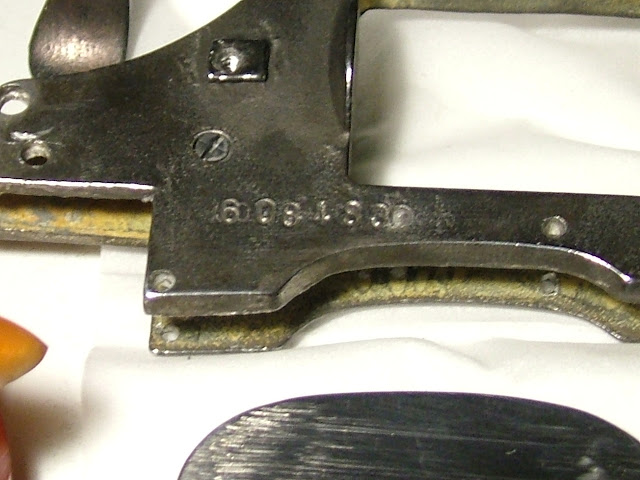
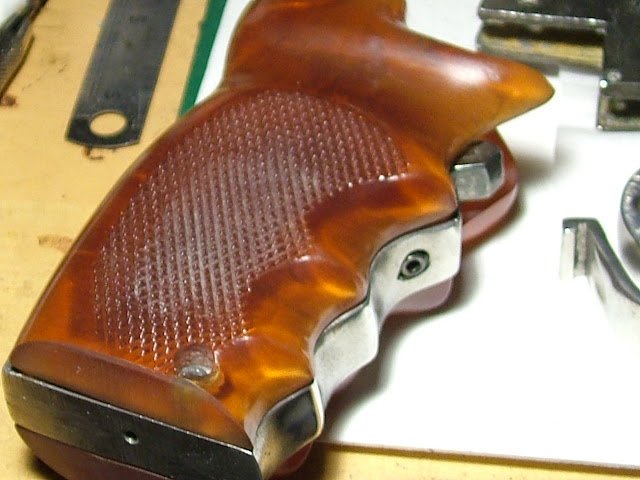
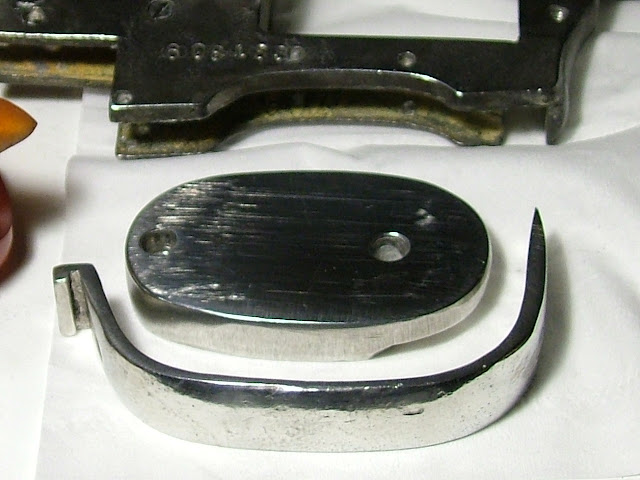
next update handy hints and tips! |
|
| Back to top |
|
|
|
|
|
|
|
|
|
|
|
| Author |
Message |
Gaff87
Community Member

Joined: 05 Oct 2008
Posts: 1727
Location: United Kingdom
|
| Posted: Wed Apr 14, 2010 5:54 am Post subject: |
|
|
Great pics, Propsjonnyb.
Neil |
|
| Back to top |
|
|
|
|
|
|
|
|
|
|
|
| Author |
Message |
joberg
Community Member
.jpg)
Joined: 06 Oct 2008
Posts: 9463
|
| Posted: Wed Apr 14, 2010 6:16 am Post subject: |
|
|
| Lookin' good so far; I love it! Thanks for sharing. |
|
| Back to top |
|
|
|
|
|
|
|
|
|
|
|
| Author |
Message |
ironfist
Community Member

Joined: 10 Feb 2009
Posts: 310
Location: East Hartford,CT
|
| Posted: Wed Apr 14, 2010 3:16 pm Post subject: |
|
|
Rich,
I would love to see some pics of the actual casting pouring process of these parts. I think it would be cool to see there raw state!!!!
_________________
The other Karl! |
|
| Back to top |
|
|
|
|
|
|
|
|
|
|
|
| Author |
Message |
BeastMaster
Community Member

Joined: 19 Jul 2007
Posts: 995
Location: UK
|
| Posted: Tue Apr 20, 2010 9:31 am Post subject: |
|
|
The post at the end that connects the barrel with the LED case is white plastic  this should be a blued metal part. Are there any plans on updating this with a metal version? this should be a blued metal part. Are there any plans on updating this with a metal version?
_________________
"F*ck it, it's just a movie. Let him worry about it" Harrison Ford |
|
| Back to top |
|
|
|
|
|
|
|
|
|
|
|
|
You cannot post new topics in this forum
You cannot reply to topics in this forum
You cannot edit your posts in this forum
You cannot delete your posts in this forum
You cannot vote in polls in this forum
|
|
|
|
|
|
|
|


