 |
 |
|
 |
|
| Author |
Message |
racprops
Community Member

Joined: 30 Oct 2006
Posts: 2450
Location: Phoenix AZ
|
 Posted: Tue Apr 20, 2010 9:52 am Post subject: Posted: Tue Apr 20, 2010 9:52 am Post subject: |
 |
|
I have no plans, with the plastic sleve it is possable to sand a 1/2 round cup for a better fit, and as it seemed so close to the painted parts of the ammo housing I just paint them at the same time.
It is one of those thing that would be done on a real gun and was not most likely due to the rush to get it ready and the fact no one would ever see it on film.
I have found most of my orders have been for a like new model, like what would really have been in the hand of Deckard, than total accurate with damage and flaws of the real prop, specailly with years of storage.
On nice thing about the kit is your free to do it as you want it, and if your inclinded you can do it just like Karl's Pictures show it, right down to all the damages done to it during filming, broken grip and side cover and rust etc.
Rich
| BeastMaster wrote: | The post at the end that connects the barrel with the LED case is white plastic  this should be a blued metal part. Are there any plans on updating this with a metal version? this should be a blued metal part. Are there any plans on updating this with a metal version? |
_________________
I never have enough time to do all I want to do! |
|
| Back to top |
|
|
|
|
 |
|
 |
|
|
|
|
| Author |
Message |
BeastMaster
Community Member

Joined: 19 Jul 2007
Posts: 995
Location: UK
|
| Posted: Tue Apr 20, 2010 5:04 pm Post subject: |
|
|
hmm.. ok. though I still think this part should have been metal as the idea of this kit was going for a more accurate take on the hero.
_________________
"F*ck it, it's just a movie. Let him worry about it" Harrison Ford |
|
| Back to top |
|
|
|
|
|
|
|
|
|
|
|
| Author |
Message |
racprops
Community Member
Joined: 30 Oct 2006
Posts: 2450
Location: Phoenix AZ
|
| Posted: Tue Apr 20, 2010 8:03 pm Post subject: |
|
|
Please reread my post.
With the plastic tube you can do either one you want.
Or go and buy a metal tube if that is what you want.
Rich
_________________
I never have enough time to do all I want to do! |
|
| Back to top |
|
|
|
|
|
|
|
|
|
|
|
| Author |
Message |
propsjonnyb
Community Member
Joined: 16 Jul 2009
Posts: 476
Location: Helmdon, Northamptonshire UK
|
| Posted: Mon Apr 26, 2010 5:51 pm Post subject: |
|
|
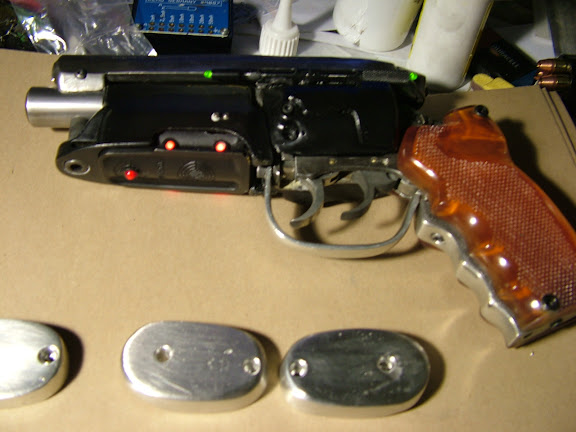
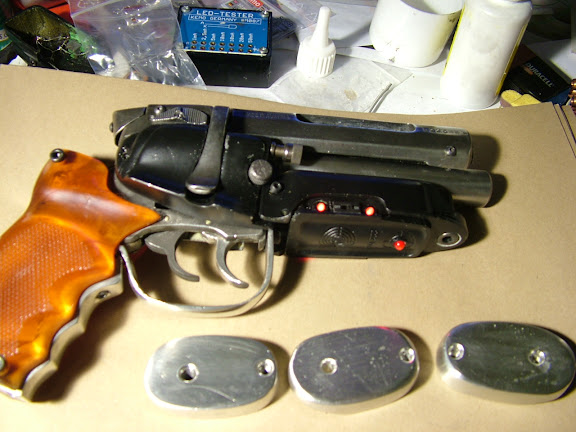
Ok , here are some shots of the virtually completed blaster , now at a stage ready for weathering , I had a couple of slag damaged butt plates that Rich kindly replaced, but I decided to give them a go and tried to turn the 'damage into the feature but plate we all know and love , there shown with a first pass polish , but no weathering yes I've statred slight weathering on the gun , but more is intended. All electronics fitted and working
Right hand Side
Left Hand Side
 |
|
| Back to top |
|
|
|
|
|
|
|
|
|
|
|
| Author |
Message |
Photech
Community Member
Joined: 05 May 2009
Posts: 207
Location: Australia
|
| Posted: Mon Apr 26, 2010 6:22 pm Post subject: |
|
|
Don't mean to be picky but the grip frame and grips look to be out alot.
Is this normal or just that fitting is not completed yet.
_________________
No! 4, 2 - 2, 4. |
|
| Back to top |
|
|
|
|
|
|
|
|
|
|
|
| Author |
Message |
racprops
Community Member
Joined: 30 Oct 2006
Posts: 2450
Location: Phoenix AZ
|
| Posted: Mon Apr 26, 2010 7:02 pm Post subject: |
|
|
I spoted that I need to do a set of pictures on fixing that.
Rich
_________________
I never have enough time to do all I want to do! |
|
| Back to top |
|
|
|
|
|
|
|
|
|
|
|
| Author |
Message |
propsjonnyb
Community Member
Joined: 16 Jul 2009
Posts: 476
Location: Helmdon, Northamptonshire UK
|
| Posted: Tue Apr 27, 2010 3:13 am Post subject: |
|
|
| No you're not being picky just observant, I just wanted to get a gun together, to get a feel for what still needed to be done , the final finishing is not done yet , there are still a few things left do, and I haven't started the weathering - so yes the gripframe is slightly out , I've replaced the white tube, ( ammo box) with a metal one as well , it also has Mspaw's steel sight rod and barrel attached - I built this following Rich's photo album - so I look forward to the update . |
|
| Back to top |
|
|
|
|
|
|
|
|
|
|
|
| Author |
Message |
joberg
Community Member
.jpg)
Joined: 06 Oct 2008
Posts: 9463
|
| Posted: Tue Apr 27, 2010 6:14 am Post subject: |
|
|
As you said: little details to be fixed here and there, but looking good so far  |
|
| Back to top |
|
|
|
|
|
|
|
|
|
|
|
| Author |
Message |
propsjonnyb
Community Member
Joined: 16 Jul 2009
Posts: 476
Location: Helmdon, Northamptonshire UK
|
| Posted: Tue Apr 27, 2010 7:58 am Post subject: |
|
|
| Thanks for the comment Joberg , much appreciated , there is still a bit to do , as I'd like to a truer 'blue' effect on the barrel - 'pewter black' does work but it really needs a couple of application's and rubbing back as Rich suggested in an earlier post, to get it looking 'right ' now comes the tricky part applying the 'rust' to weather the gun - I appreciate Rich's comments about the pristine gun being handed to HF but even that would have had some 'weathering' -just to make it look used to fit in the film's urban /industrial feel. I'm also three quarters way through my other LE build this time, with my conversion kit as the base - pictures to follow shortly |
|
| Back to top |
|
|
|
|
|
|
|
|
|
|
|
| Author |
Message |
racprops
Community Member
Joined: 30 Oct 2006
Posts: 2450
Location: Phoenix AZ
|
| Posted: Tue Apr 27, 2010 11:07 am Post subject: |
|
|
Well a small problem has shown up in the grips and outer frame fitting.
When I ran off the first run I took a couple and built them up, everything seemed to line up fine.
So I packed up and shipped the kits.
Then I started building the next batch of full buildups along with the pick of the litter five to be the deluxe models.
Well I found that a lot of the outer grip frames did not line up as well with the grips. I found I had to bend them to get them to line up.
Then as I started to mount them to the pistol frame again I found they were not lining up on the pistol and again had to bend then and hammer them into place.
One of the nice things is you can do that with this metal.
By the way the trigger guard can use a light tap just in front to bend it backwards to fit it better.
Why is this happening...I can only guess that as the metal cools after being melted at around 600 degrees it shrinks unevenly causing some warpage. Or the heat warps the molds some or both...
I will be putting together a photo folder showing these bending and hammerings and compressions to help you fit these models better.
Things like this have been a part of building these models all along, all castings plastic and metal will come out different and shift in size and fit to some degree, even in a run of 10 or more there will always be some different sized or shaped parts, not more than a few will be the original size and shape.
Fixing those is the harder part of model making.
I will post when I get the pictures posted.
Thanks for your understanding.
Rich
_________________
I never have enough time to do all I want to do! |
|
| Back to top |
|
|
|
|
|
|
|
|
|
|
|
| Author |
Message |
racprops
Community Member
Joined: 30 Oct 2006
Posts: 2450
Location: Phoenix AZ
|
| Posted: Tue Apr 27, 2010 5:40 pm Post subject: |
|
|
These are now in a new folder called Grips and Frames part two.
Hope these help you.
Rich
_________________
I never have enough time to do all I want to do! |
|
| Back to top |
|
|
|
|
|
|
|
|
|
|
|
| Author |
Message |
BeastMaster
Community Member
Joined: 19 Jul 2007
Posts: 995
Location: UK
|
| Posted: Wed Apr 28, 2010 6:18 am Post subject: |
|
|
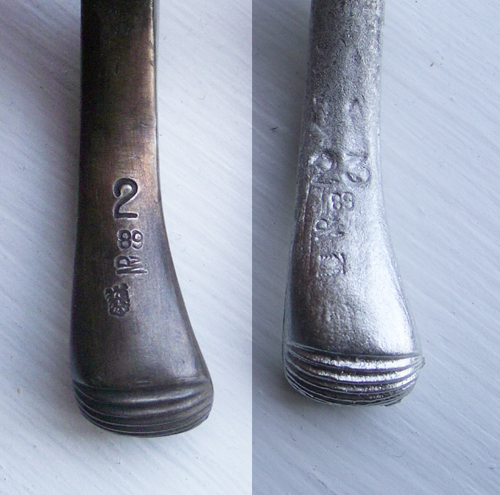
Rich: I sent you an email on this, but I'm hoping the markings turned out alot better on some of your other castings. I really liked the way they looked on the masters.
Also I noticed my die stamps are infact the same size as your markings, so not as huge as you thought  just a tad thicker and more spaced apart. just a tad thicker and more spaced apart.
_________________
"F*ck it, it's just a movie. Let him worry about it" Harrison Ford |
|
| Back to top |
|
|
|
|
|
|
|
|
|
|
|
| Author |
Message |
Staar
Community Member

Joined: 04 Feb 2008
Posts: 757
Location: AUSTRALIA
|
| Posted: Wed Apr 28, 2010 6:59 am Post subject: |
|
|
| BeastMaster wrote: |
|
I sincerely hope you kept your stamps mate because you will need them after you've smoothed all the dents and divots out of those parts…
Regards
MARK
_________________
 |
|
| Back to top |
|
|
|
|
|
|
|
|
|
|
|
| Author |
Message |
racprops
Community Member
Joined: 30 Oct 2006
Posts: 2450
Location: Phoenix AZ
|
| Posted: Wed Apr 28, 2010 7:03 am Post subject: |
|
|
No he won't I am replaceing it with a cleaner casting.
Rich
_________________
I never have enough time to do all I want to do! |
|
| Back to top |
|
|
|
|
|
|
|
|
|
|
|
| Author |
Message |
racprops
Community Member
Joined: 30 Oct 2006
Posts: 2450
Location: Phoenix AZ
|
| Posted: Wed Apr 28, 2010 7:52 am Post subject: |
|
|
Long nights and days meant some came out less and were sent.
I have picked out a nice replacement receiver for him and if I could figure out how to post pictures here I would show it to you.
So I send a copy to him to post.
Rich
_________________
I never have enough time to do all I want to do! |
|
| Back to top |
|
|
|
|
|
|
|
|
|
|
|
| Author |
Message |
BeastMaster
Community Member
Joined: 19 Jul 2007
Posts: 995
Location: UK
|
| Posted: Wed Apr 28, 2010 4:16 pm Post subject: |
|
|
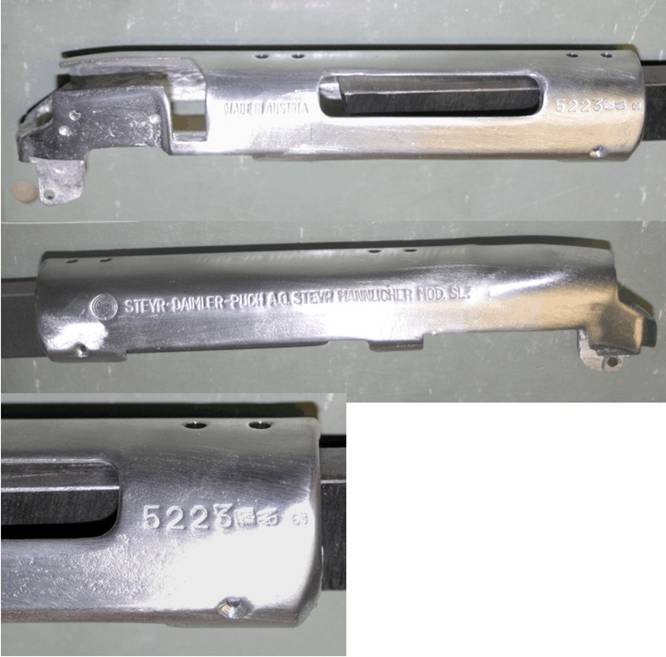
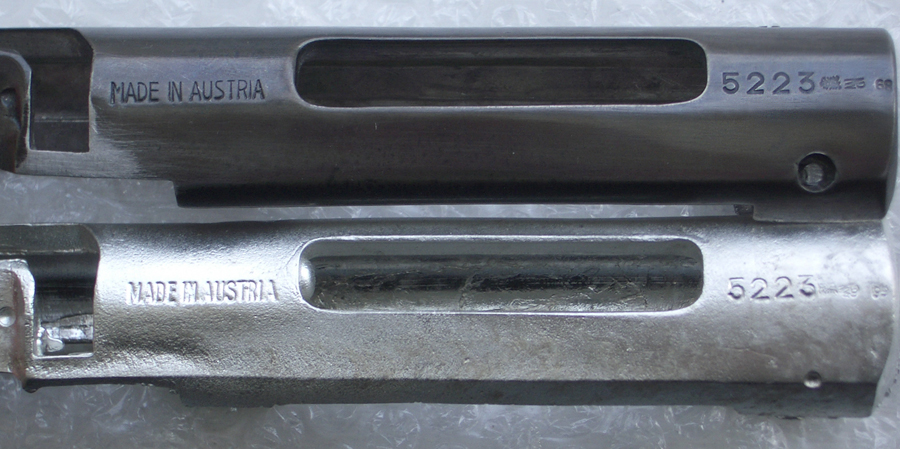
ok here's the new receiver rich has offered to replace with. much nicer casting and the markings seem alot better on this one.
my only problem with it is the nice sharp edges on the castings seem to be lost and it's not something I can sand back in without losing some of the original shape, so would still prefere a raw casting if thats ok.
_________________
"F*ck it, it's just a movie. Let him worry about it" Harrison Ford |
|
| Back to top |
|
|
|
|
|
|
|
|
|
|
|
| Author |
Message |
Staar
Community Member
Joined: 04 Feb 2008
Posts: 757
Location: AUSTRALIA
|
| Posted: Wed Apr 28, 2010 8:48 pm Post subject: |
|
|
| BeastMaster wrote: |
my only problem with it is the nice sharp edges on the castings seem to be lost and it's not something I can sand back in without losing some of the original shape, so would still prefere a raw casting if thats ok. |
That certainly does look better..
Going by the photographs though it seems as if its been cleaned up quite heavily and the result is that those important "sharp edges" you refer to have been lost. I agree it might be better to try and get a raw cast so that you can rework the surface and preserve the angles..
Looking forward to seeing how this develops.
Regards
MARK
_________________
|
|
| Back to top |
|
|
|
|
|
|
|
|
|
|
|
| Author |
Message |
BeastMaster
Community Member
Joined: 19 Jul 2007
Posts: 995
Location: UK
|
| Posted: Thu Apr 29, 2010 5:27 am Post subject: |
|
|
yeah with all the sanding and buffing required it can be easy to lose those edges which I think really define the receiver.
The same thing with the two screw holes at the end. I want to drill them in after all the sanding and polishing to preserve the hard edges around them.
Rich: I dont mind waiting for the new castings. please keep me informed 
_________________
"F*ck it, it's just a movie. Let him worry about it" Harrison Ford |
|
| Back to top |
|
|
|
|
|
|
|
|
|
|
|
| Author |
Message |
E-Wan
Community Member
Joined: 07 Dec 2009
Posts: 22
Location: Los Angeles, CA
|
| Posted: Thu Apr 29, 2010 5:27 pm Post subject: |
|
|
| Question for you Rich - which screw connects the pin at the end of the receiver to the bolt? |
|
| Back to top |
|
|
|
|
|
|
|
|
|
|
|
| Author |
Message |
racprops
Community Member
Joined: 30 Oct 2006
Posts: 2450
Location: Phoenix AZ
|
| Posted: Thu Apr 29, 2010 7:14 pm Post subject: |
|
|
Well there are two screws in the bolt I use 4/40s in both, the pin I drill adn then run a 4/40 3/8 allen head cap screw in the back side of tab adn then sand all down to the cap screw.
The rear cap is a 3/4 inch long 4/40 round head allen screw.
Rich
_________________
I never have enough time to do all I want to do! |
|
| Back to top |
|
|
|
|
|
|
|
|
|
|
|
|
You cannot post new topics in this forum
You cannot reply to topics in this forum
You cannot edit your posts in this forum
You cannot delete your posts in this forum
You cannot vote in polls in this forum
|
|
|
|
|
|
|
|


