 |
 |
|
 |
|
| Author |
Message |
bsgfan12
Community Member
Joined: 15 Jul 2007
Posts: 49
|
 Posted: Wed Sep 03, 2008 2:48 pm Post subject: Why Polish all the parts? Posted: Wed Sep 03, 2008 2:48 pm Post subject: Why Polish all the parts? |
 |
|
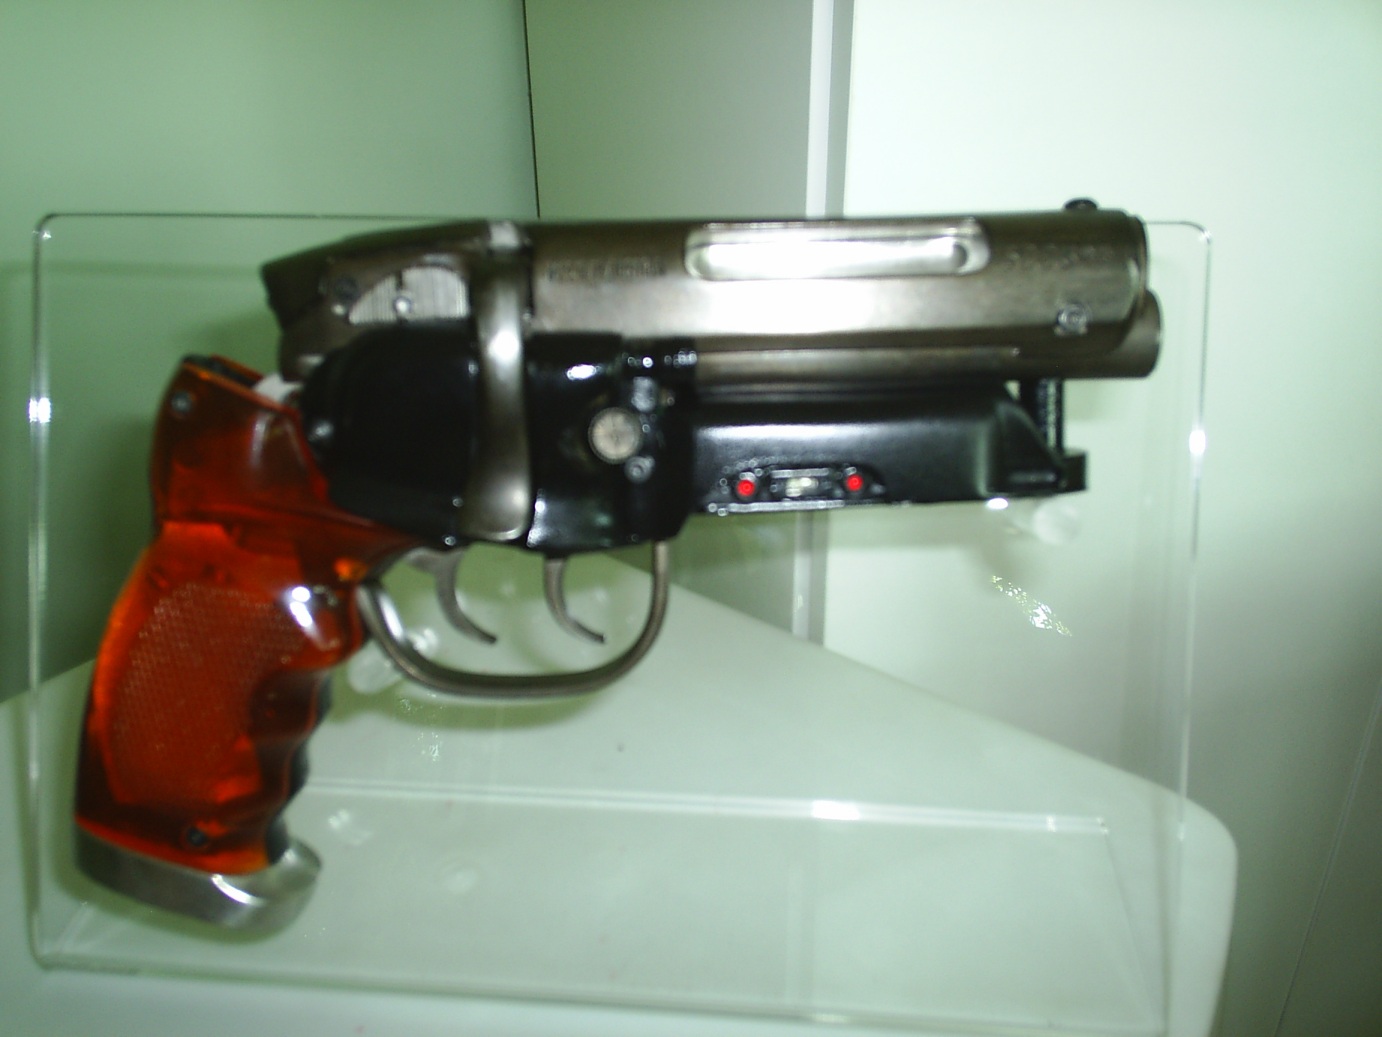
I'm attempting my first sidkit. Without sounding like an idiot, how important is polishing all the parts? If I am going to blue or paint the majority of the parts, do they need to be shiny? I am using steel wool since I don't have a dremel and I can get somewhat of a sheen. Is it to buff out the imperfections of the metal?
Thanks for the help.
________
Jugalettes
Last edited by bsgfan12 on Mon Feb 14, 2011 9:39 pm; edited 1 time in total |
|
| Back to top |
|
|
|
|
 |
|
 |
|
|
|
|
| Author |
Message |
Mr Webber
Community Member

Joined: 13 Apr 2008
Posts: 1824
Location: Terra Australis
|
| Posted: Wed Sep 03, 2008 7:44 pm Post subject: |
|
|
I ended up buying a generic dremel from my hardwear store, it only cost $22 and had all the attatchments with it, brass and wire brush bits etc.
Would have been lost without it. I shined up everything just to make sure all the surfaces were even for painting, or not painting, as Clutch stated, you can only do so much shining before you cant see anymore
improvment and you may damage the metal.
Thanks again Aaron for helping me with that other thing 
_________________
Formerly offworld66 |
|
| Back to top |
|
|
|
|
|
|
|
|
|
|
|
| Author |
Message |
SaberFreak
Community Member
Joined: 24 Jun 2007
Posts: 111
Location: Somewhere in the outer-rim planets
|
| Posted: Sat Sep 06, 2008 11:00 pm Post subject: |
|
|
The polishing is to get rid of all the minute bumps and unevenness on the metal. This is especially crucial in a metal like pewter, since its a very soft metal and the finest lines in the rubber mold can cause a bump and all this will show up and be exaggerated by the bluing, or any kind of stain.
Actually, using a Dremel and a wirebrush is the 'amateur's alternative', since Sid know almost every prop maker/builder would most probably have a Dremel.
The 'professional' way is to use a buffing wheel, combined with buffing compound. You take out much less with a buffing wheel, and give a more even, much higher shine. But its not something easily done on small parts. |
|
| Back to top |
|
|
|
|
|
|
|
|
|
|
|
| Author |
Message |
bsgfan12
Community Member
Joined: 15 Jul 2007
Posts: 49
|
| Posted: Sun Sep 07, 2008 11:39 am Post subject: |
|
|
I have been toiling away all weekend on this. I see what you mean, the bluing seemed to grab certain parts of the barrel. I am going to assume it adds character to my blaster. It is really a learning process. The cylinder won't eject the rounds because there must have been some debris in the cylinder where the rod goes and I ended up pounding it through to get it to fit. And those leds!! I like that it was prewired and the connecting terminal, but I had a heck of a time getting those tiny wires connected. I would have them on and then a second later nothing.
Overall I'm pleased that I did it myself, but it's not going to win any awards.
________
Vaporizer reviews
Last edited by bsgfan12 on Mon Feb 14, 2011 9:39 pm; edited 1 time in total |
|
| Back to top |
|
|
|
|
|
|
|
|
|
|
|
| Author |
Message |
clutch
Community Member

Joined: 12 Dec 2006
Posts: 548
|
| Posted: Tue Sep 09, 2008 10:37 am Post subject: |
|
|
| Dude, that blows away a large percentage of the guns out there. Nice job! |
|
| Back to top |
|
|
|
|
|
|
|
|
|
|
|
| Author |
Message |
bsgfan12
Community Member
Joined: 15 Jul 2007
Posts: 49
|
| Posted: Tue Sep 09, 2008 12:14 pm Post subject: |
|
|
Thanks for the kind words. Now for the next time, did anyone have problems with getting the thumb release to hold the cylinder tightly in place? It doesn't seem to be quite long enough.
________
Super Cub
Last edited by bsgfan12 on Mon Feb 14, 2011 9:39 pm; edited 1 time in total |
|
| Back to top |
|
|
|
|
|
|
|
|
|
|
|
| Author |
Message |
clutch
Community Member
Joined: 12 Dec 2006
Posts: 548
|
| Posted: Tue Sep 09, 2008 12:33 pm Post subject: |
|
|
Well, I managed to snap my pin off, so I have zero functionality. I'm going to try to cobble something together with what I have left.
Really hate this soft metal. A lot of the screws are backing out with metal clogging the threads.
I can't find hex screws the right size anywhere.
Eventually I'll get this together.
BTW, my bag of bits came with an extra hex bolt with a rounded head and a locking nut. Any idea what these are for? |
|
| Back to top |
|
|
|
|
|
|
|
|
|
|
|
| Author |
Message |
bsgfan12
Community Member
Joined: 15 Jul 2007
Posts: 49
|
| Posted: Tue Sep 09, 2008 12:57 pm Post subject: |
|
|
I had an extra washer and nut in mine. I thought the nut was for the screw on the slide that stops the bolt . If I put it on though, it doesn't let the bolt move at all.
The bolt doesn't move as much as his first version. Or at least mine doesn't.
________
SHELBY GR-1
Last edited by bsgfan12 on Mon Feb 14, 2011 9:40 pm; edited 1 time in total |
|
| Back to top |
|
|
|
|
|
|
|
|
|
|
|
| Author |
Message |
Mr Webber
Community Member
Joined: 13 Apr 2008
Posts: 1824
Location: Terra Australis
|
| Posted: Tue Sep 09, 2008 7:02 pm Post subject: |
|
|
Nice job Aaron, is that you in the avatar?......very creative. 
_________________
Formerly offworld66 |
|
| Back to top |
|
|
|
|
|
|
|
|
|
|
|
| Author |
Message |
bsgfan12
Community Member
Joined: 15 Jul 2007
Posts: 49
|
| Posted: Tue Sep 09, 2008 8:29 pm Post subject: |
|
|
No, that's my whitefall polaroid of Harrison Ford as a replicant.
Pretty nifty though.
________
MERCURY BROUGHAM
Last edited by bsgfan12 on Mon Feb 14, 2011 9:40 pm; edited 1 time in total |
|
| Back to top |
|
|
|
|
|
|
|
|
|
|
|
| Author |
Message |
temponaut
Community Member

Joined: 19 Apr 2006
Posts: 440
Location: Tokyo, Japan
|
| Posted: Wed Sep 10, 2008 4:24 am Post subject: |
|
|
Nice job, bsgfan12! That Blaster looks a lot better than you may think! 
(Also, a well-intentioned comment about the display: If that's the stand I think it is, then I believe it was designed to hold the Blaster differently. I believe the rear pin is meant to go inside the trigger guard immediately behind the rear trigger, and the front pin will naturally slide beneath the tip of the barrel. This way, the Blaster will be positioned more evenly on the stand, rather than sitting up above the top edge.)
clutch: I've been watching and reading about your epic build with great interest. Man, it seems as if you've had everything go wrong so far, but still somehow you've got the whole thing looking great. Kudos for your determination, and thanks for sharing so many horror stories that may help the rest of us have easier builds.
I can't speak for Siderio of course, and hope I won't get him deluged with requests by writing this, but I can tell you that in the past, when I told him I wanted to try something experimental with the grips of a Space: 1999 Stun Gun kit I purchased from him, he responded, "Go ahead without fear! If you damage the grips, I'll send you a replacement set at no charge." As it turned out, I didn't need the extra set of grips, but I was so impressed and encouraged by his attitude. In my personal experience he has always been remarkably generous this way.
You might consider shooting Siderio an e-mail. Maybe you could ask to purchase a replacement pin? I'm sure he would accommodate you in one way or another. He really does want to see modelers happy with his kits.
_________________
"Your old titles mean nothing here... Captain!" |
|
| Back to top |
|
|
|
|
|
|
|
|
|
|
|
| Author |
Message |
clutch
Community Member
Joined: 12 Dec 2006
Posts: 548
|
| Posted: Wed Sep 10, 2008 9:38 am Post subject: |
|
|
I've been thinking about my comments and it may sound like I am casting Sid's kits in a negative light. That is not my intention.
I just want to make it clear that this is a GREAT kit.
I've thought about contacting Siderio about parts, but I'm going to try and figure it out on my own first since everything that has gone wrong has been my fault and not the kit's fault. |
|
| Back to top |
|
|
|
|
|
|
|
|
|
|
|
| Author |
Message |
Finbladerunner
Community Member
Joined: 09 May 2008
Posts: 111
Location: Finland
|
| Posted: Sun Sep 14, 2008 10:35 am Post subject: |
|
|
While ago I used my Dremel & wirebrush tool to get nice surface and I did! But what happened... brush didn't last for long and I got these spiky metal brush parts all over my clotches. Ruined them totally. So beware when using the wirebrush. Safety googles are must!!
Before and after the polishing job:
 |
|
| Back to top |
|
|
|
|
|
|
|
|
|
|
|
| Author |
Message |
repdetect
Community Member
Joined: 19 Mar 2007
Posts: 268
Location: FRANCE
|
| Posted: Tue Oct 14, 2008 2:33 pm Post subject: |
|
|
Actually, polish all the parts wasn't a difficulty for me with a good ironwhool, the blue wonder works very well and looks nice...but as a newbie in model building it was a real mess to paint the parts properly !!
I did it with a tiny brush and it looked awfull !...furthermore, when i put the 'finished' blaster in the holster and draw it part of the paint stayed in the holster...a real nightmare !
So, i wonder if someone could help me with some advices...knowing that i don't have any specific gear to do the job like paint pistol and so on ...
For now, i have removed quite easily all this bad looking paint with acetone and i got to polish these parts again, which should be a piece of cake !
_________________
I know what you're thinking...did he fire six shots or only five ?
Well to tell you the truth, in all the excitement i kind of lost track myself... |
|
| Back to top |
|
|
|
|
|
|
|
|
|
|
|
| Author |
Message |
SKIN JOB 66
Community Member

Joined: 16 Jan 2008
Posts: 2724
Location: FRANCE
|
| Posted: Tue Oct 14, 2008 3:59 pm Post subject: |
|
|
| repdetect wrote: | Actually, polish all the parts wasn't a difficulty for me with a good ironwhool, the blue wonder works very well and looks nice...but as a newbie in model building it was a real mess to paint the parts properly !!
I did it with a tiny brush and it looked awfull !...furthermore, when i put the 'finished' blaster in the holster and draw it part of the paint stayed in the holster...a real nightmare !
So, i wonder if someone could help me with some advices...knowing that i don't have any specific gear to do the job like paint pistol and so on ...
For now, i have removed quite easily all this bad looking paint with acetone and i got to polish these parts again, which should be a piece of cake ! |
The friend of mine who built my all metal Sidkit V1 told me that car paint worked very well... actualy, it was the only paint that sticked to Sid's metal gun ! (he repainted it 3 times before applying car paint !)
Hope it'll help...
_________________
THE FUTURE IS A THING OF THE PAST |
|
| Back to top |
|
|
|
|
|
|
|
|
|
|
|
| Author |
Message |
repdetect
Community Member
Joined: 19 Mar 2007
Posts: 268
Location: FRANCE
|
| Posted: Thu Oct 16, 2008 1:08 am Post subject: |
|
|
Hey Fred !....thanks for the tip !
I think i'll have it made by a friend who used to paint small role-playing game figures... he gonna try acrylic paint as the gun is more or less the same metal
_________________
I know what you're thinking...did he fire six shots or only five ?
Well to tell you the truth, in all the excitement i kind of lost track myself... |
|
| Back to top |
|
|
|
|
|
|
|
|
|
|
|
| Author |
Message |
BeastMaster
Community Member

Joined: 19 Jul 2007
Posts: 995
Location: UK
|
| Posted: Fri Jan 16, 2009 2:40 pm Post subject: |
|
|
for those that have polished with the brass brush, will one brush last you for all the parts?
also does the brass brush take off a fair layer of metal? I was thinking I might have to do all the engraving stuff after the polish.
_________________
"F*ck it, it's just a movie. Let him worry about it" Harrison Ford |
|
| Back to top |
|
|
|
|
|
|
|
|
|
|
|
| Author |
Message |
clutch
Community Member
Joined: 12 Dec 2006
Posts: 548
|
| Posted: Sun Jan 18, 2009 2:31 am Post subject: |
|
|
| One brush is sufficient. It's pretty gentle, but you will notice the engraving becoming more shallow after repeated brushings. |
|
| Back to top |
|
|
|
|
|
|
|
|
|
|
|
| Author |
Message |
Bwood
Community Member
Joined: 20 Sep 2009
Posts: 843
|
| Posted: Wed Aug 31, 2011 11:40 am Post subject: |
|
|
I have done the brass-brush dremel thing, but it is not getting the parts very shiny. I want the parts that are going to be blued black to have a mirror finish before bluing. Is this possible with "home" techniques and tools?? Suggestions welcome.  |
|
| Back to top |
|
|
|
|
|
|
|
|
|
|
|
| Author |
Message |
Robotprops
Community Member
Joined: 11 Apr 2010
Posts: 280
Location: Vancouver, B.C.
|
| Posted: Wed Aug 31, 2011 10:52 pm Post subject: |
|
|
| I get nice shines out of very fine steel wool. Even SOS pads work great. I like the results even more than what I get from 2000 grit sandpaper. |
|
| Back to top |
|
|
|
|
|
|
|
|
|
|
|
|
You cannot post new topics in this forum
You cannot reply to topics in this forum
You cannot edit your posts in this forum
You cannot delete your posts in this forum
You cannot vote in polls in this forum
|
|
|
|
|
|
|
|


