 |
 |
|
 |
|
| Author |
Message |
BeastMaster
Community Member

Joined: 19 Jul 2007
Posts: 994
Location: UK
|
 Posted: Thu Jan 08, 2009 5:57 pm Post subject: modifying the sidkit barrel? Posted: Thu Jan 08, 2009 5:57 pm Post subject: modifying the sidkit barrel? |
 |
|
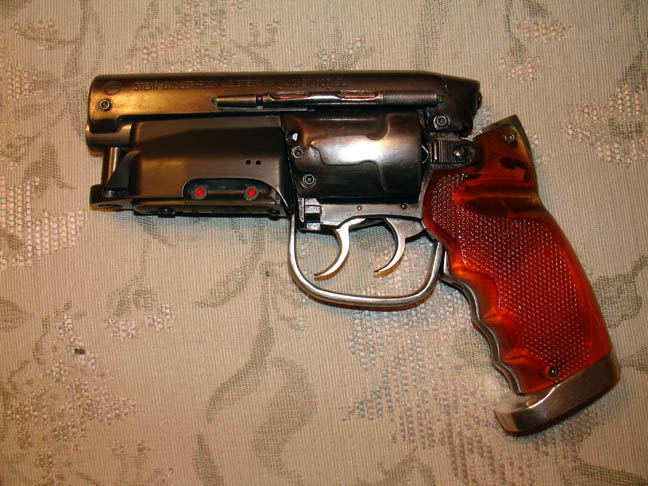
just wondering if anyone has modified or has any ideas on modifying the sidkit barrel to give it that beveled end and smaller hole? preferebly adding to it somehow.
_________________
"F*ck it, it's just a movie. Let him worry about it" Harrison Ford |
|
| Back to top |
|
|
|
|
 |
|
 |
|
|
|
|
| Author |
Message |
chew
Community Member
Joined: 01 Dec 2008
Posts: 120
Location: Brooklyn, NY
|
| Posted: Thu Jan 08, 2009 7:48 pm Post subject: |
|
|
Funny you should mention it. I am planning on doing it tomorrow with a friend who is more familiar with metal than I. The plan so far is to melt down a bullet and pour it in to the back of the open barrel, which will be jammed in to a small flower pot filled with wet sand to stop the flow of metal, essentially turning the first inch in to a solid slug. then boring out the proper diameter hole. I am less concerned with internal accuracy than I am with the front looking right.
It could also be a total disaster.
_________________
I just do eyes. |
|
| Back to top |
|
|
|
|
|
|
|
|
|
|
|
| Author |
Message |
BeastMaster
Community Member
Joined: 19 Jul 2007
Posts: 994
Location: UK
|
| Posted: Thu Jan 08, 2009 9:16 pm Post subject: |
|
|
sounds a bit risky chew, especially since replacements are now a no go. wouldn't pouring the metal into the cylinder instantly melt the barrel? and if it does how well will the sand hold it up?
though that maybe similar to the technique the doctor used for his and it worked out a treat!
http://propsummit.com/viewtopic.php?t=504&highlight=
I don't understand how he shaped it with a soldering iron though 
to be honest I think the best bet is to flatten the end flush, then somehow make a mold of the beveled piece, cast it in the same metal and attach it to the end. bevel and hole in one go and you still got a full hollow barrel 
let me know how it goes 
_________________
"F*ck it, it's just a movie. Let him worry about it" Harrison Ford |
|
| Back to top |
|
|
|
|
|
|
|
|
|
|
|
| Author |
Message |
doc3d
Community Member
Joined: 28 Nov 2008
Posts: 134
Location: Washington
|
| Posted: Thu Jan 08, 2009 10:25 pm Post subject: |
|
|
I have to align with BeastMaster. Risky. Do you know the composition of the alloy? I've been told Sidkits are tin/lead pewter (as opposed to high zinc potmetal).
Melt a bullet, you say... do you know what the bullet alloy is? Unless you've got a pretty solid handle on the metalurgy, it's a pretty big crap shoot.
Re soldering, if you can easily solder to the kit metal, a small torch or a high wattage spatulate tipped gun can add metal. With the Coyle kit I made into a shooting gun, I had to shorten the barrel, fill and remake the front Steyr receiver screw holes, and make a new screw hole on the left side cylinder shroud. Being tin/led "pewter" it was easy. I also used acid core flux solder, and had a tub of flux on hand for redos. Also had a mini-torch fired up... Though for me, strength of the shell wasn't an issue, because everything is hung on a real Charter Arms Bulldog, which is steel and aluminum.
Try to do some testing first, where nothing is going to show-- maybe the area hidden by the Steyr magazine-- and get a feel for the metal.
Whatever, good luck!
The other Doc
I had different issues than you-- different objectives-- but I think we were working with similar metals if yours was "pewter" as opposed to pot metal. (BTW that little extra hole above the 2nd cylinder shroud bolt is to vent chamber gasses. It's not done on the actual prop or any other kits.)
Last edited by doc3d on Fri Jan 09, 2009 9:24 pm; edited 1 time in total |
|
| Back to top |
|
|
|
|
|
|
|
|
|
|
|
| Author |
Message |
chew
Community Member
Joined: 01 Dec 2008
Posts: 120
Location: Brooklyn, NY
|
| Posted: Fri Jan 09, 2009 1:59 am Post subject: |
|
|
the "bullets" are made of the same metal as the gun. They are the ones that came with the gun. Since I plan on loading it with real deactivated shells later they're just spare tin. or pewter, whatever... the barrel jacket is thick enough that it will not instantly melt and once the first inch is solid it will be easy to bore out and reshape.
If all else fails I'll be at a machine shop beggin to have a nw barrel milled anyway! 
_________________
I just do eyes. |
|
| Back to top |
|
|
|
|
|
|
|
|
|
|
|
| Author |
Message |
clutch
Community Member

Joined: 12 Dec 2006
Posts: 548
|
| Posted: Fri Jan 09, 2009 10:23 am Post subject: |
|
|
Mill me one too will ya!  Veering off-topic here, but I wonder how much Russrep would charge us to have some buttplates machined in stainless steel? Veering off-topic here, but I wonder how much Russrep would charge us to have some buttplates machined in stainless steel? |
|
| Back to top |
|
|
|
|
|
|
|
|
|
|
|
| Author |
Message |
chew
Community Member
Joined: 01 Dec 2008
Posts: 120
Location: Brooklyn, NY
|
| Posted: Sat Jan 10, 2009 9:27 am Post subject: |
|
|
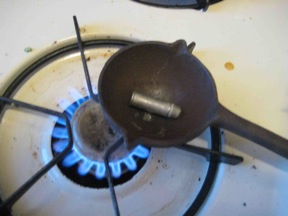
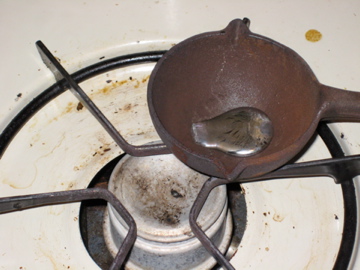
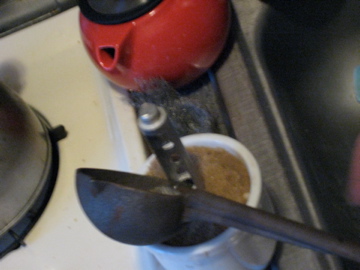
And it worked... sorry I am such a noob I don't have a way to post the photos but we just made a pocket with a finger in a mug of cold wet sand jammed in the barrel re filled from the back with molten "bullet" looked like poo until I re ground it with a dremel fitted with a 5/16" cutting head. It looks like it was machined now. I encourage everyone to try it. Watching the bullet melt so quickly there was an instant urge to quote "Say... That's a NICE bike..."
Oh and an important step is to insert the two screws above and below the barrel so as not to fill their corresponding tapped holes. The screws back right out after the metal cools.
_________________
I just do eyes. |
|
| Back to top |
|
|
|
|
|
|
|
|
|
|
|
| Author |
Message |
BeastMaster
Community Member
Joined: 19 Jul 2007
Posts: 994
Location: UK
|
| Posted: Sat Jan 10, 2009 11:43 am Post subject: |
|
|
Excellent! glad it workedout  definately try and post some pics. Does the barrel feel that much heavier now it is solid? definately try and post some pics. Does the barrel feel that much heavier now it is solid?
I've got one of those large dremel cutters. never used it befor, so I assume you can use it like a normal drill?
_________________
"F*ck it, it's just a movie. Let him worry about it" Harrison Ford |
|
| Back to top |
|
|
|
|
|
|
|
|
|
|
|
| Author |
Message |
joberg
Community Member
.jpg)
Joined: 06 Oct 2008
Posts: 9447
|
| Posted: Sat Jan 10, 2009 4:56 pm Post subject: |
|
|
| Congrats Chew! Cannot wait to see the pics. |
|
| Back to top |
|
|
|
|
|
|
|
|
|
|
|
| Author |
Message |
chew
Community Member
Joined: 01 Dec 2008
Posts: 120
Location: Brooklyn, NY
|
| Posted: Sat Jan 10, 2009 9:09 pm Post subject: |
|
|
It DOES feel heavier super cool!!
if someone pm's me and tells me how to post photos I'll put them up.... I'll be working on the final shaping of the barrel in the next few days.
_________________
I just do eyes. |
|
| Back to top |
|
|
|
|
|
|
|
|
|
|
|
| Author |
Message |
BeastMaster
Community Member
Joined: 19 Jul 2007
Posts: 994
Location: UK
|
| Posted: Sun Jan 11, 2009 7:32 am Post subject: |
|
|
Top right, next to home button you have the upload button
might try this tomorrow when I can get some sand. though thinking of adding an extra 5mm for that bevel. might slightly raise it in the sand to create the extra gap.
_________________
"F*ck it, it's just a movie. Let him worry about it" Harrison Ford |
|
| Back to top |
|
|
|
|
|
|
|
|
|
|
|
| Author |
Message |
chew
Community Member
Joined: 01 Dec 2008
Posts: 120
Location: Brooklyn, NY
|
| Posted: Sun Jan 11, 2009 10:17 am Post subject: |
|
|
see update
_________________
I just do eyes.
Last edited by chew on Mon Jan 12, 2009 2:08 pm; edited 1 time in total |
|
| Back to top |
|
|
|
|
|
|
|
|
|
|
|
| Author |
Message |
chew
Community Member
Joined: 01 Dec 2008
Posts: 120
Location: Brooklyn, NY
|
| Posted: Sun Jan 11, 2009 11:02 am Post subject: |
|
|
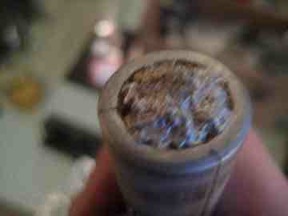
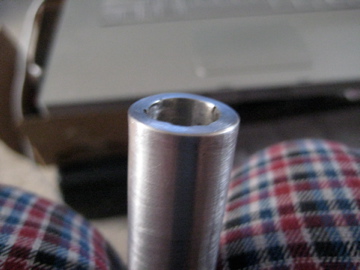
here are the various steps...

_________________
I just do eyes. |
|
| Back to top |
|
|
|
|
|
|
|
|
|
|
|
| Author |
Message |
doc3d
Community Member
Joined: 28 Nov 2008
Posts: 134
Location: Washington
|
| Posted: Sun Jan 11, 2009 12:48 pm Post subject: |
|
|
Nice work, pal!
This is my kind of technology-- done on the kitchen stove!
Doc |
|
| Back to top |
|
|
|
|
|
|
|
|
|
|
|
| Author |
Message |
BeastMaster
Community Member
Joined: 19 Jul 2007
Posts: 994
Location: UK
|
| Posted: Sun Jan 11, 2009 1:59 pm Post subject: |
|
|
nice! cheers for showing the stages looks like this worked out a treat!
Did you drill the hole after?
_________________
"F*ck it, it's just a movie. Let him worry about it" Harrison Ford |
|
| Back to top |
|
|
|
|
|
|
|
|
|
|
|
| Author |
Message |
joberg
Community Member
Joined: 06 Oct 2008
Posts: 9447
|
| Posted: Sun Jan 11, 2009 4:14 pm Post subject: |
|
|
As doc said: K.S.T....Kitchen Stove Tech (try repeating that 10 times fast).
Works from vacu-forming to metal melting! |
|
| Back to top |
|
|
|
|
|
|
|
|
|
|
|
| Author |
Message |
chew
Community Member
Joined: 01 Dec 2008
Posts: 120
Location: Brooklyn, NY
|
| Posted: Sun Jan 11, 2009 6:15 pm Post subject: |
|
|
Hey Thanks guys!!!
I used the same 5/16" cutting bit that someone else suggested in a thread I can't remember which... it looks like a jagged little barrel. then when I was just about to go out and buy a dremel, my wife produces a Foredom Flex shaft rotary tool that she's had since her jewelry making days in college!
_________________
I just do eyes. |
|
| Back to top |
|
|
|
|
|
|
|
|
|
|
|
| Author |
Message |
chew
Community Member
Joined: 01 Dec 2008
Posts: 120
Location: Brooklyn, NY
|
| Posted: Mon Jan 12, 2009 10:24 am Post subject: |
|
|
UPDATE
I actually decided I wasn't happy with the pits in the barrel so I re poured it.
To extend the barrel 1/2" past the end so I would have Plenty to grind down,
I made a little form out of a strip of soda can, wrapped it around the barrel with about one inch extending- securing it in place with packing tape,
I used the sand mold again but made sure only the first half of the aluminum wraparound was touching sand to facilitate a more even pour at the barrel tip,
making sure to then pack cold wet sand as high as I could so as not to cover the same hole from before I melted more metal and poured quick. I also realized that you don't want to cook this stuff for too long, as soon as it melts count to ten and pour quickly!!!
Any way it worked great. I am shaping the bevel at the tip and will post pictures later.
_________________
I just do eyes. |
|
| Back to top |
|
|
|
|
|
|
|
|
|
|
|
| Author |
Message |
eltee
Community Member
Joined: 31 Oct 2006
Posts: 437
Location: West Coast USA
|
| Posted: Mon Jan 12, 2009 11:40 am Post subject: |
|
|
Would there be any interest if real .44 cal barrel stock was used? You can buy rifled barrel stock, cut it and mill it as you see fit and have a real gun steel barrel with rifling and the right bore diameter.
I haven't seen a Sidkit or Coyle barrel unattached to the gun in its entirety so I don't know how much machinework would be involved, but it can't be that complex. If someone can post some pics I can see if it can be done here.
Mind you, I don't have a Sidkit and my Coyle Worldcon is with Rich right now. |
|
| Back to top |
|
|
|
|
|
|
|
|
|
|
|
| Author |
Message |
BeastMaster
Community Member
Joined: 19 Jul 2007
Posts: 994
Location: UK
|
| Posted: Mon Jan 12, 2009 3:09 pm Post subject: |
|
|
look forward to seeing that I got a mate who has a drill press, so might be able to just drill out the hole when done.
did the metal not stick to the aluminium?
_________________
"F*ck it, it's just a movie. Let him worry about it" Harrison Ford |
|
| Back to top |
|
|
|
|
|
|
|
|
|
|
|
|
You cannot post new topics in this forum
You cannot reply to topics in this forum
You cannot edit your posts in this forum
You cannot delete your posts in this forum
You cannot vote in polls in this forum
|
|
|
|
|
|
|
|


