 |
 |
|
 |
|
| Author |
Message |
enero
Community Member

Joined: 20 Nov 2006
Posts: 59
Location: Washington DC
|
 Posted: Sat Oct 10, 2009 8:31 pm Post subject: My (hopefully) on going resin blaster restoration project Posted: Sat Oct 10, 2009 8:31 pm Post subject: My (hopefully) on going resin blaster restoration project |
 |
|
Just thought I'd share with you, the slow and painful process of me trying to reverse some horrible decisions that I made years ago with an old resin blaster kit.
A little background on this kit:
I bought is a long long LONG time ago from Village Comics in NYC. It is believed to be from the late 80's-early 90s. Possibly manufactured by a company called Starline? And possibly created by a follow Propsummit member, Morganthirteen. I'm a bit hazy on the details of this thing. All I know is that I had this kit when I was still living at home with my parents and that was the late 80's. Anyhoo. I was a kid, and had no idea what to do with a hunk of resin, so I made all kinds of terrible choices in the painting of it.
Many many layers of acrylic and lacquer paint. And then finally the nail in the coffin was the coat of white primer that I (tried) to coat it with a few years back (and as you all know, lacquer over acrylic = bad!). Mainly I did this, out of curiosity and spike. yeah yeah, I'm an idiot 
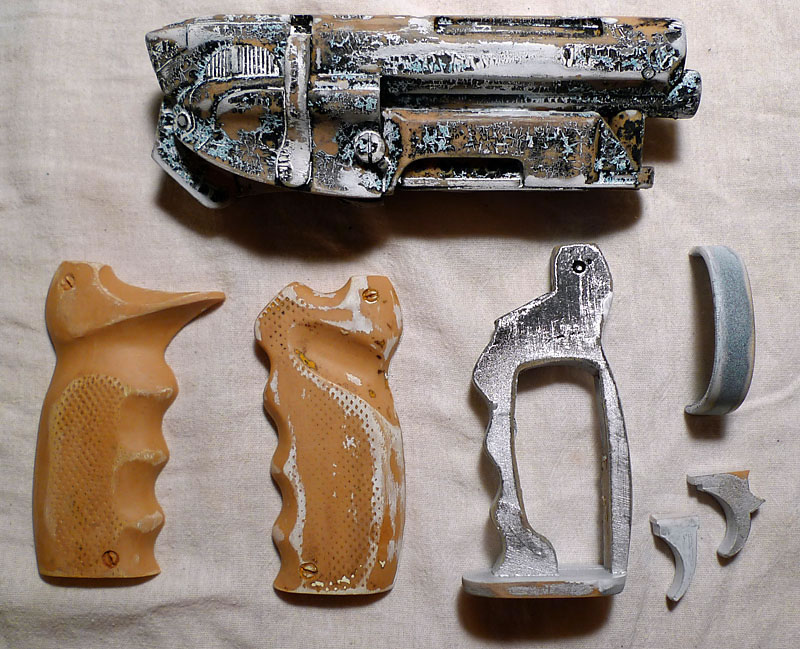
The first picture shows the progress. I didn't think to take pictures before I started. But the thing was pretty much covered with bright white wrinkled, messed up, primer. I got most of the primer off the grips and a good amount off the body. (The grip frame only has silver and black on it)
I have to say. I think the main reason I am posting this is the excitement that I am experiencing from how impressed I am with how amazingly Easy-Off is working. This is about 30 minutes of Easy-off with a good scrubbing with a toothbrush. About 50% off of the body and almost all off the grips. I had no idea that this would be going so smoothly.

Any other reason I'm posting this is in hopes that making this public will make me finish this. Its been living with me for so long that its really time to get this done. I hope to be able to get all the paint off and repaint and finish it properly. I'll be posting more as I go.
If anyone has any suggestions or tips, I'd love to hear it! |
|
| Back to top |
|
|
|
|
 |
|
 |
|
|
|
|
| Author |
Message |
Gaff87
Community Member

Joined: 05 Oct 2008
Posts: 1727
Location: United Kingdom
|
| Posted: Sun Oct 11, 2009 7:11 am Post subject: |
|
|
Can't wait to see more pictures as you progress 
Neil.
p.s
Morganthirteen is a member here  |
|
| Back to top |
|
|
|
|
|
|
|
|
|
|
|
| Author |
Message |
ironfist
Community Member

Joined: 10 Feb 2009
Posts: 310
Location: East Hartford,CT
|
| Posted: Sun Oct 11, 2009 8:18 am Post subject: |
|
|
In another thread, a member says you can remove paint from plastic by soaking the stuff in the cleaner PINESOL. This might be the perfect chance to prove this. I'd get a quart chinese soup container, do test on one of the smaller parts. put it in and filler up over the part. Then see if it works, could take days of soaking. Good luck!
_________________
The other Karl! |
|
| Back to top |
|
|
|
|
|
|
|
|
|
|
|
| Author |
Message |
Noeland
Community Guide
Joined: 24 Oct 2006
Posts: 1328
|
| Posted: Sun Oct 11, 2009 9:28 am Post subject: |
|
|
I've used easy off over cleaner to remove paint from resin with pretty good results. No soaking required, but you have to let the easy off work on the paint a bit before you try and remove it.
_________________
I don't have enough blasters! |
|
| Back to top |
|
|
|
|
|
|
|
|
|
|
|
| Author |
Message |
enero
Community Member
Joined: 20 Nov 2006
Posts: 59
Location: Washington DC
|
| Posted: Sun Oct 11, 2009 2:41 pm Post subject: |
|
|
| ironfist wrote: | | In another thread, a member says you can remove paint from plastic by soaking the stuff in the cleaner PINESOL. This might be the perfect chance to prove this. I'd get a quart chinese soup container, do test on one of the smaller parts. put it in and filler up over the part. Then see if it works, could take days of soaking. Good luck! |
I thought that pinesol only worked for acrylics? I did think about getting a bottle of Pinesol. But was wary because of the whole submerging thing and because it contained oil. I've had so much issues with paint not sticking right on resin kits in the past that I just didnt want to take a chance on it. |
|
| Back to top |
|
|
|
|
|
|
|
|
|
|
|
| Author |
Message |
enero
Community Member
Joined: 20 Nov 2006
Posts: 59
Location: Washington DC
|
| Posted: Sun Oct 11, 2009 2:42 pm Post subject: |
|
|
| Noeland wrote: | | I've used easy off over cleaner to remove paint from resin with pretty good results. No soaking required, but you have to let the easy off work on the paint a bit before you try and remove it. |
Yeah easy-off is pretty sweet and not having to dunk it makes me feel a little safer in the process. I wish I had known about this years ago. So many kits going by the way side because of bad paint jobs.... |
|
| Back to top |
|
|
|
|
|
|
|
|
|
|
|
| Author |
Message |
The Loyalizer
Community Member

Joined: 08 Oct 2007
Posts: 742
Location: Down in 4th Sector, Chinatown
|
| Posted: Sun Oct 11, 2009 4:38 pm Post subject: |
|
|
The best way I've found to remove acrylics is to soak the piece in warm water for a couple days. Once acrylic has dried its largely a thin layer of plastic. The warm water will soften it up and then a good scrubbing should pull it off the plastic.
_________________

"We began to recognize in them a strange obsession..."
http://fcomin.cgsociety.org/gallery/ |
|
| Back to top |
|
|
|
|
|
|
|
|
|
|
|
| Author |
Message |
hole dweller
Community Member

Joined: 13 Aug 2009
Posts: 78
Location: Canada
|
| Posted: Sun Oct 11, 2009 5:02 pm Post subject: |
|
|
There are many ways to strip the paint.
Oven cleaner woks well but it is very corrosive and toxic.
Bake fluid works great but it can on occasion soften the resin and it leaves and oily film.
Dawn Power Dissolver is the newest, best thing for stripping kits. Lots of builders on the model kit forums use it.
Gary
_________________
WWW.GFORCEMODELS.COM |
|
| Back to top |
|
|
|
|
|
|
|
|
|
|
|
| Author |
Message |
ironfist
Community Member
Joined: 10 Feb 2009
Posts: 310
Location: East Hartford,CT
|
|
| Back to top |
|
|
|
|
|
|
|
|
|
|
|
| Author |
Message |
Staar
Community Member

Joined: 04 Feb 2008
Posts: 757
Location: AUSTRALIA
|
| Posted: Sun Oct 11, 2009 11:28 pm Post subject: |
|
|
Wow.. it looks like you've got your work cut out for you mate...
The thought that immediately comes to mind is that you will possibly find that the integrity of the casting will be quite badly hammered - i.e. the sharp edges of the various blaster parts will be soft or pitted. Likewise some of the other finer details that existed in the original cast will be seriously compromised..?
Because this is possibly going to be the case you might choose to take a look at the blaster Rick made that looked like a 'relic' discovery - rusted and beautifully corroded to look like a future weapon that had been unearthed in a archeological dig somewhere...
I'm not sure if this is an option for you and I don't know sure where I saw the pix, but I'm sure either a search or another member might have them to hand for you to look at..
Either way, I'm looking forward to seeing how you get one. Arguably one of the more challenging blaster projects underway at the moment??
Best of luck!
_________________
 |
|
| Back to top |
|
|
|
|
|
|
|
|
|
|
|
| Author |
Message |
enero
Community Member
Joined: 20 Nov 2006
Posts: 59
Location: Washington DC
|
| Posted: Mon Oct 12, 2009 4:11 am Post subject: |
|
|
| Staar wrote: | | The thought that immediately comes to mind is that you will possibly find that the integrity of the casting will be quite badly hammered - i.e. the sharp edges of the various blaster parts will be soft or pitted. Likewise some of the other finer details that existed in the original cast will be seriously compromised..? |
Hey Staar, this thing was such a bad cast to begin with that I'm not too worried. Much of the edges were pretty worn away from the get go. This thing is the worst quality model you could get! Giant holes, paper thin spots, completely pock-marked. I bought it coz it was the only one I could afford as a kid (I think I got it for like 80 bucks). It was better then nothing at the time. And it holds a special place in my heart coz it was my first
| Staar wrote: | | Because this is possibly going to be the case you might choose to take a look at the blaster Rick made that looked like a 'relic' discovery - rusted and beautifully corroded to look like a future weapon that had been unearthed in a archeological dig somewhere... |
Its funny you mention RR's "Relic" coz tonight, after the third Easy-Off coating, it was the first thing that came to mind when I washed off all the crud!
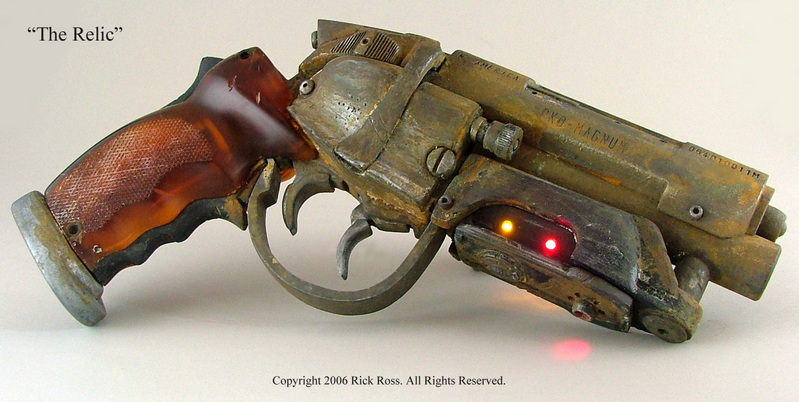
When all is said and done, I'll most likely go with a weathered/distressed look. It's probably the easiest way to go.
And thanks for the luck, I'm gonna need it! |
|
| Back to top |
|
|
|
|
|
|
|
|
|
|
|
| Author |
Message |
enero
Community Member
Joined: 20 Nov 2006
Posts: 59
Location: Washington DC
|
| Posted: Mon Oct 12, 2009 4:21 am Post subject: |
|
|
| The Loyalizer wrote: | | The best way I've found to remove acrylics is to soak the piece in warm water for a couple days. Once acrylic has dried its largely a thin layer of plastic. The warm water will soften it up and then a good scrubbing should pull it off the plastic. |
What acrylic that was exposed come right off (with zero effort) with (non-acetone) nail polish remover. The problem with this guy is that there was at least 4 coats of paint on it. For some reason what looks to me some sort of metallic blue enamel base, then an acrylic brown, THEN acrylic black, and finally that craptastic Mr. Base White 1000 lacquer primer. |
|
| Back to top |
|
|
|
|
|
|
|
|
|
|
|
| Author |
Message |
andy
Community Guide

Joined: 01 Nov 2006
Posts: 6237
Location: Rochester, NY
|
| Posted: Mon Oct 12, 2009 4:23 am Post subject: |
|
|
Yep, that is the gun made by Shawn Morgan, Originally sold by Universal Armorer. It would have to be Early 90's instead of late 80's though.
I own Shawn's wood masters for that kit. I am missing the triggers though, so if you ever decide to mold them let me know. actually if you could trace them out for me I could cut out my own to fill the missing parts.
I can't wait to see how this comes out.
Andy |
|
| Back to top |
|
|
|
|
|
|
|
|
|
|
|
| Author |
Message |
enero
Community Member
Joined: 20 Nov 2006
Posts: 59
Location: Washington DC
|
| Posted: Mon Oct 12, 2009 4:52 am Post subject: |
|
|
| andy wrote: | Yep, that is the gun made by Shawn Morgan, Originally sold by Universal Armorer. It would have to be Early 90's instead of late 80's though.
I own Shawn's wood masters for that kit. I am missing the triggers though, so if you ever decide to mold them let me know. actually if you could trace them out for me I could cut out my own to fill the missing parts.
I can't wait to see how this comes out.
Andy |
wow, do you have pics up of the wood master? I would love to see what that looks like! I guess the early 90's would make sense, as I remember playing with it throughout college...
PM me your email and I will send a scan of the tracing! |
|
| Back to top |
|
|
|
|
|
|
|
|
|
|
|
| Author |
Message |
andy
Community Guide
Joined: 01 Nov 2006
Posts: 6237
Location: Rochester, NY
|
| Posted: Mon Oct 12, 2009 5:18 am Post subject: |
|
|
Posted here before, the top right gray one is the wood master minus the buttplate and trigger guard that I do have with it, alongside a few of my other versions of the gun...
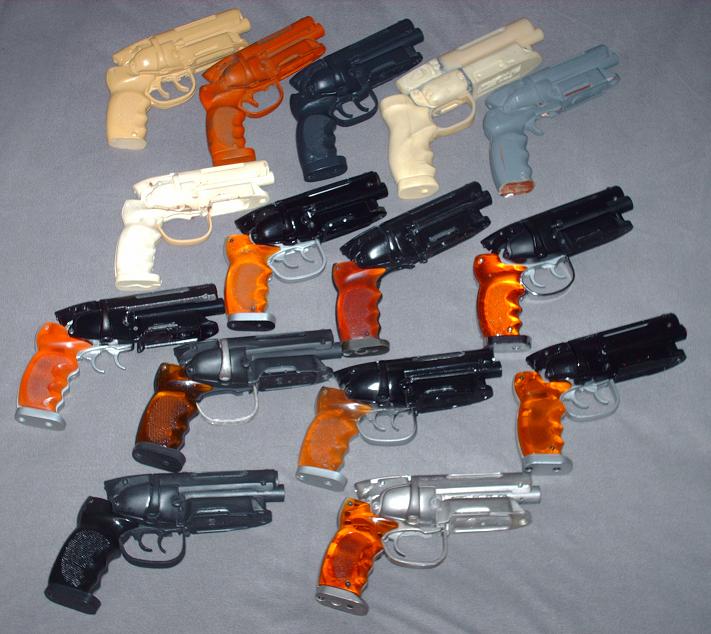
Along side a stunt casting and letter from Shawn.

Andy |
|
| Back to top |
|
|
|
|
|
|
|
|
|
|
|
| Author |
Message |
joberg
Community Member
.jpg)
Joined: 06 Oct 2008
Posts: 9463
|
| Posted: Mon Oct 12, 2009 1:47 pm Post subject: |
|
|
I love those "raising from the dead" kind-o-project...gives the stuff a new life!  |
|
| Back to top |
|
|
|
|
|
|
|
|
|
|
|
| Author |
Message |
enero
Community Member
Joined: 20 Nov 2006
Posts: 59
Location: Washington DC
|
| Posted: Tue Oct 13, 2009 2:50 am Post subject: |
|
|
| andy wrote: |
Andy |
wow, it's really something to see it in it's original form. Its so different then the mangled mess that's sitting on my table! |
|
| Back to top |
|
|
|
|
|
|
|
|
|
|
|
| Author |
Message |
enero
Community Member
Joined: 20 Nov 2006
Posts: 59
Location: Washington DC
|
| Posted: Mon Oct 19, 2009 6:06 pm Post subject: |
|
|
Here are the triggers for Andy and anyone else who wants them for reference.

Here is a hi-res PSD version of the image:
http://files.me.com/digi6pack/11onvu |
|
| Back to top |
|
|
|
|
|
|
|
|
|
|
|
| Author |
Message |
andy
Community Guide
Joined: 01 Nov 2006
Posts: 6237
Location: Rochester, NY
|
| Posted: Tue Oct 20, 2009 1:00 am Post subject: |
|
|
Thank you very much, 
Andy |
|
| Back to top |
|
|
|
|
|
|
|
|
|
|
|
| Author |
Message |
enero
Community Member
Joined: 20 Nov 2006
Posts: 59
Location: Washington DC
|
| Posted: Tue Oct 20, 2009 1:32 am Post subject: |
|
|
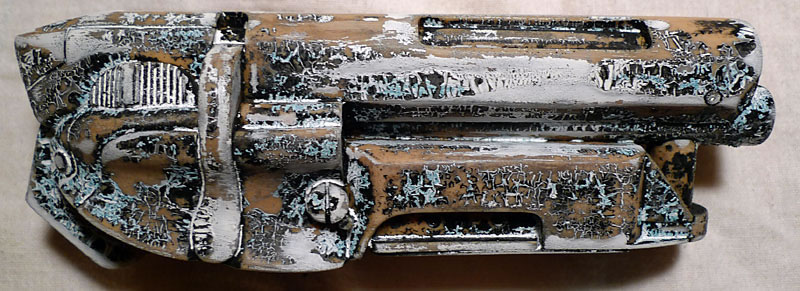
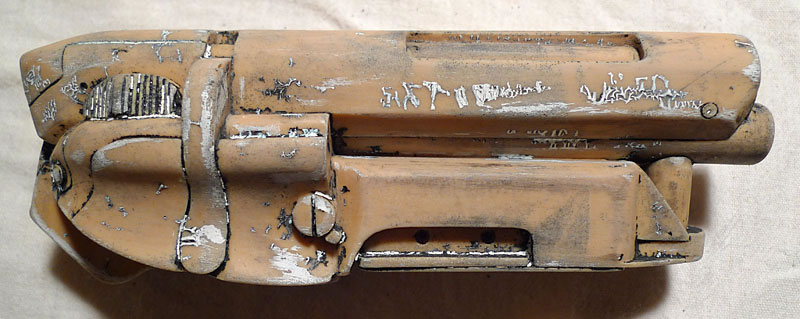
Just a quick up date to my progress. I got as much paint off as I'm going to get. Did about 5 applications of Easy-Off and then for the stuff that just wouldnt budge, I gave all the pieces a quick Thinner bath. Now it's time for sanding and clean up!
 |
|
| Back to top |
|
|
|
|
|
|
|
|
|
|
|
|
You cannot post new topics in this forum
You cannot reply to topics in this forum
You cannot edit your posts in this forum
You cannot delete your posts in this forum
You cannot vote in polls in this forum
|
|
|
|
|
|
|
|


