 |
 |
 |
 |
 |
| Author |
Message |
Staar
Community Member

Joined: 04 Feb 2008
Posts: 757
Location: AUSTRALIA
|
 Posted: Wed Oct 05, 2011 5:48 am Post subject: Blade Runner Goldberg Arms Snub Nose PKD - A Review Posted: Wed Oct 05, 2011 5:48 am Post subject: Blade Runner Goldberg Arms Snub Nose PKD - A Review |
 |
|
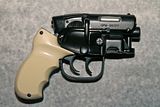
When Visual Effects Supervisor Dave Goldberg started a thread here on Propsummit regarding a new blaster he was planning I was intrigued. Not only was he adding value to the BR franchise but he was building a unique blaster model with such pristine precision that it promised to be something special. Fast forward a couple of months and Dave had refined the design in Rhino, milled the parts and had them ready for shipping to willing buyers.
The kit when it arrived, proved to be as special as it promised to be. I have built a number of these blasters over the years and in my opinion the Rick Ross PKD and the Sidkit have sported the cleanest casts but the parts Goldberg arms produced are the most impeccably cast kit parts I have ever had the pleasure of working with.


Every part of the kit has been expertly produced and extreme care had been taken in working out how each piece fitted into the other. A lot of thought had also gone into pre-cutting the grip screws and giving advice regarding trimming, sanding, finishes, glue types and finishes. Aside from some small areas that required minimal sanding and one area on the upper receiver that required the removal of excess webbing this is an exceptionally produced kit and the only small flaw were two tiny bubbles that needed to be filled. The quality of the materials is top-drawer, the part edges are sharp and uncompromising and the grips are crystal clear.

Because I usually favor the worn and extremely weathered look for my BR blasters I decided this time to finish the Goldberg Arms Snub Nose as cleanly as I could - emulating the polished finish on the fabulous Tomenosuke blaster. The end result was exactly what I had hoped for - clean sharp and perfect - but I was in a way dissatisfied because, it looked too clean and pristine for my tastes. Deciding then and there to take it to the next level, instead of heavily weathering the metal parts with rust and grime, I chose to rather have the blaster feature worn blueing from a lot of use. In the end, I felt that the solution I came up with aesthetically ticked all the hard-world boxes required by the Blade Runner genre without the gun ending up looking like it had been kicked around a football field in the rain.
This is in my opinion a fantastic kit, expertly conceived, perfectly produced, worth every penny and certainly a worthy addition to the Blade Runner franchise.

Cheers Dave.. you’ve done a terrific thing here mate!
Regards and best
MARK
_________________
 |
|
| Back to top |
|
 |
|
 |
 |
 |
 |
 |
 |
 |
 |
| Author |
Message |
Daddy Solo
Community Member

Joined: 03 Jan 2011
Posts: 72
Location: NY
|
 Posted: Wed Oct 05, 2011 9:56 pm Post subject: Posted: Wed Oct 05, 2011 9:56 pm Post subject: |
 |
|
Well said and awesome job!!!! I built mine last week after watching Dave's thread grow with amazing post after amazing post. Cheers 

_________________
 |
|
| Back to top |
|
 |
|
 |
 |
 |
 |
 |
 |
 |
 |
| Author |
Message |
joberg
Community Member
.jpg)
Joined: 06 Oct 2008
Posts: 9466
|
 Posted: Fri Oct 07, 2011 6:51 am Post subject: Posted: Fri Oct 07, 2011 6:51 am Post subject: |
 |
|
It's a beauty people  and the results showed in this thread are the result of a well thought off kit by Dave. and the results showed in this thread are the result of a well thought off kit by Dave.
Tks for the review Staar and the very good result achieved  |
|
| Back to top |
|
 |
|
 |
 |
 |
 |
 |
 |
 |
 |
| Author |
Message |
DaveG
Community Member
Joined: 13 Mar 2011
Posts: 373
Location: Southern Calif.
|
 Posted: Sat Oct 08, 2011 11:55 pm Post subject: Posted: Sat Oct 08, 2011 11:55 pm Post subject: |
 |
|
Wow, Mark! Thanks for the great review! I'm glad the kit has been so well received. Your paint finish looks great! It fits right in with the other blasters in your collection.
_________________
Dave
"I just want to say people... Get A Life! Move out of your parent's basement! It's just a movie!" |
|
| Back to top |
|
 |
|
 |
 |
 |
 |
 |
 |
 |
 |
| Author |
Message |
Bwood
Community Member
Joined: 20 Sep 2009
Posts: 843
|
 Posted: Mon Oct 10, 2011 11:53 am Post subject: Posted: Mon Oct 10, 2011 11:53 am Post subject: |
 |
|
Too soon for the all-metal, fully functional version?  |
|
| Back to top |
|
 |
|
 |
 |
 |
 |
 |
 |
 |
 |
| Author |
Message |
Quarryman
Joined: 24 Oct 2011
Posts: 3
|
 Posted: Fri Oct 28, 2011 5:43 am Post subject: Posted: Fri Oct 28, 2011 5:43 am Post subject: |
 |
|
| Hi all. I'm new to this forum. I was drawn here by Dave's fabulous kit. I have one I'm working on as well. I'm fascinated by the metallic finish you have here. Could you please describe your process a little? It really looks great and I'm very curious about your technique here. Thanks. |
|
| Back to top |
|
 |
|
 |
 |
 |
 |
 |
 |
 |
 |
| Author |
Message |
Staar
Community Member

Joined: 04 Feb 2008
Posts: 757
Location: AUSTRALIA
|
 Posted: Sat Oct 29, 2011 8:35 am Post subject: Posted: Sat Oct 29, 2011 8:35 am Post subject: |
 |
|
Quarryman --
Cheers for the kind words mate. There are a number of ways to get a metallic finish on the blaster one of which is described by Dave himself in his thread. I wanted a slightly more 'worn' look to my snubby so I worked it up slightly differently.
Firstly, I primed the entire blaster with a flat black finish which not only gives the model a tough coating but, it also gives me a neutral pallet on which to work. The black also sits well in the recesses so it enhances a natural weathering in the nooks and corners.
Second, using a new product I found called Liquid Pencil by Derivan (grey 3) I lightly worked over the metal parts to add a graphite sheen to the flat black metal areas. I must stress that this should be done carefully because its a fairly thick paste which can easily clog up the fine detail of the model. Used properly however, it enhances the metal parts very nicely.
Third. Using crushed graphite pencil, I rubbed in the shavings onto the areas where I wanted more wear and tear. Logically, this is around the triggers, and body (near the bolt) and a few other areas which would tend to be rubbed through use. Once finished, I sealed it all with artists fixative spray which I find dulls the graphite finish to a lesser extent than the usual sealants.
Lastly, using pewter Rub and Buff, I gently rubbed the slightly brighter finish over the sealed graphite - again, where wear and tear would be more evident and carefully blending it into the sealed graphite surfaces making sure there is no harsh line. I emphasised the end of the barrel, the front of the receiver, the rear of the receiver and the protruding edges of the bolt. The trigger and the trigger guard, the raised edges of the sight rod and the cylinder release mechanism. I use my finger and apply the Rub n Buff sparingly slowly building the exposed metal until it reaches that fine point where its aesthetically pleasing to the eye. Remembers - Less is More!
I also treated the screws (not those on the grip) in similar fashion and finished the other areas (the side covers and the magazine) in a sharp satin black - a nice contrast to the exposed metal.
BTW, if you are not comfortable using the liquid pencil, you will achieve a very similar result with only crushed graphite (a 6B pencil). Since the Liquid pencil is hard to apply and if you've never done it before, you can carefully build up your graphite rubbed areas and achieve a very satisfactory metal finish before sealing and applying the Rubb n Buff.
To enhance the 'used' look I applied - again, very carefully - a thin build-up of hi-gloss varnish to areas around the safety catch, the inside areas of the bolt, the parts where the triggers meet the frame as well as around the cylinder release catch to emulate gun oil sitting in the reassesses. Its a subtle thing but without drawing too much attention to itself, it makes the blaster look primed and ready - without it actually leaking real oil onto your display or onto your desk.
Good luck and please let us see how your blaster turns out.
Regards and best
MARK
_________________
 |
|
| Back to top |
|
 |
|
 |
 |
 |
 |
 |
 |
 |
 |
| Author |
Message |
joberg
Community Member
.jpg)
Joined: 06 Oct 2008
Posts: 9466
|
 Posted: Sat Oct 29, 2011 4:35 pm Post subject: Posted: Sat Oct 29, 2011 4:35 pm Post subject: |
 |
|
Thanks Mark for explaining those wonderful techniques  It makes your guns stand out! It makes your guns stand out! |
|
| Back to top |
|
 |
|
 |
 |
 |
 |
 |
 |
 |
 |
| Author |
Message |
Quarryman
Joined: 24 Oct 2011
Posts: 3
|
 Posted: Sun Oct 30, 2011 5:45 am Post subject: Posted: Sun Oct 30, 2011 5:45 am Post subject: |
 |
|
| Thank you very much for such a thorough, detailed explanation. I see it's these various layers that add that depth you've achieved. Impressive. Thanks again. |
|
| Back to top |
|
 |
|
 |
 |
 |
 |
 |
 |
 |
 |
|
You cannot post new topics in this forum
You cannot reply to topics in this forum
You cannot edit your posts in this forum
You cannot delete your posts in this forum
You cannot vote in polls in this forum
|
|
 |
 |
 |
 |
|
 |


