 |
 |
|
 |
|
| Author |
Message |
Baron Von Blondle
Community Member

Joined: 21 Sep 2010
Posts: 101
Location: In Trouble
|
 Posted: Mon Aug 08, 2011 2:03 pm Post subject: another PDK resin kit build Posted: Mon Aug 08, 2011 2:03 pm Post subject: another PDK resin kit build |
 |
|
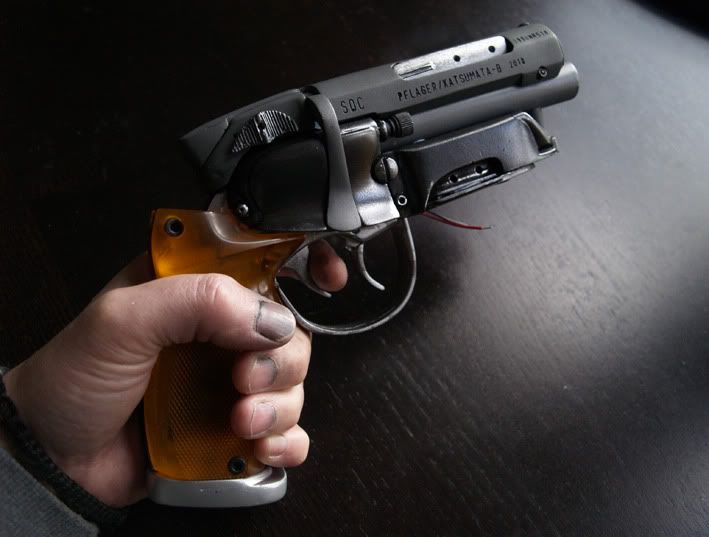
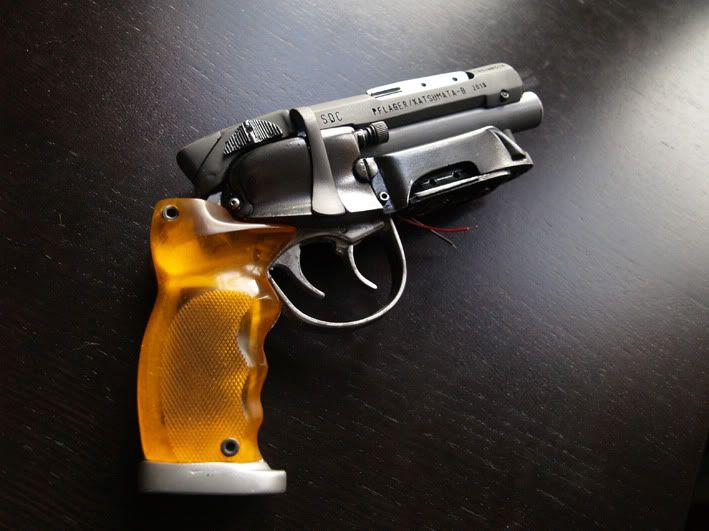
So I'm in the same position as nonner242 having just taken receipt of one of the Australian reisn kits.
The start is much the same as he as already (most helpfully) documented - washing, sanding and filling the various imperfections - my receiver was in pretty good shape unlike his but I decided to go ahead and take the perfectionist route and fill the 2 or 3 almost unnoticablr 'dimples'
to add to his thread's information I've made some further preparation as documented below...
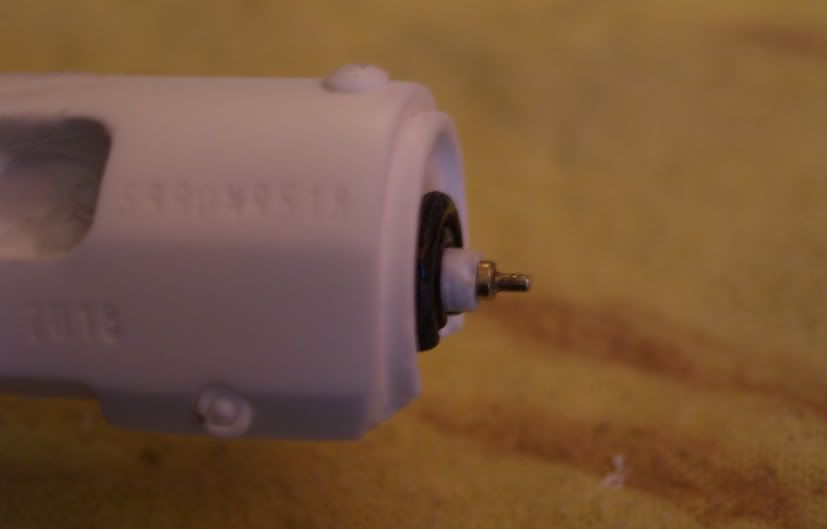
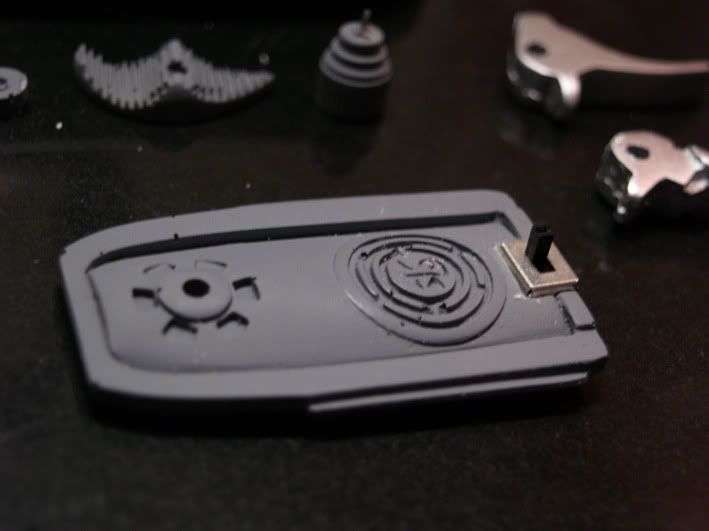
1:- As nonner242 already mentioned the front end of the upper receiver is pretty much nothing more than a lump or blob..very undetailed and a bit dissapointing for me as it's one of the features of the blaster I really love, so..I decided to try and dress it a bit.
Looking through my boxes and boxes of 'bits n' stuff' I found the broken tip off of my motorcycle trye valve and it immediately looked like a prime candidate - coupled with a couple of rubber tap washers that I also used on my previous blaster build (toy conversion - http://www.propsummit.com/viewtopic.php?t=2482&highlight= )
here's how it looks at the time being...
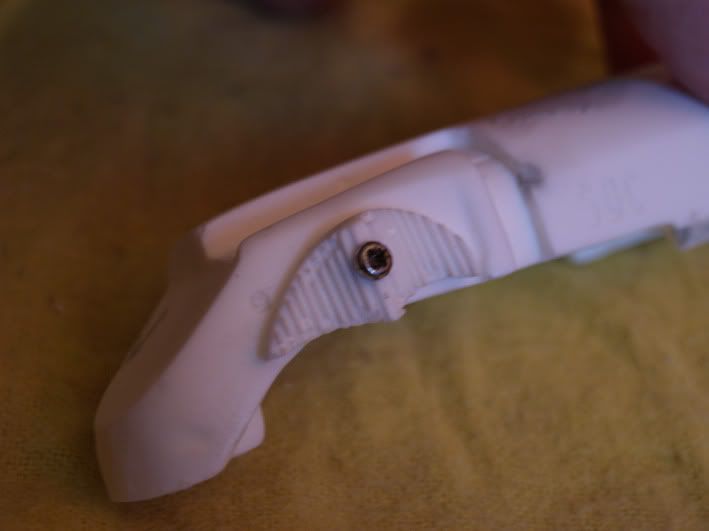
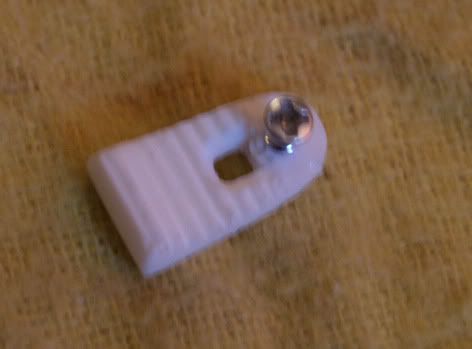
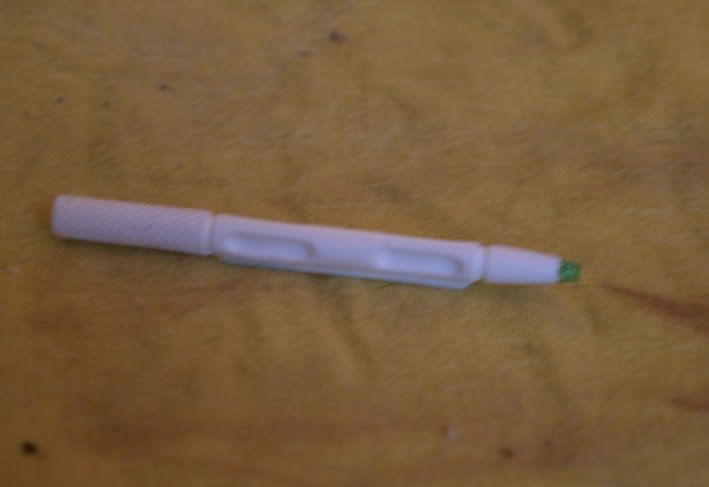
I was also not too impressed with some of the screw head castings, particularly on the thumb switches so I carefully scalpelled and sanded them off and replaced them with real screws - the added bonus being they are more sturdily held in place than just glued
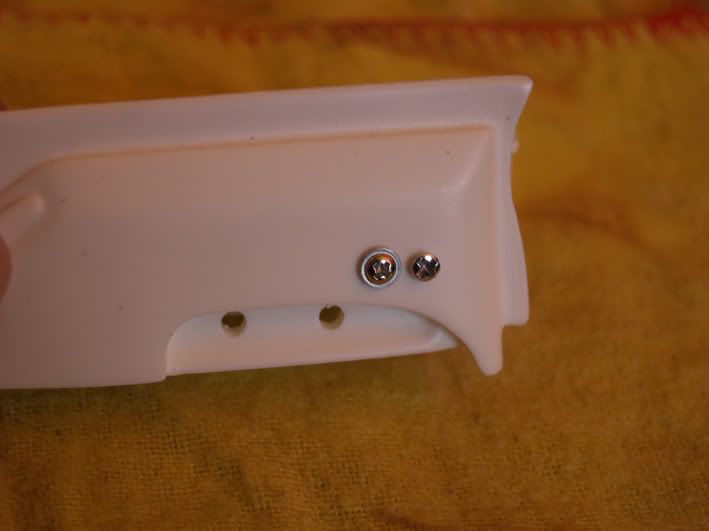
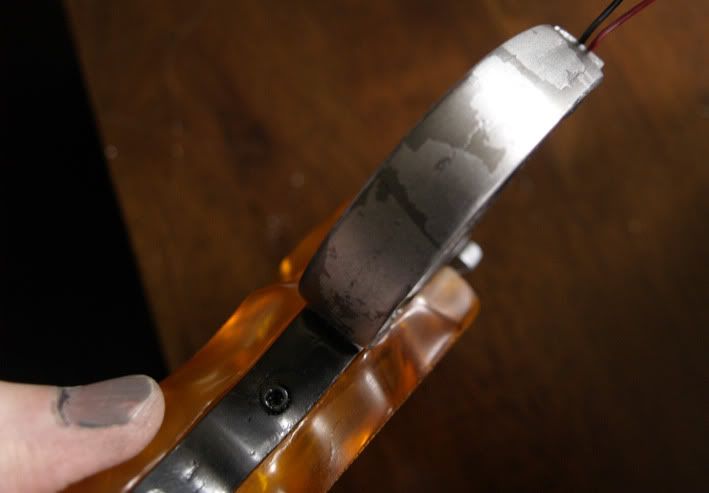
while I had my bag of random bits out I also found two likely suspects for the screws on the mag housing
I then set about trying to join the rear of the bulldog frame and make it as seamless as possible, glueing it and going over and into the cracks with some filler
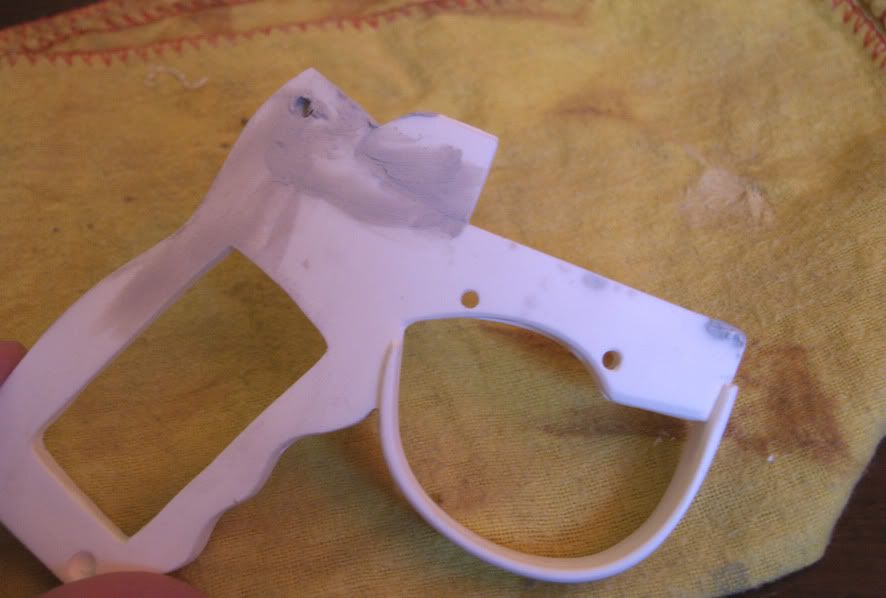
finally I carefully drilled out both ends of the sight rod to install two (non functioning) green LED's one at each end..there's only one fitted in the below pic
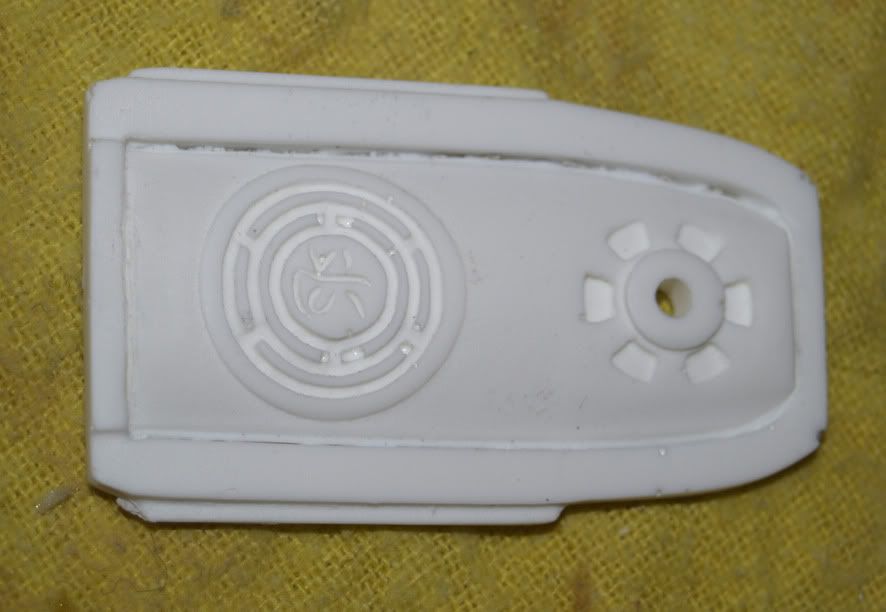
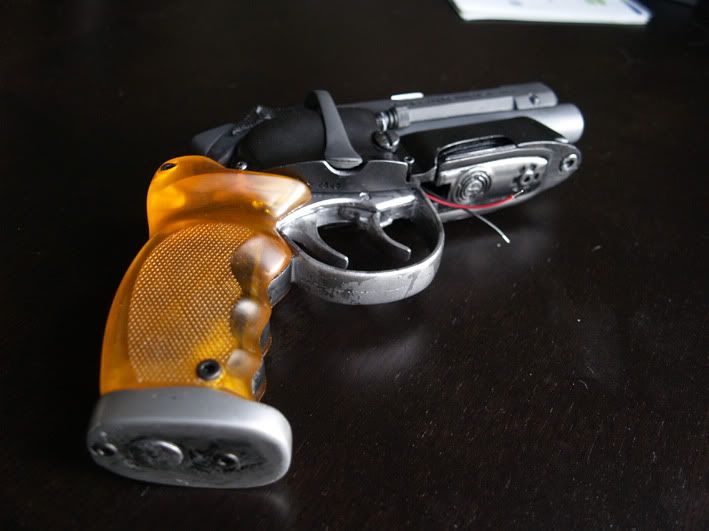
and here's just a closeup of the bottom of the mag housing to show the nice little details that this kit has..
My only worry at this stage is where to fit the on/off switch for the red LED's..there's no room in the mag housing....hhmmmm....so much more work to do...but so much fun to be had!
Respect
P.
_________________
Illustrator, Propmaker, general fiddler....https://www.facebook.com/Strangelysaucy |
|
| Back to top |
|
|
|
|
 |
|
 |
|
|
|
|
| Author |
Message |
joberg
Community Member
.jpg)
Joined: 06 Oct 2008
Posts: 9447
|
| Posted: Tue Aug 09, 2011 7:58 am Post subject: |
|
|
So far so good P. Keep up the good work as well as the pics  |
|
| Back to top |
|
|
|
|
|
|
|
|
|
|
|
| Author |
Message |
Baron Von Blondle
Community Member
Joined: 21 Sep 2010
Posts: 101
Location: In Trouble
|
| Posted: Tue Aug 09, 2011 12:03 pm Post subject: |
|
|
thanks Joberg! I'm fairly pleased so far.
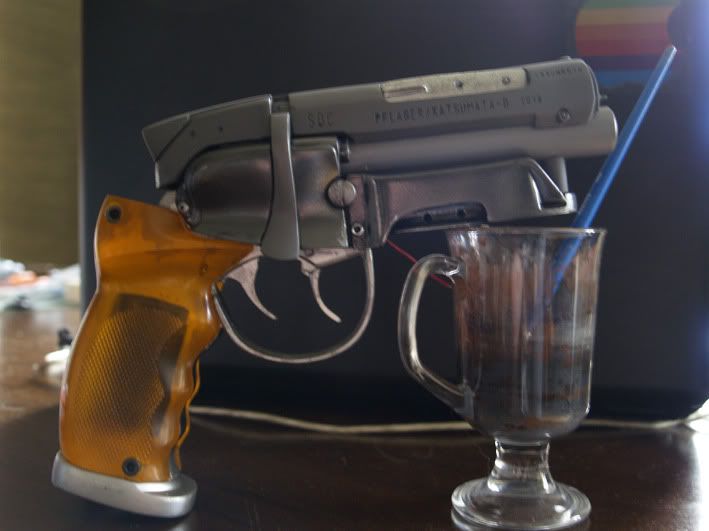
today I've just been giving the grips some elbow grease...Nonner242 was right - it's exausting!! but they're almost clear enough looking now - photo's to come soon.
I wanted to ask any of the UK members here what paint they'd recommend for the receiver and gun metal parts?. I've used different metallic finish auto paints from halfords before on other projects that look 'okay' but I don't want anything on this blaster to look just 'ok'
I'm having difficulty finding anything like the Testors or Krylon that US members have advocated...any help from you brits?
Respect
P.
_________________
Illustrator, Propmaker, general fiddler....https://www.facebook.com/Strangelysaucy |
|
| Back to top |
|
|
|
|
|
|
|
|
|
|
|
| Author |
Message |
nonner242
Community Member

Joined: 25 Jun 2011
Posts: 77
Location: OHIO USA
|
| Posted: Tue Aug 09, 2011 7:16 pm Post subject: |
|
|
I just did another run on my grips today...its like Im addicted! 
Looks like yours is comin along very nicely! I still have not found any small screws around my home. Its still my plan to replace afew fakies with real ones. I like your front receiver, it looks great. Again all my extra parts are for much larger guns, I got alot of tubes,brass,Electronics and pipe fixtures. I need to find some green LEDs too, got every other color tho...lol.
I like Alclad or Rub n Buff and another one I still have the bottle but label has been gone for years, and I cannot for the life of me remember the name. Well those are my 3 tops by far..
BTW Im jealous that yours thumbs slides look so nice. Mine are not worth using and impossible to fix. Im going to have to recreate them from sculpy or something.
Keep it up. |
|
| Back to top |
|
|
|
|
|
|
|
|
|
|
|
| Author |
Message |
Baron Von Blondle
Community Member
Joined: 21 Sep 2010
Posts: 101
Location: In Trouble
|
| Posted: Sun Aug 14, 2011 10:55 am Post subject: |
|
|
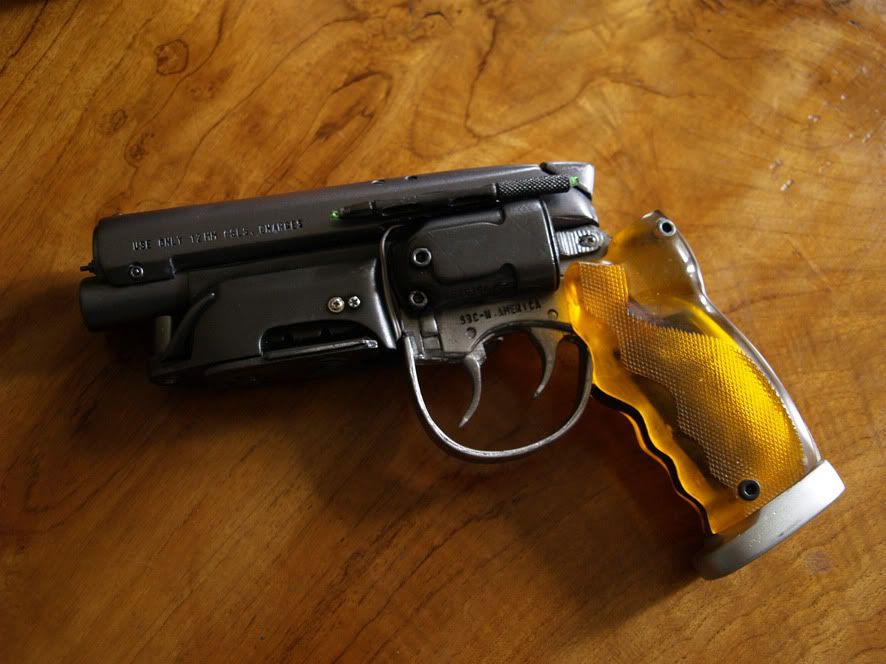
well I've had a few shaky moments with this build that I'll not go into for fear of looking silly  but...it's finally getting back on track and the progress so far is as follows...I still need to topcoat all the gunmetal parts (bolt, upper receiver etc..) but...it's finally getting back on track and the progress so far is as follows...I still need to topcoat all the gunmetal parts (bolt, upper receiver etc..)
I am going for a 'sorta, kinda' movie style but not as rusted or knackered looking, I've gone for a flat black paint for the chamber cover and ammo pack but went over the top of that with a heavy dose of graphite shaving rubbed in. I have to say the graphite gives it an awesome finish! the black looks very heavy/sturdy and where I've rubbed it into the chromed areas (above the triggers, the triggers themselves) it's changed it from looking like a clean and shiny new toy to a weathered, used piece of kit.

I also had a happy accident whilst reverse masking the grip frame and triggers to apply the black trim - Once I started to remove the masking tape it took away a very thin layer of the silver paint that looks like authentic damage/wear to the finish :-
and lastly I finally found a cosy spot for the on/off switch in the bottom of the mag/ammo housing with the lights.
getting there.....
Respect
P.
_________________
Illustrator, Propmaker, general fiddler....https://www.facebook.com/Strangelysaucy
Last edited by Baron Von Blondle on Sun Aug 14, 2011 12:38 pm; edited 1 time in total |
|
| Back to top |
|
|
|
|
|
|
|
|
|
|
|
| Author |
Message |
nonner242
Community Member
Joined: 25 Jun 2011
Posts: 77
Location: OHIO USA
|
| Posted: Sun Aug 14, 2011 11:30 am Post subject: |
|
|
Very nice indeed!
I debated the graphite....but happy with my metallic wax..for now.
I get funny sometimes. |
|
| Back to top |
|
|
|
|
|
|
|
|
|
|
|
| Author |
Message |
joberg
Community Member
Joined: 06 Oct 2008
Posts: 9447
|
| Posted: Mon Aug 15, 2011 8:08 am Post subject: |
|
|
Very good work all in all: looking spiffy allright  |
|
| Back to top |
|
|
|
|
|
|
|
|
|
|
|
| Author |
Message |
Baron Von Blondle
Community Member
Joined: 21 Sep 2010
Posts: 101
Location: In Trouble
|
| Posted: Mon Aug 15, 2011 10:53 am Post subject: |
|
|
99.8% done...
Just need to fit the electronics and am waiting on some rub n buff to add some final little touches. I may weather it a touch more too but for now I'll let it be pretty much as is.
The final stages of construction were done using pins to strengthen the bond between parts and superglue.
My ONLY gripe with the project so far is the right side thumb switch which is not 100% perfect but I'm sure I'll survive 
Next project is to build/buy a display case, this baby is going up on the wall! my cats are far to curious to leave such a gem laying around inviting naughty paws....
Respect
P.
_________________
Illustrator, Propmaker, general fiddler....https://www.facebook.com/Strangelysaucy |
|
| Back to top |
|
|
|
|
|
|
|
|
|
|
|
| Author |
Message |
joberg
Community Member
Joined: 06 Oct 2008
Posts: 9447
|
| Posted: Tue Aug 16, 2011 7:52 am Post subject: |
|
|
Curious cats  ??? Nice piece for sure...now onto the next project ??? Nice piece for sure...now onto the next project |
|
| Back to top |
|
|
|
|
|
|
|
|
|
|
|
| Author |
Message |
Baron Von Blondle
Community Member
Joined: 21 Sep 2010
Posts: 101
Location: In Trouble
|
| Posted: Tue Aug 16, 2011 8:12 am Post subject: |
|
|
yeah I have two cats whose favourite game is 'lets push things off tables and shelves and see if they break'

Respect
P.
_________________
Illustrator, Propmaker, general fiddler....https://www.facebook.com/Strangelysaucy |
|
| Back to top |
|
|
|
|
|
|
|
|
|
|
|
| Author |
Message |
Baron Von Blondle
Community Member
Joined: 21 Sep 2010
Posts: 101
Location: In Trouble
|
| Posted: Wed Aug 17, 2011 10:50 am Post subject: |
|
|
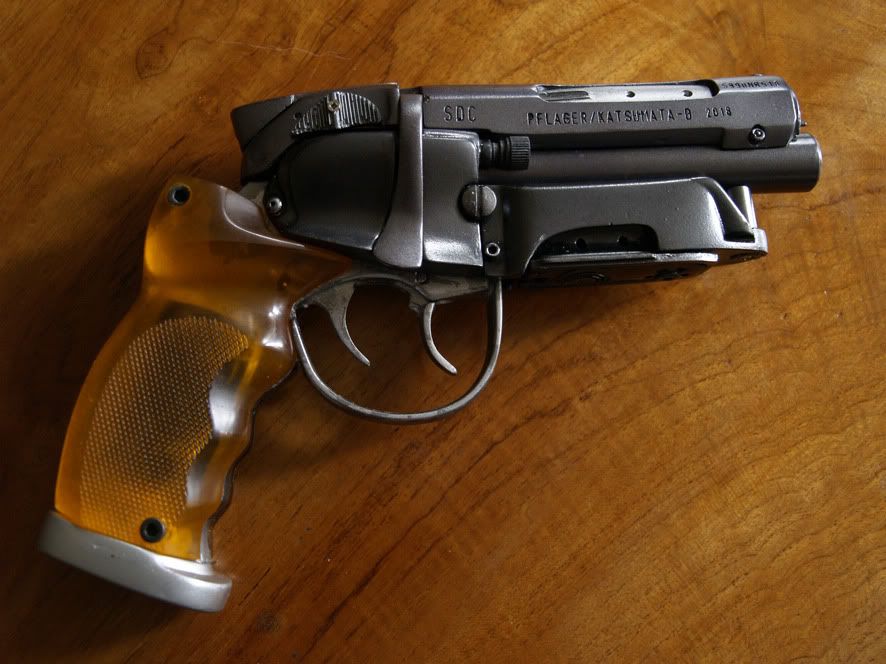
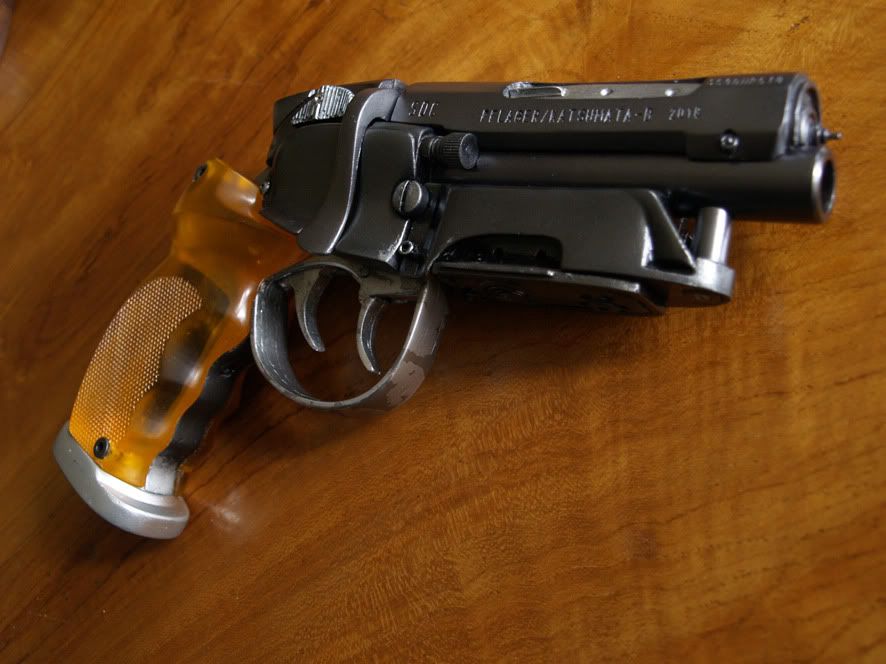
okay as is my way I can't leave things alone...whilst waiting for the electronics to go in (yes I need help, I'm a dummy) I have been looking over the blaster for any little touches or improvements.
The first thing that ocurred to me was that the batteries for the LED's will be visible through the handgrips..way too 2011...so I found an old bit of circuit board which is about the right size and it fits snugly between the batteries and the grips...a mysterious circuit board perhaps for palm print ID or something equally as 2019
then inspired by Nonner242's gorgeous silver colouring I purchased myself some rub n buff metallic wax in silver leaf colour and WOW it really makes a difference..it's very hard to capture in a photograph but it looks exactly like honest to goodness polished steel now. very reflective and it even looks weighty...anyway here's some attempts to capture the gorgeous lustre....
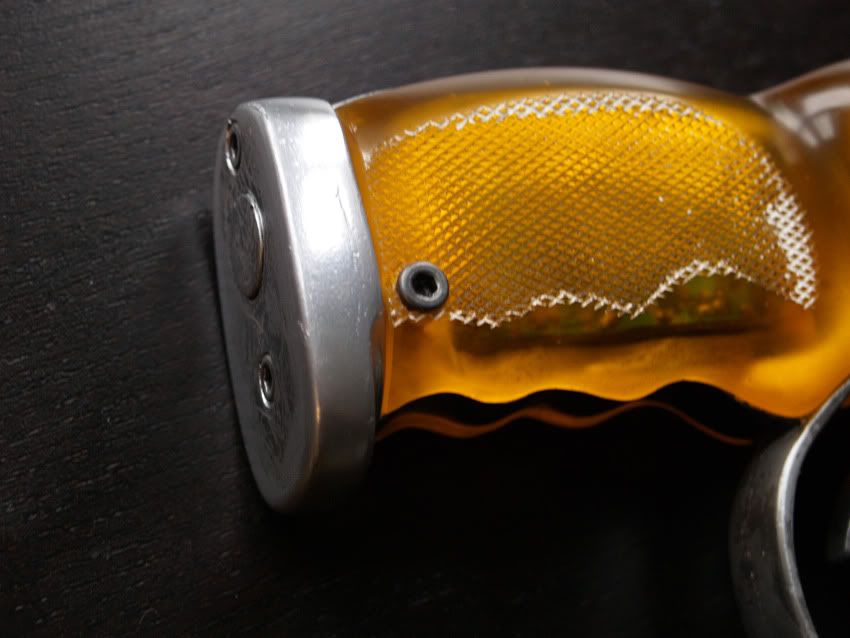
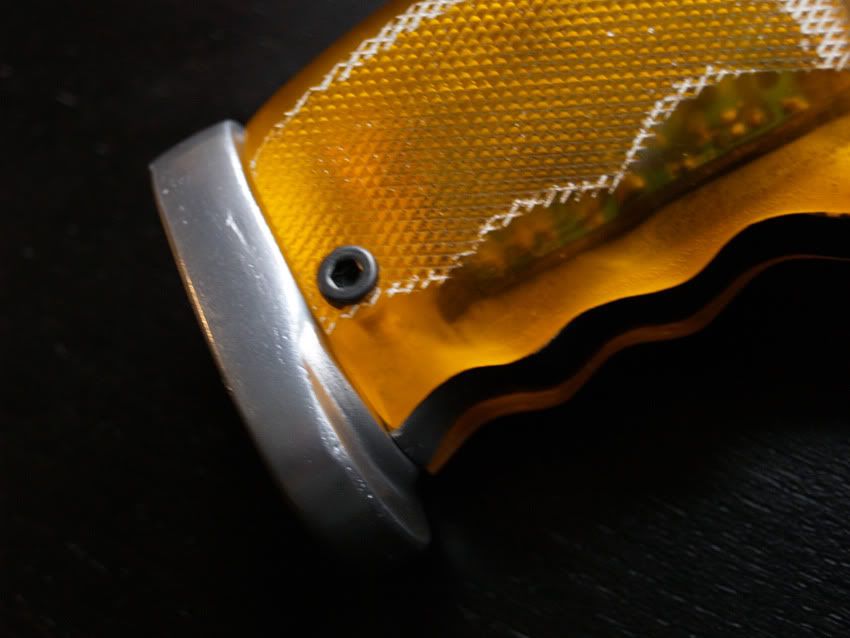
I've used it also to lightly go over some of the details on the receiver/bolt area and although it's IMPOSSIBLE to photograph I can assure you that on the edges it really gives it a very realistic feeling
Respect
P.
_________________
Illustrator, Propmaker, general fiddler....https://www.facebook.com/Strangelysaucy |
|
| Back to top |
|
|
|
|
|
|
|
|
|
|
|
| Author |
Message |
joberg
Community Member
Joined: 06 Oct 2008
Posts: 9447
|
| Posted: Wed Aug 17, 2011 8:50 pm Post subject: |
|
|
| Circuit board is interesting...not my cuppa, but no matter: it's your happiness that matter in the end. |
|
| Back to top |
|
|
|
|
|
|
|
|
|
|
|
| Author |
Message |
Eric Ardros
Community Member
Joined: 27 Aug 2011
Posts: 58
Location: Ontario, Canada
|
| Posted: Sun Aug 28, 2011 9:39 am Post subject: |
|
|
Wow, P! 
That's an awesome job you did on that kit. I've been eyeballing that kit on eBay for a while now, debating on whether or not to buy it.
Now that I've seen what can be done with it, I'm going to seriously consider it. The pricing is pretty fair too, considering all that comes with it.
Quick question from a newb to the forums and PKD building. For the polish you achieved on the amber grips, how exactly does one do that?
I've never done any prop builds with parts that required polishing, so that technique is completely unknown to me.
_________________
My friends, love is better than anger. Hope is better than fear. Optimism is better than despair. So let us be loving, hopeful and optimistic. And we’ll change the world. -- Jack Layton, 1950-2011 |
|
| Back to top |
|
|
|
|
|
|
|
|
|
|
|
| Author |
Message |
Staar
Community Member

Joined: 04 Feb 2008
Posts: 757
Location: AUSTRALIA
|
| Posted: Sun Aug 28, 2011 9:42 am Post subject: |
|
|
I agree, a lovely build!
Warmest congratulations mate..
Kind regards
MARK
_________________
 |
|
| Back to top |
|
|
|
|
|
|
|
|
|
|
|
| Author |
Message |
jerry0503222
Joined: 18 Sep 2011
Posts: 1
|
|
| Back to top |
|
|
|
|
|
|
|
|
|
|
|
| Author |
Message |
Baron Von Blondle
Community Member
Joined: 21 Sep 2010
Posts: 101
Location: In Trouble
|
| Posted: Wed Sep 21, 2011 12:00 pm Post subject: |
|
|
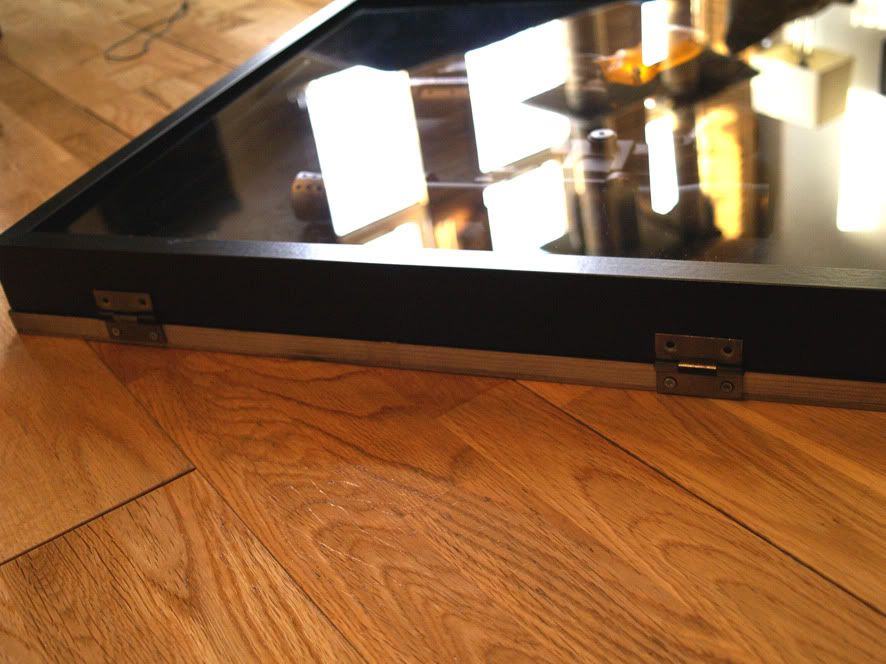
I'm almost finished with the display/shadow box for the blaster.
My goodly wife installed all the electronics so it's all finished and ready for display.
I just got the deepest frame Ikea had to offer and have set about making a back for it that adds the extra cm needed to house the blaster comfortably.
Just need to paint the edges and screw in the hinges and it's going up on the wall in a prominent spot

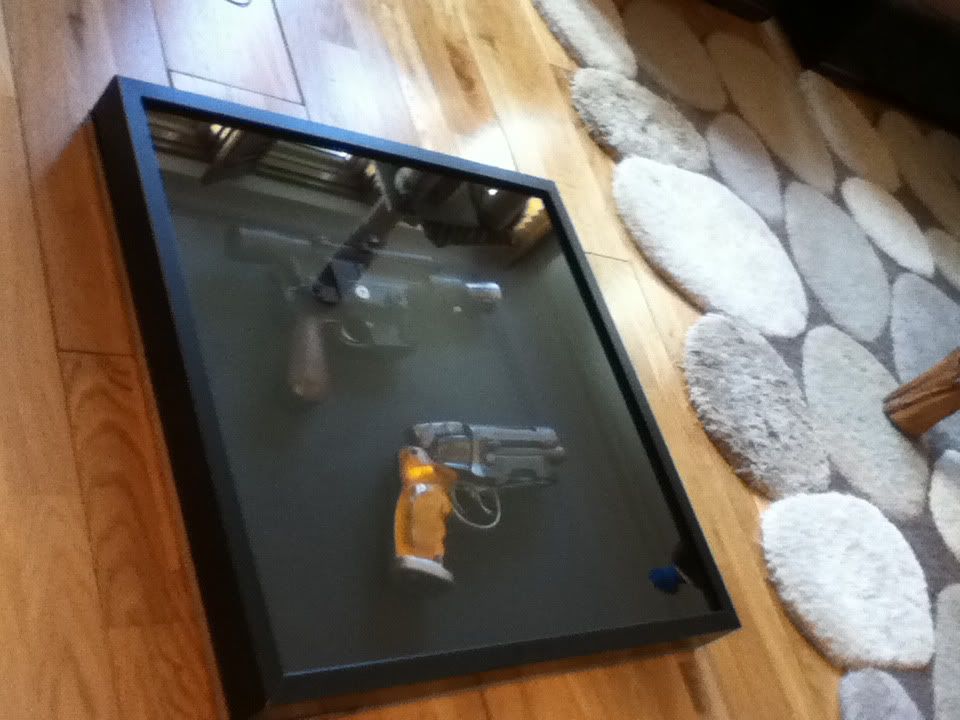
(Han Solo blaster added to fill te empty space - I will probably be putting some more BR memorabilia - passes, ID etc...and a poster or photo of Deckard)
Respect
P.
_________________
Illustrator, Propmaker, general fiddler....https://www.facebook.com/Strangelysaucy |
|
| Back to top |
|
|
|
|
|
|
|
|
|
|
|
| Author |
Message |
Baron Von Blondle
Community Member
Joined: 21 Sep 2010
Posts: 101
Location: In Trouble
|
| Posted: Thu Sep 29, 2011 12:54 pm Post subject: |
|
|
the final display..well until I can get my hands one some more stuff for it
Made the boyards box, my own take on the matchbook, the vidphon card, ID and weapons permit and the ammo box - thanks to the originators

Respect
P.
_________________
Illustrator, Propmaker, general fiddler....https://www.facebook.com/Strangelysaucy |
|
| Back to top |
|
|
|
|
|
|
|
|
|
|
|
| Author |
Message |
andy
Community Guide

Joined: 01 Nov 2006
Posts: 6237
Location: Rochester, NY
|
| Posted: Thu Sep 29, 2011 1:42 pm Post subject: |
|
|
Absolutely brilliant display. It captures the spirit of the movie too.
Andy |
|
| Back to top |
|
|
|
|
|
|
|
|
|
|
|
| Author |
Message |
Staar
Community Member
Joined: 04 Feb 2008
Posts: 757
Location: AUSTRALIA
|
| Posted: Thu Sep 29, 2011 10:53 pm Post subject: |
|
|
| andy wrote: | Absolutely brilliant display. It captures the spirit of the movie too.
Andy |
I agree.. gorgeous turnout!
Warm regards
MARK
_________________
|
|
| Back to top |
|
|
|
|
|
|
|
|
|
|
|
| Author |
Message |
joberg
Community Member
Joined: 06 Oct 2008
Posts: 9447
|
| Posted: Fri Sep 30, 2011 11:10 am Post subject: |
|
|
| Excellent display for sure ...but I got to warn you: first you start with the frame, then the display case and then the shelving unit it's addictive ! |
|
| Back to top |
|
|
|
|
|
|
|
|
|
|
|
|
You cannot post new topics in this forum
You cannot reply to topics in this forum
You cannot edit your posts in this forum
You cannot delete your posts in this forum
You cannot vote in polls in this forum
|
|
|
|
|
|
|
|


