 |
 |
|
 |
|
| Author |
Message |
Fangorn81
Community Member

Joined: 03 May 2009
Posts: 172
Location: Brooklyn, NY
|
 Posted: Wed Dec 21, 2011 10:14 pm Post subject: ~2007 Sidkit build [WIP] Posted: Wed Dec 21, 2011 10:14 pm Post subject: ~2007 Sidkit build [WIP] |
 |
|
I think a couple of you showed interest in seeing this build, I'm afraid I'm not as good at documenting my progress as some might like, but I've tried to take photos along the way.
This is the kit I recently bought from mspaw, which graciously included a machined steel barrel and original binding post. I hope to round it out with a machined sight rod of his as well, and maybe a machined aluminum butt plate if anyone feels an itch to make some again.
I'm debating the Weaver knob, but I can always change that later. I also will be heavily modifying the ammo clip to be as close to the actual prop as possible. Anyway, here's progress so far:

The kit as I got it...

Rough buildup to check fit of parts (after extensive sanding/polishing and fitting).

Dremmeled out faux screws to make way for the mounting screw on mspaws barrel. It looks a little rough here, but after some love, the scratches have vanished.

Primed parts to be painted gloss black soon...as well as slightly weathered grips.

parts to be blued lined up awaiting their fate. I used Blue Wonder, it was fairly easy and turned out great...except for the steel barrel. It came out a bit darker and bluer than the pewter parts...So, after sanding it back down a bit with 1500 grit paper, I re-blued it but skipped heating the metal and it came out really close to the color of the heat blued pewter.

Another rough buildup, with the blued and primed parts. I am getting pretty excited to see this thing completed.
More to come...


I dremmeled out the side cover today...this was a bit scary, but after some careful hand filing, and a coat of paint, it looks like it was cast that way!
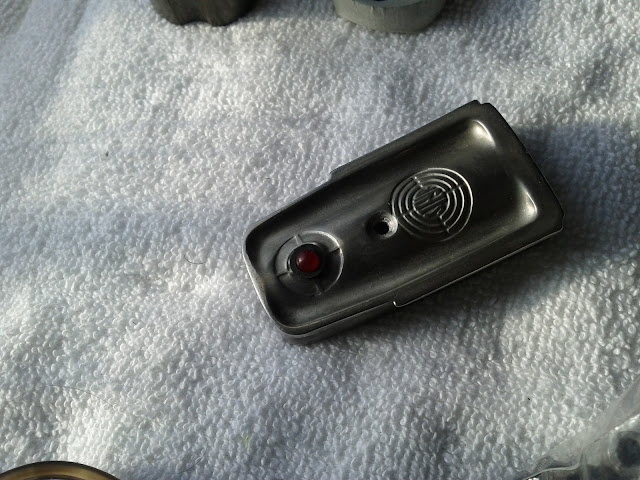
Also tested the fit of an LED and mounting clip...looks pretty much exactly like the real thing! (If only I had the same luck with the side LED's).
Heading out for some gloss black and more LED mounds later today (and I guess I should buy some Christmas gifts too!)

Ok, I got some paint, parts AND some Christmas shopping done. I'm waiting on my black parts to dry...my apartment smells terrible! This is what I get for just using a makeshift painting hood near an open window...
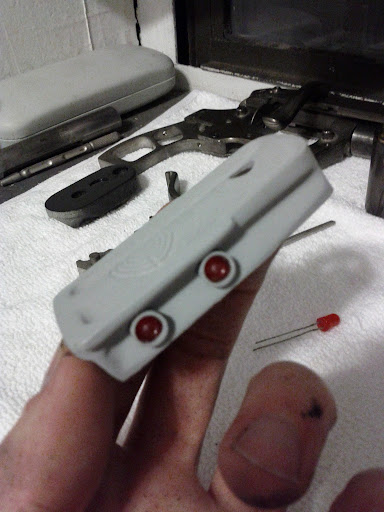
I added some LED's to the ammo clip today also. They aren't exactly like the original, and I may try something different. I don't really like how big they are or how close together the predrilled holes were...this will probably be the bane of this build...I also want a better slide switch than the one that came with the kit.
[EDIT] I've removed those LEDs and refilled the holes with epoxy putty. quite a pain. I left my phone in NC over Christmas and haven't been able to take any pictures!

Epoxy filled and re drilled ammo clip...to correct my previous work (which I didn't like). I still have to sculpt/find sockets for the LEDs. Looks pretty rough in this picture, but it's not. Putty and sanded metal don't do flash photography well.

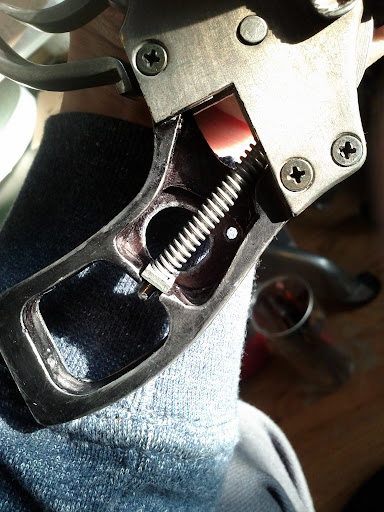
I replaced the hammer spring with a sturdier and more accurate one. As well as a square washer like the original.
[imghttps://lh4.googleusercontent.com/-o5Q8P1gF95w/TyWiayFHt-I/AAAAAAAAEnA/Z7-vwTBgmvc/s512/IMG_20120129_144610.jpg[/img]
EDIT: I've also shortened the hammer pin to a more accurate length since this photo.

Drilled holes for side greebles.

I was hoping not to use any glue or epoxy on this kit, which is why I even went to the trouble of using a tiny screw to attach these two pieces. I've since given up on that idea. We're now going for 90% glueless.

Repainted all the black parts, as they got a bit dinged up while I was nitpicking other details...I also removed the paint from the flat head screw, I plan on blueing it.
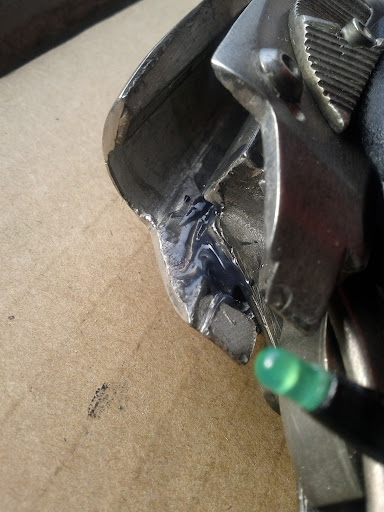
I added some epoxy at the rear of the receiver to sturdy it up. It seems to be working well.

I just got these two switches off ebay. Not sure which one to use!

I ended up using metal epoxy to attach the ammo clip housing to the barrel. It's not what i wanted to do, but the gun can still be torn down almost all the way, and it's really sturdy.

I carved out a hole and mounted the switch to the clip, now I just need to wire the LEDs. Also jakob2121 was nice enough to gift me with some LED mounts which I am eagerly awaiting.

I'm also waiting on some rare earth magnets I ordered that I'm gonna use to attach the clip.

Since the blaster is really starting to near completion, I've already gotten distracted by a side project. I started building a box to keep it in today. I think I'm going to do a drawer style box but for now I am just working on the inner tray area, so that can be decided later. It is going to have burgundy felt covering the dividers and hinged lids to the large compartment at the top. It should be pretty sweet...

Staned the wood and started putting on the felt. It is looking really awesome!
Other than that we're getting pretty close (apart from wiring the LEDs).


ALMOST DONE!!!
I've been doing some obsessive detail work while I wait for my ammo clip:

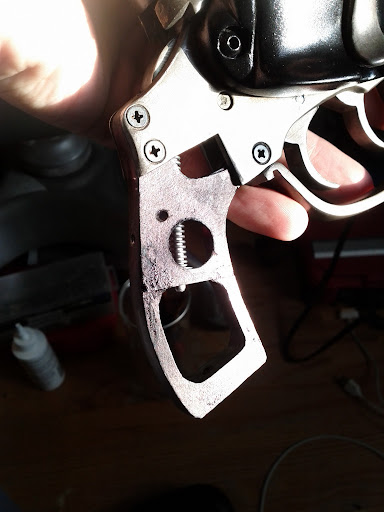
replaced the trigger pins with steel...

Added some "white gunk" to a few screws.

Added this hole near the triggers.

Added some "rust" to some bolts and crevices.
Added a side piece to the bulldog grip to get the accurate details of those two circles. It's just thin painted cardboard, but under the grips, you can't tell at all.
To-do list:
- Getting a Weaver casting from Rich along with one of his 2011A ammo clips.
- Also looking for some kind of "futuristic" looking firing caps to put on the dummy rounds. I've decided to make some "sonic" rounds for the gun instead of the real dummy rounds. More info to come on that...
- Weather the paint.
- Finish the damn box.
_________________
Good against remotes is one thing. Good against the living? That's something else.
Joah Mahan
Last edited by Fangorn81 on Sun Jan 29, 2012 4:32 pm; edited 25 times in total |
|
| Back to top |
|
|
|
|
 |
|
 |
|
|
|
|
| Author |
Message |
Fangorn81
Community Member
Joined: 03 May 2009
Posts: 172
Location: Brooklyn, NY
|
| Posted: Wed Dec 21, 2011 10:27 pm Post subject: |
|
|
Question:
I am having trouble deciding if the outer grip frame is painted black on the sides beneath the grips or just on the front and back....
From the photos of the actual prop from Worldcon, it looks like it's just bare aluminum, but I know several kits seems to have that area painted (Tomenosuke) and I can't tell for sure.
Right now I have opted for the bare aluminum beneath the grips, but I'd love any definitive info....
_________________
Good against remotes is one thing. Good against the living? That's something else.
Joah Mahan |
|
| Back to top |
|
|
|
|
|
|
|
|
|
|
|
| Author |
Message |
andy
Community Guide

Joined: 01 Nov 2006
Posts: 6237
Location: Rochester, NY
|
| Posted: Thu Dec 22, 2011 2:30 am Post subject: |
|
|
Here are pics of the hero gun with the grips off from Rich and the guys who cleaned it up for the auction...


The outer frame actually looks to be black anodized aluminum.
Andy |
|
| Back to top |
|
|
|
|
|
|
|
|
|
|
|
| Author |
Message |
joberg
Community Member
.jpg)
Joined: 06 Oct 2008
Posts: 9447
|
| Posted: Thu Dec 22, 2011 8:15 am Post subject: |
|
|
Very good build so far  (cannot go wrong with Mspaw real steel parts). (cannot go wrong with Mspaw real steel parts).
I thing that the inner grip should be dark also (maybe not as dark as the outside parts...). |
|
| Back to top |
|
|
|
|
|
|
|
|
|
|
|
| Author |
Message |
Fangorn81
Community Member
Joined: 03 May 2009
Posts: 172
Location: Brooklyn, NY
|
| Posted: Thu Dec 22, 2011 11:37 am Post subject: |
|
|
That's pretty definitive!
_________________
Good against remotes is one thing. Good against the living? That's something else.
Joah Mahan |
|
| Back to top |
|
|
|
|
|
|
|
|
|
|
|
| Author |
Message |
andy
Community Guide
Joined: 01 Nov 2006
Posts: 6237
Location: Rochester, NY
|
| Posted: Thu Dec 22, 2011 3:28 pm Post subject: |
|
|
I am digging the matt/quilt you have the gun resting on in this picture  ... ...
Andy |
|
| Back to top |
|
|
|
|
|
|
|
|
|
|
|
| Author |
Message |
Fangorn81
Community Member
Joined: 03 May 2009
Posts: 172
Location: Brooklyn, NY
|
| Posted: Thu Dec 22, 2011 6:35 pm Post subject: |
|
|
It's a quilt I got a few years ago when I worked at Target.
Yes, if you are thinking it looks a whole lot like the one in Deckard's apartment, I agree. And it was just an awesome coincidence that I bought it! I only got it cause it was on clearance, I didn't notice the similarities til much later...
_________________
Good against remotes is one thing. Good against the living? That's something else.
Joah Mahan |
|
| Back to top |
|
|
|
|
|
|
|
|
|
|
|
| Author |
Message |
andy
Community Guide
Joined: 01 Nov 2006
Posts: 6237
Location: Rochester, NY
|
| Posted: Thu Dec 22, 2011 11:26 pm Post subject: |
|
|
I saw the same one at Target a few years back, on sale as well, but they only had king and twin sizes. I always hoped they would bring it back, but since it went on clearance it might not have sold very well. Ahh, the little things that obsess us with BR 
Good work on the Sidkit, I will be keeping an eye here to see how it comes along.
Andy |
|
| Back to top |
|
|
|
|
|
|
|
|
|
|
|
| Author |
Message |
Futurepig
Community Member

Joined: 28 Jun 2011
Posts: 54
|
| Posted: Mon Dec 26, 2011 11:53 pm Post subject: |
|
|
Thanks for posting the pictures. It's fascinating to see how a great piece is built step by step.
_________________
 |
|
| Back to top |
|
|
|
|
|
|
|
|
|
|
|
| Author |
Message |
Fangorn81
Community Member
Joined: 03 May 2009
Posts: 172
Location: Brooklyn, NY
|
| Posted: Fri Dec 30, 2011 1:45 pm Post subject: |
|
|
OK, does anyone have advice on sturdying the rear of the Steyr barrel where the bolt slides? this seems to be a pretty weak part, and it is always flexing out and getting a little rattly when I slide the bolt open/closed. There isn't really anywhere to add a screw or even glue anything but I'd like it to be more durable.
Maybe epoxy resin where it slides onto the bulldog frame? I was hoping to build this whole kit without glue...but it looks like the best option to me at this point.
_________________
Good against remotes is one thing. Good against the living? That's something else.
Joah Mahan |
|
| Back to top |
|
|
|
|
|
|
|
|
|
|
|
| Author |
Message |
mspaw
Community Member
Joined: 18 Mar 2007
Posts: 234
Location: Sacramento CA
|
| Posted: Mon Jan 02, 2012 9:55 pm Post subject: |
|
|
wow- its coming along nicely! I'm so glad it found a good home. I just hope I can provide a couple more parts for you here soon, I'm looking at another site rod run if there is enough interest.
Keep up the great work.
-Michael |
|
| Back to top |
|
|
|
|
|
|
|
|
|
|
|
| Author |
Message |
Fangorn81
Community Member
Joined: 03 May 2009
Posts: 172
Location: Brooklyn, NY
|
| Posted: Thu Jan 05, 2012 11:10 am Post subject: |
|
|
I hope so!
_________________
Good against remotes is one thing. Good against the living? That's something else.
Joah Mahan |
|
| Back to top |
|
|
|
|
|
|
|
|
|
|
|
| Author |
Message |
mspaw
Community Member
Joined: 18 Mar 2007
Posts: 234
Location: Sacramento CA
|
| Posted: Thu Jan 05, 2012 11:50 am Post subject: |
|
|
Fang-
I just reread over your buildup notes and was a bit concerned to hear that you're having trouble with the cap head screws on the barrel. If you want please pm me and let figure that out as I want to make sure its all working for you.
All the best!
-Michael |
|
| Back to top |
|
|
|
|
|
|
|
|
|
|
|
| Author |
Message |
Fangorn81
Community Member
Joined: 03 May 2009
Posts: 172
Location: Brooklyn, NY
|
| Posted: Fri Jan 06, 2012 1:31 pm Post subject: |
|
|
Thanks! PM sent. I kind of have an idea...
_________________
Good against remotes is one thing. Good against the living? That's something else.
Joah Mahan |
|
| Back to top |
|
|
|
|
|
|
|
|
|
|
|
| Author |
Message |
Fangorn81
Community Member
Joined: 03 May 2009
Posts: 172
Location: Brooklyn, NY
|
| Posted: Tue Jan 17, 2012 4:46 pm Post subject: |
|
|
Lots of updates!
_________________
Good against remotes is one thing. Good against the living? That's something else.
Joah Mahan |
|
| Back to top |
|
|
|
|
|
|
|
|
|
|
|
| Author |
Message |
joberg
Community Member
Joined: 06 Oct 2008
Posts: 9447
|
| Posted: Tue Jan 17, 2012 7:23 pm Post subject: |
|
|
A beauty for sure Love the box with the red felt...Staar did a box a few years ago, did you take your inspiration from that build?
Eager to see what you'll do next. Keep up the good work. |
|
| Back to top |
|
|
|
|
|
|
|
|
|
|
|
| Author |
Message |
Fangorn81
Community Member
Joined: 03 May 2009
Posts: 172
Location: Brooklyn, NY
|
| Posted: Tue Jan 17, 2012 7:37 pm Post subject: |
|
|
Yes indeed. I think Staar's box really added that extra element of realism.
My grandfather had boxes for several of his guns, and opening them always made those guns feel more "important" than his other ones. Besides, if I'm not hanging it on the wall I wanted something nice to keep it in so it doesn't get dinged up.
I'm pretty sure Staar made that Deckard ID badge graphic in the photo also...
_________________
Good against remotes is one thing. Good against the living? That's something else.
Joah Mahan |
|
| Back to top |
|
|
|
|
|
|
|
|
|
|
|
| Author |
Message |
Staar
Community Member

Joined: 04 Feb 2008
Posts: 757
Location: AUSTRALIA
|
| Posted: Tue Jan 17, 2012 8:20 pm Post subject: |
|
|
This thread is really fantastic on every level.
A great build with really enviable attention to detail.
The box you're building is the ultimate book-end in my opinion.
Warmest congratulations and highest regards
MARK
_________________
 |
|
| Back to top |
|
|
|
|
|
|
|
|
|
|
|
| Author |
Message |
Fangorn81
Community Member
Joined: 03 May 2009
Posts: 172
Location: Brooklyn, NY
|
| Posted: Tue Jan 17, 2012 9:37 pm Post subject: |
|
|
And that is very much a compliment sir.
A tip of the hat from a man who's had the honor of working for the studio responsible for inspiring my career in animation and is responsible for one of the best blaster builds I've ever seen is quite appreciated.
Thanks you!
_________________
Good against remotes is one thing. Good against the living? That's something else.
Joah Mahan |
|
| Back to top |
|
|
|
|
|
|
|
|
|
|
|
| Author |
Message |
Fangorn81
Community Member
Joined: 03 May 2009
Posts: 172
Location: Brooklyn, NY
|
| Posted: Thu Jan 26, 2012 8:54 pm Post subject: |
|
|
While I'm waiting for my Ammo clip to arrive from Rich (I got fed up with modifying the Sidkit one) I've whipped up some graphics that I plan on shellacking to the box once it's finished. The provenance sheet will probably be on the underside of the drawer...

Nameplate idea. I kind of decided to give a nod to other blaster kits that have existed over the years.
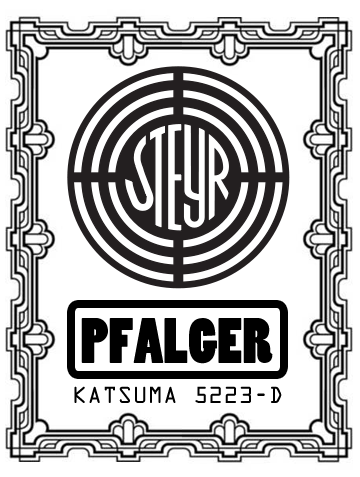
An alternate nameplate.
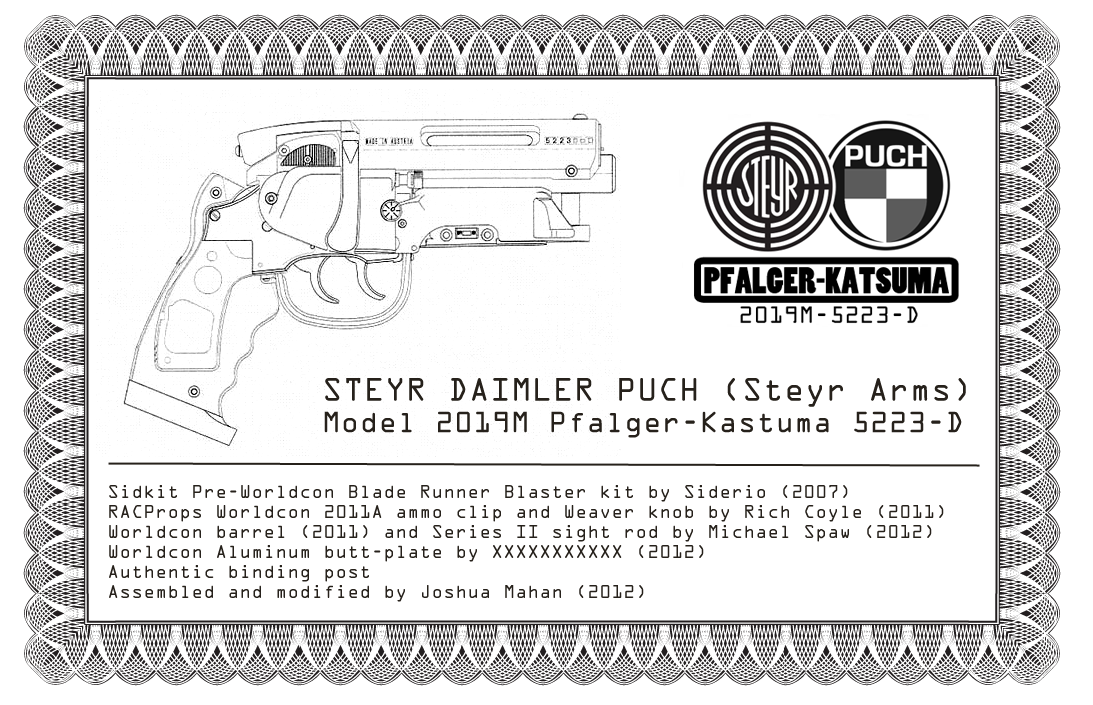
Provenance sheet (for posterity). It's a bit hopeful as the mspaw sight rod run hasn't started yet, and I still need someone to point me in the direction of an aluminum butt plate that is proper Worldcon dimensions...
_________________
Good against remotes is one thing. Good against the living? That's something else.
Joah Mahan
Last edited by Fangorn81 on Thu Jan 26, 2012 9:19 pm; edited 2 times in total |
|
| Back to top |
|
|
|
|
|
|
|
|
|
|
|
|
You cannot post new topics in this forum
You cannot reply to topics in this forum
You cannot edit your posts in this forum
You cannot delete your posts in this forum
You cannot vote in polls in this forum
|
|
|
|
|
|
|
|


