 |
 |
|
 |
|
| Author |
Message |
joberg
Community Member
.jpg)
Joined: 06 Oct 2008
Posts: 9447
|
 Posted: Sun Aug 02, 2015 8:29 am Post subject: Posted: Sun Aug 02, 2015 8:29 am Post subject: |
 |
|
Good transfo on that piece...that prop will weigh quite a bit I'm sure.
Eager to see the next update  |
|
| Back to top |
|
|
|
|
 |
|
 |
|
|
|
|
| Author |
Message |
Isnochys79
Community Member
Joined: 17 Jan 2013
Posts: 121
Location: France
|
| Posted: Fri Aug 28, 2015 3:45 am Post subject: |
|
|
I am totally admirative of the way you build that prop and the various materials you know how to work on. That's a true piece of Art

Fred |
|
| Back to top |
|
|
|
|
|
|
|
|
|
|
|
| Author |
Message |
8th_Passenger
Community Member

Joined: 28 Nov 2009
Posts: 443
Location: Hertfordshire, UK
|
| Posted: Sat Aug 29, 2015 4:42 am Post subject: |
|
|
Thank you Fred.
I would really like to get it finished this year!
I'm finding it hard to find the time to work on it.
Hopefully more soon.
Colin
_________________
Ripley: What's it key on?
Ash: Micro changes in air density. |
|
| Back to top |
|
|
|
|
|
|
|
|
|
|
|
| Author |
Message |
SSB
Community Member
Joined: 15 Apr 2007
Posts: 175
Location: Florida, USA
|
|
| Back to top |
|
|
|
|
|
|
|
|
|
|
|
| Author |
Message |
8th_Passenger
Community Member
Joined: 28 Nov 2009
Posts: 443
Location: Hertfordshire, UK
|
| Posted: Sat Aug 29, 2015 2:24 pm Post subject: |
|
|
Thanks SSB for you comments. They are much appreciated.
The lightened screen cap is fantastic. I've added it to the thread if that's okay.
Pro Mod already identified the possible 1/72 Moerser Karl part. The photo you put a link too was excellent.
I thought I would add this to the thread as it's all good reference.
.jpg)
I think what I have made for that part will do for now. Though I am tempted to re make it. I'm not sure if I could justify buying the kit for that one part. Thought I did for the Saturn V engine.
Thanks agian for your input Mike.
Colin
_________________
Ripley: What's it key on?
Ash: Micro changes in air density. |
|
| Back to top |
|
|
|
|
|
|
|
|
|
|
|
| Author |
Message |
SSB
Community Member
Joined: 15 Apr 2007
Posts: 175
Location: Florida, USA
|
| Posted: Sat Aug 29, 2015 2:33 pm Post subject: |
|
|
Of course; you're welcome 
I thought some of the ribbed pipes might be from Space Shuttle kits (the SRBs) but I don't think the pattern matches.
That bare brass square visible on the nozzle(?) looks to me like where a part was applied but then fell off after painting but before filming.
-MJ |
|
| Back to top |
|
|
|
|
|
|
|
|
|
|
|
| Author |
Message |
8th_Passenger
Community Member
Joined: 28 Nov 2009
Posts: 443
Location: Hertfordshire, UK
|
| Posted: Wed Sep 02, 2015 3:03 pm Post subject: |
|
|
There is definitely detail missing from that part of the nozzle. It seems to vary from unit to unit too (as with everything else!).

This one seems to have two bits of detail.

Those two photos are of the right side of the unit. I'll have to have a better look at the reference and see if there was anything ever on the left.
It looks like an angled block but its hard to judge the shape.
Could be a simple shape like this.

I thought I would revisit the underside detail now I can see more detail in SSB's photo.
I've highlighted two area's (Box 01 and 02)

Over the weekend I came across a sketch I had done of the detail in Box 01 some time back. I wasn't far off!

I had been planning on using these bits below but now I think I will have another go.
.jpg)
Not sure about the detail in Box 02! Looks like it's in the way of the grip. I might make something and see how it fits in.
Finally this section shows a different angle of the detail on the white tank.
More things to make!

More soon (hopefully).
Colin
_________________
Ripley: What's it key on?
Ash: Micro changes in air density. |
|
| Back to top |
|
|
|
|
|
|
|
|
|
|
|
| Author |
Message |
SSB
Community Member
Joined: 15 Apr 2007
Posts: 175
Location: Florida, USA
|
| Posted: Wed Sep 02, 2015 7:35 pm Post subject: |
|
|
| That detail bit on the tank looks awfully similar to what you scratchbuilt for the ... um ... base of the igniter(?). |
|
| Back to top |
|
|
|
|
|
|
|
|
|
|
|
| Author |
Message |
SKIN JOB 66
Community Member

Joined: 16 Jan 2008
Posts: 2724
Location: FRANCE
|
| Posted: Thu Sep 03, 2015 2:25 am Post subject: |
|
|
| 8th_Passenger wrote: |
This one seems to have two bits of detail.
|
Colin, to me these two parts on the side of the nozzle look identical to what can be seen on both sides of the motion tracker screen or aside its key... it would be logical to have used some of them to detail the thrower since they have been used extensively on the tracker...
What do you think ?
Fred
PS : The photo below comes from Birdie's collection on yourprops.com

_________________
THE FUTURE IS A THING OF THE PAST |
|
| Back to top |
|
|
|
|
|
|
|
|
|
|
|
| Author |
Message |
joberg
Community Member
Joined: 06 Oct 2008
Posts: 9447
|
| Posted: Sun Sep 06, 2015 8:39 am Post subject: |
|
|
Good stuff Colin (and thanks to SSB for additional pics). Wow, this prop keeps on giving (headache and all  ). Eager to see the rest soon! ). Eager to see the rest soon! |
|
| Back to top |
|
|
|
|
|
|
|
|
|
|
|
| Author |
Message |
8th_Passenger
Community Member
Joined: 28 Nov 2009
Posts: 443
Location: Hertfordshire, UK
|
| Posted: Mon Sep 07, 2015 2:16 pm Post subject: |
|
|
Thanks for the feedback guys.
Fred I had a look on Birdie's build thread on Propsummit and he had a link to those knobs from a US site.
I did a quick search on RS Components here in the UK and found identical ones. They come in three slightly different sizes.
Colin
_________________
Ripley: What's it key on?
Ash: Micro changes in air density. |
|
| Back to top |
|
|
|
|
|
|
|
|
|
|
|
| Author |
Message |
SKIN JOB 66
Community Member
Joined: 16 Jan 2008
Posts: 2724
Location: FRANCE
|
| Posted: Mon Sep 07, 2015 2:34 pm Post subject: |
|
|
| 8th_Passenger wrote: | Thanks for the feedback guys.
Fred I had a look on Birdie's build thread on Propsummit and he had a link to those knobs from a US site.
I did a quick search on RS Components here in the UK and found identical ones. They come in three slightly different sizes.
Colin |
Good to know they're still available, Colin !!!

Fred
_________________
THE FUTURE IS A THING OF THE PAST |
|
| Back to top |
|
|
|
|
|
|
|
|
|
|
|
| Author |
Message |
8th_Passenger
Community Member
Joined: 28 Nov 2009
Posts: 443
Location: Hertfordshire, UK
|
| Posted: Sun Jan 31, 2016 6:35 am Post subject: |
|
|
It's been almost five months since I did any practical work on the flamethrower.
I lost momentum and any sort of drive for the project. Winter blues I guess!
So I'm trying to kick start myself back into action.
Here are the slider knobs I got for where the emitter meets the body. I will have to do a mechanical fixing to stop them from being easily broken off! Also I have to choose which size/s fits best.

Next up is the extra detail on the underside. I used a combination of elements I already had and mixed them up to approximate the shapes in the reference.

I took a mould and did some casts so the elements were one piece rather than several stuck together. The angle piece I trimmed to shape post casting.

One of the jobs I has been dreading turned out not to be too painful after all. This was the fabrication of some more screen accurate pad eyes. The thought of piercing out the steel base plates had been putting me off.

I found some small shackles that were the right size and trimmed off the bottoms. A lucky find which saved me bending some steel in a tight radius.

Dry fitted here.

Silver soldered here.

Cleaned up a bit here for a comparison next to the shop bought one.

Fitted to the top vent here (not he right type of bolts).

And the same here at the rear.

Colin
_________________
Ripley: What's it key on?
Ash: Micro changes in air density. |
|
| Back to top |
|
|
|
|
|
|
|
|
|
|
|
| Author |
Message |
joberg
Community Member
Joined: 06 Oct 2008
Posts: 9447
|
| Posted: Sun Jan 31, 2016 11:50 am Post subject: |
|
|
Winter blues  Don't say that to a person hating winter and living in Canada Don't say that to a person hating winter and living in Canada  ...but I digress. ...but I digress.
I'm happy that you're back at it. As for any project, sometimes it's the little things that make us continue the said project.
Really eager to see the rest coming to life! |
|
| Back to top |
|
|
|
|
|
|
|
|
|
|
|
| Author |
Message |
8th_Passenger
Community Member
Joined: 28 Nov 2009
Posts: 443
Location: Hertfordshire, UK
|
| Posted: Sat Feb 06, 2016 6:48 pm Post subject: |
|
|
Thanks for your comments joberg.
To tell the truth it isn't just the winter blues. I've had to do a large home improvement project which has taken up a lot of my time.
Its got to the point where I'm having to resolve a lot of unresolved small details. Things I've been putting off. If I want to get this project finished then I've just go to get on with it.
Here's a test for the detail where the emitter meets the body. The reference seems to suggest that there is one of these wedge shaped sliders on the left side and two on the right. The ones on the right are hard to make out. They could be two different shapes. I decided to standardize them using the same slider in all locations. These blocks have fallen off during production and we can see some of the marks where they have been. In a way I'm trying to created something that's never really been seen. So at the monment it's looking a bit odd.


Hopefully when its all painted it will blend in and look the part!
Next it was time to see if I could make the pilot flame a reality.
I pre drilled some holes for the staple to hold the copper tube to the body.

Then I drilled the entry hole for the gas feed into the nozzle end.

I silver soldered my brass reducer component to the gas fitting I had bought .

Assembled here.
.jpg)
With all joints a good fit and sealed I lit the end of the pipe for a test.


Result!
Still some work to do which I will explain in another post.
While I was set up for soldering I bent up the pipe which exits the base of the white tank. I had to turn the end down first so it would slot into the fitting.
I bent it around some 2" steel I had left over from the nozzle.


Dry fitted in position. I've yet to decided where the entry hole into the underside is.

More decisions!
So here's an overview of where I'm at.
.jpg)
More soon
Colin
_________________
Ripley: What's it key on?
Ash: Micro changes in air density. |
|
| Back to top |
|
|
|
|
|
|
|
|
|
|
|
| Author |
Message |
SKIN JOB 66
Community Member
Joined: 16 Jan 2008
Posts: 2724
Location: FRANCE
|
| Posted: Sun Feb 07, 2016 9:59 am Post subject: |
|
|
BRILLIANT thoughts and work Colin, I'm amazed once again !!!
Fred
_________________
THE FUTURE IS A THING OF THE PAST |
|
| Back to top |
|
|
|
|
|
|
|
|
|
|
|
| Author |
Message |
joberg
Community Member
Joined: 06 Oct 2008
Posts: 9447
|
| Posted: Sun Feb 07, 2016 10:47 am Post subject: |
|
|
I hate renos for that reason: too many little details that makes for a lot of work at the end 
Rant over
It's looking good Colin; the pilot light makes it more exciting than ever! |
|
| Back to top |
|
|
|
|
|
|
|
|
|
|
|
| Author |
Message |
SSB
Community Member
Joined: 15 Apr 2007
Posts: 175
Location: Florida, USA
|
| Posted: Sun Feb 07, 2016 4:07 pm Post subject: |
|
|
"And it really, really works!"
Fantastic. |
|
| Back to top |
|
|
|
|
|
|
|
|
|
|
|
| Author |
Message |
8th_Passenger
Community Member
Joined: 28 Nov 2009
Posts: 443
Location: Hertfordshire, UK
|
| Posted: Sun Feb 07, 2016 4:37 pm Post subject: |
|
|
Fred, joberg, thanks for the comments.
I'm getting close now to painting the flamethrower.
This means gluing on the left side permanently! I think I've done everything I need to inside. The grip assembly will unbolt leaving me a half inch gap on the underside should I need to gain access. The flexible gas pipe I can feed in through the pre drilled hole on the right side.
My plan is to paint the unit white then give the surface a grey wash before adding the detail. I had toyed with an 'off white' but I think just a good coat of white primer as a top coat should be a good base.
On the Propstore unit there is a tan/yellow paint which shows through in some areas. This looks like a filler primer spray you can get here in the Uk form a car accessory and bicycle shop called Halfords.
So what I'm thinking is prime the unit grey first so I can do all my final filling and sanding. Then a coat of the yellow filler primer and then a white top coat. This way I can rub back the white leaving the yellow or grey.
Having said all that the yellow primer only really shows through on the unit Propstore used to own. Illustrated here in this photo. It's where the missing slider knobs used to be.

I have to admit I don't really like any of the paint jobs on the various units post filming.
Here are a selection of images to illustrate. The last three being the Propstore unit.

I much prefer the look of the units during filming which have a much more even white top coat and grey wash.

I like the stripe on the bottom of the white tank in the photo on the back seat.
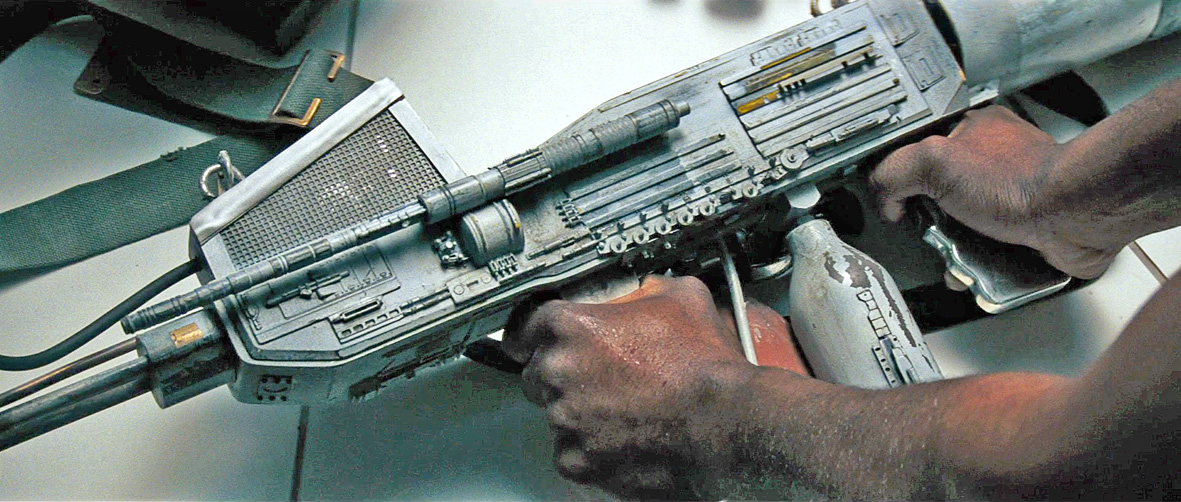
The paint reference for the left side will be this shot from the film. I especially like the paint work on the tanks.
Colin
_________________
Ripley: What's it key on?
Ash: Micro changes in air density. |
|
| Back to top |
|
|
|
|
|
|
|
|
|
|
|
| Author |
Message |
8th_Passenger
Community Member
Joined: 28 Nov 2009
Posts: 443
Location: Hertfordshire, UK
|
| Posted: Sun Feb 07, 2016 4:46 pm Post subject: |
|
|
Thanks for your comment SSB.
I was pleased with my pilot flame test.
I think I can improve on it. I will explain how in a future post.
Just knowing I can achieve a small flame safely bodes well for the finished photos!
Colin
_________________
Ripley: What's it key on?
Ash: Micro changes in air density. |
|
| Back to top |
|
|
|
|
|
|
|
|
|
|
|
|
You cannot post new topics in this forum
You cannot reply to topics in this forum
You cannot edit your posts in this forum
You cannot delete your posts in this forum
You cannot vote in polls in this forum
|
|
|
|
|
|
|
|


