 |
 |
|
 |
|
| Author |
Message |
bwade wanna
Community Member

Joined: 03 Mar 2010
Posts: 133
|
 Posted: Thu Nov 06, 2014 2:51 am Post subject: My polished Tomenosuke Pro Retail + weaver knob question Posted: Thu Nov 06, 2014 2:51 am Post subject: My polished Tomenosuke Pro Retail + weaver knob question |
 |
|
Hi all
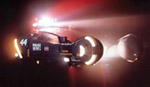
Here is my humble attempt at buffing my amber grips and achieving a deep black shine on the receiver and bolt handle of my Tomenosuke Pro Retail - with the help of 000 grit sand paper, steel wool, a black Sharpie, and endless layering and polishing.
Aside from replacing the plastic barrel with a bored-out steel barrel, if another run is ever done (hence I didn't bother polishing the plastic one), I want to swap out the slotted screw on the bolt side with a real Weaver windage/elevation knob. From the instruction sheet, the slotted screw does not appear threaded, and it barely budges when I try to loosen it, so I don't want to turn it too hard and accidentally cause damage. Can someone help guide me through the safe removal of the screw?
Thanks in advance!


 |
|
| Back to top |
|
|
|
|
 |
|
 |
|
|
|
|
| Author |
Message |
racprops
Community Member

Joined: 30 Oct 2006
Posts: 2450
Location: Phoenix AZ
|
| Posted: Thu Nov 06, 2014 5:42 am Post subject: |
|
|
From the Pro KIT it is not a real screw.
It and the front facing binding screw both appear to be simple pressed fitted. Also their holes are too large so the real screws will not fit tightly after you were to drill them out to their size and cannot be threaded to the correct sizes.
Second as you have NOT gone with the ware and tear of a a Worldcon model hay go with the Weaver Knob which is NOT viable anywhere in the film??
Trust me many have tried to find it and it is not there.
Any why here is a picture of a Pro Kit side cover.
PS NICE job by the way.
Rich

_________________
I never have enough time to do all I want to do! |
|
| Back to top |
|
|
|
|
|
|
|
|
|
|
|
| Author |
Message |
Buch
Community Member

Joined: 27 Feb 2014
Posts: 1184
Location: Copenhagen, Denmark
|
| Posted: Thu Nov 06, 2014 8:09 am Post subject: |
|
|
You literally just drew on the receiver with a sharpie and polished it?!? Think the result is good 
_________________
Monsieur, azonnal kövessen engem bitte |
|
| Back to top |
|
|
|
|
|
|
|
|
|
|
|
| Author |
Message |
bwade wanna
Community Member
Joined: 03 Mar 2010
Posts: 133
|
| Posted: Thu Nov 06, 2014 10:29 am Post subject: |
|
|
Rich, thanks so much for your kind words, insight, and comments!
I realize the Weaver knob never made it into the film, but it has become so iconic a symbol of the Worldcon hero blaster, that it's grown on me and also feels more appropriate a greebly than a massive slotted screw.
As for the replacement of the screw with a real Weaver knob, I figured that after I extract the screw like a stubborn tooth, I can do one of the following three:
1) fill the cavity with solder and then carefully tap it with the correct Weaer knob thread (10-32)
2) fill it with epoxy instead and tap it once it's cured.
3) drill out a larger hole in the cavity and either epoxy or press-fit a threaded insert (after I've shortened it by grinding).

Which method do you recommend?
Buch, thanks for the compliment! I first polished the heck out of the parts and then applied the Sharpie in layers, gently polishing & buffing until I got nice even finish. I first tried it out on a test area on the inside of the receiver and was very pleased with the result. At first I considered a Sharpie because I didn't want to deal with the bluing fumes, but Sharpie fumes are not that much better! |
|
| Back to top |
|
|
|
|
|
|
|
|
|
|
|
| Author |
Message |
Bwood
Community Member
Joined: 20 Sep 2009
Posts: 843
|
| Posted: Thu Nov 06, 2014 1:04 pm Post subject: |
|
|
Wow - a Sharpie. I have been dreading bluing mine because I have no bluing experience whatsoever. I will have to try this.
What, if anything, do you use to protect the finish, (since Sharpie isn't known for it's durability as a metal finish to say the least.) |
|
| Back to top |
|
|
|
|
|
|
|
|
|
|
|
| Author |
Message |
bwade wanna
Community Member
Joined: 03 Mar 2010
Posts: 133
|
| Posted: Thu Nov 06, 2014 1:51 pm Post subject: |
|
|
Hi Bwood. I haven't sealed it yet, so I'm very careful not to touch the finish with my bare hands yet. I was thinking of using Meguiar’s #21 Mirror Glaze Synthetic Sealant 2.0, which I just happen to have lying around. Here's what it looks like:

Since Sharpie markers are alcohol-based (specifically propanol, butanol, and diacetone), make sure that whatever sealant you use is either synthetic or water-based, with no alcohol content, otherwise it will cause the Sharpie to streak.
Any other sealing suggestions are welcome! |
|
| Back to top |
|
|
|
|
|
|
|
|
|
|
|
| Author |
Message |
hirohawa
Community Member

Joined: 18 May 2006
Posts: 1067
|
| Posted: Thu Nov 06, 2014 2:13 pm Post subject: |
|
|
Wow. That finish with a sharpie - just wow.
Great work |
|
| Back to top |
|
|
|
|
|
|
|
|
|
|
|
| Author |
Message |
bwade wanna
Community Member
Joined: 03 Mar 2010
Posts: 133
|
| Posted: Thu Nov 06, 2014 3:31 pm Post subject: |
|
|
High praise, coming from you, Hirohawa - I blush! 
There's no way I'm the first person to think of using a Sharpie... It just BEGS to be tried, lol!
Last edited by bwade wanna on Thu Nov 06, 2014 9:20 pm; edited 1 time in total |
|
| Back to top |
|
|
|
|
|
|
|
|
|
|
|
| Author |
Message |
racprops
Community Member
Joined: 30 Oct 2006
Posts: 2450
Location: Phoenix AZ
|
| Posted: Thu Nov 06, 2014 3:34 pm Post subject: |
|
|
The insert looks good.
I would go with the one I have done before.
I have not done either of yours.
Rich
_________________
I never have enough time to do all I want to do! |
|
| Back to top |
|
|
|
|
|
|
|
|
|
|
|
| Author |
Message |
joberg
Community Member
.jpg)
Joined: 06 Oct 2008
Posts: 9447
|
| Posted: Thu Nov 06, 2014 7:03 pm Post subject: |
|
|
Sharpie can be used for a lot of things and that's one thing you can add to the list 
Beautiful job on that gun; I dare anyone to tell me it's a pro blueing method!! |
|
| Back to top |
|
|
|
|
|
|
|
|
|
|
|
| Author |
Message |
corellian77
Community Member

Joined: 29 May 2011
Posts: 58
|
| Posted: Thu Nov 06, 2014 10:43 pm Post subject: |
|
|
Unreal... I can't believe you were able to achieve that finish with a Sharpie!  I assume this was the kit, not the assembled model, correct? I assume this was the kit, not the assembled model, correct? |
|
| Back to top |
|
|
|
|
|
|
|
|
|
|
|
| Author |
Message |
bwade wanna
Community Member
Joined: 03 Mar 2010
Posts: 133
|
| Posted: Fri Nov 07, 2014 12:10 am Post subject: |
|
|
Corellian,
I own the retail version. I still have a Sidkit Worldcon that I barely got started on 4 years ago, but put aside when my daughter was born. Hence my long hiatus from the forum. I knew that if I bought the Tomenosuke Pro kit, with my luck we'd get pregnant again and the same thing would happen. So I paid a little more for a finished blaster and have been tinkering with it in my spare time (painting, polishing, wiring, etc.)
Now I'll finally swap out the slotted screw for a real Weaver knob and figure out how to get me a steel barrel. If no-one's selling, I'll probably use Sketchup to reverse-engineer the plastic barrel and send it out to a local machine shop. Oh, and I have a cool idea for a stand (no, it won't involve a Sharpie!) |
|
| Back to top |
|
|
|
|
|
|
|
|
|
|
|
| Author |
Message |
cratercritter
Community Member
Joined: 15 Jul 2009
Posts: 558
|
| Posted: Fri Nov 07, 2014 7:00 am Post subject: |
|
|
Wow... your blaster looks very Sharp!
Well done. Looks like it was blued. |
|
| Back to top |
|
|
|
|
|
|
|
|
|
|
|
| Author |
Message |
clutch
Community Member
Joined: 12 Dec 2006
Posts: 548
|
| Posted: Mon Nov 10, 2014 9:17 am Post subject: |
|
|
| Did you put an extra LED in it? |
|
| Back to top |
|
|
|
|
|
|
|
|
|
|
|
| Author |
Message |
bwade wanna
Community Member
Joined: 03 Mar 2010
Posts: 133
|
| Posted: Mon Nov 10, 2014 6:40 pm Post subject: |
|
|
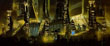
Clutch, yes - I bought 3 mm DIP 2-pin green LEDs and cut off the flanges so they would fit inside the Jeweler's drill. Then I drilled out the LED mounting cavities so I could run wires to the pins. I added a momentary switch inside the frame just forward of the trigger so I could get the laser-ranging effect I was going for. The LEDs draw power directly from the red LED battery holder contacts with a resistor in between.
Today I got around to knocking out the slotted screw and drilling through the D-shaft hole in the right hand side cylinder cover. I decided not to press-fit the brass threaded insert into an undersized hole because I'd read how other people had broken the bridge between the front and rear sections, and I didn't want to take any chances - the larger hole left very little metal on one side of it and thus no room for error. I ended up just using LocTite Heavy Duty 5-Minute setting epoxy, and I used the flat surface behind the slotted screw to register the Weaver Knob while the epoxy set between the insert and the hole. I also rotated the insert so that the Weaver knob would be in the correct Worldcon orientation if I bottomed out the knob on the insert.
I still have to file away the edge of the Mannlicher magazine so it fits around the insert and paint the insert black. More pics soon & thanks fore visiting!


 |
|
| Back to top |
|
|
|
|
|
|
|
|
|
|
|
| Author |
Message |
joberg
Community Member
Joined: 06 Oct 2008
Posts: 9447
|
| Posted: Mon Nov 10, 2014 7:04 pm Post subject: |
|
|
| So far so good...I like the slotted screw myself, but the Weaver Knob is not looking bad per say |
|
| Back to top |
|
|
|
|
|
|
|
|
|
|
|
| Author |
Message |
Robotprops
Community Member
Joined: 11 Apr 2010
Posts: 280
Location: Vancouver, B.C.
|
| Posted: Tue Nov 11, 2014 3:05 am Post subject: |
|
|
As a side note, has it been revealed that the slotted screw is also from the Weaver scope?
I recently bought a few at a vintage gun show and was a little surprised to realize that. |
|
| Back to top |
|
|
|
|
|
|
|
|
|
|
|
| Author |
Message |
racprops
Community Member
Joined: 30 Oct 2006
Posts: 2450
Location: Phoenix AZ
|
| Posted: Tue Nov 11, 2014 5:07 am Post subject: |
|
|
| Robotprops wrote: | As a side note, has it been revealed that the slotted screw is also from the Weaver scope?
I recently bought a few at a vintage gun show and was a little surprised to realize that. |
Pictures?
Rich
_________________
I never have enough time to do all I want to do! |
|
| Back to top |
|
|
|
|
|
|
|
|
|
|
|
| Author |
Message |
Robotprops
Community Member
Joined: 11 Apr 2010
Posts: 280
Location: Vancouver, B.C.
|
| Posted: Tue Nov 11, 2014 6:07 pm Post subject: |
|
|
 |
|
| Back to top |
|
|
|
|
|
|
|
|
|
|
|
| Author |
Message |
racprops
Community Member
Joined: 30 Oct 2006
Posts: 2450
Location: Phoenix AZ
|
| Posted: Tue Nov 11, 2014 6:16 pm Post subject: |
|
|
Sorry not a match.
Rich
_________________
I never have enough time to do all I want to do! |
|
| Back to top |
|
|
|
|
|
|
|
|
|
|
|
|
You cannot post new topics in this forum
You cannot reply to topics in this forum
You cannot edit your posts in this forum
You cannot delete your posts in this forum
You cannot vote in polls in this forum
|
|
|
|
|
|
|
|


