 |
 |
|
 |
|
| Author |
Message |
DARKVIEW
Community Member

Joined: 06 Aug 2015
Posts: 51
Location: UK
|
 Posted: Wed Sep 16, 2015 9:29 am Post subject: Posted: Wed Sep 16, 2015 9:29 am Post subject: |
 |
|
Cheers RIch, mine didn't have guide holes on those inner parts so i didnt know where to drill!! (some are there on other parts to guide, some not! Abouts the gun).
_________________
https://www.facebook.com/darkview
http://twitter.com/darkview
Last edited by DARKVIEW on Wed Sep 16, 2015 10:27 am; edited 1 time in total |
|
| Back to top |
|
|
|
|
 |
|
 |
|
|
|
|
| Author |
Message |
racprops
Community Member

Joined: 30 Oct 2006
Posts: 2450
Location: Phoenix AZ
|
| Posted: Wed Sep 16, 2015 9:32 am Post subject: |
|
|
Well are you showing pictures of YOUR model??
R
_________________
I never have enough time to do all I want to do! |
|
| Back to top |
|
|
|
|
|
|
|
|
|
|
|
| Author |
Message |
DARKVIEW
Community Member
Joined: 06 Aug 2015
Posts: 51
Location: UK
|
|
| Back to top |
|
|
|
|
|
|
|
|
|
|
|
| Author |
Message |
racprops
Community Member
Joined: 30 Oct 2006
Posts: 2450
Location: Phoenix AZ
|
| Posted: Wed Sep 16, 2015 9:52 am Post subject: |
|
|
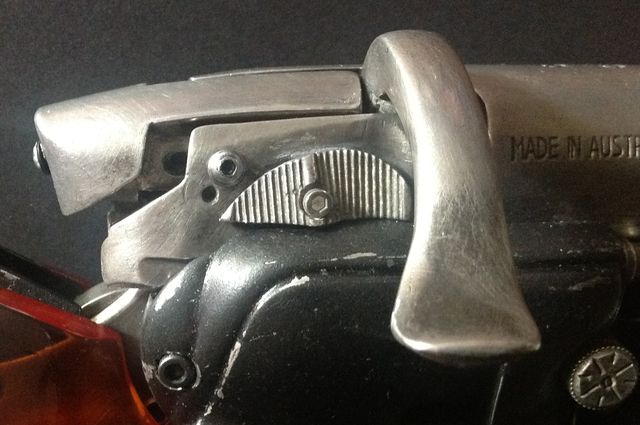
OK first you want to cut the grip frame level with the grips.
Next I see there is a pair of holes in the rear cap and the back of the bolt.
You may have to glue a 4/40 nut inside the back of the bolt so you can thread a round head 4/40 screw though the rear cap to the bolts.
Next see the dimple above notch behind the safety?? It is where you drill with a #43 drill and thread for a another 4/40 round head screw.
This screw has to be just long enough to fit though the slot but not bind the bolt.
The safety is held by a small round head screw not that allen cap screw.
Check out the picture I posted for these details.
_________________
I never have enough time to do all I want to do! |
|
| Back to top |
|
|
|
|
|
|
|
|
|
|
|
| Author |
Message |
DARKVIEW
Community Member
Joined: 06 Aug 2015
Posts: 51
Location: UK
|
| Posted: Wed Sep 16, 2015 10:11 am Post subject: |
|
|
Cheers will do that when lve a bit time. (Wifey wants her chest of drawers fixed now!!!). Tut! One good thing is apart from my created weathering while disassembly/construction etc.. I create natural weathering from handling it etc and of course being careful of the taped threads wearing out etc.. When it's finished it gets it's final weathering coat/ bluing etc
_________________
https://www.facebook.com/darkview
http://twitter.com/darkview
Last edited by DARKVIEW on Wed Sep 16, 2015 10:34 am; edited 6 times in total |
|
| Back to top |
|
|
|
|
|
|
|
|
|
|
|
| Author |
Message |
racprops
Community Member
Joined: 30 Oct 2006
Posts: 2450
Location: Phoenix AZ
|
| Posted: Wed Sep 16, 2015 10:13 am Post subject: |
|
|
OK Have fun storming the castle...
_________________
I never have enough time to do all I want to do! |
|
| Back to top |
|
|
|
|
|
|
|
|
|
|
|
| Author |
Message |
Bwood
Community Member
Joined: 20 Sep 2009
Posts: 843
|
| Posted: Wed Sep 16, 2015 10:39 am Post subject: |
|
|
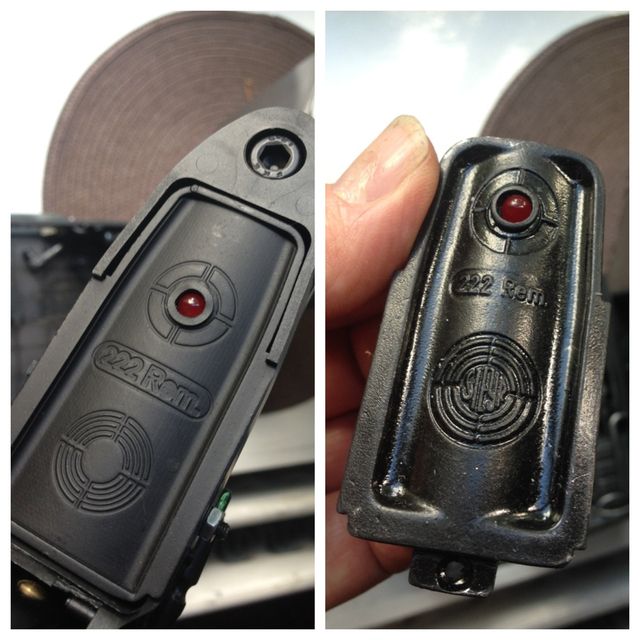
| Quote: | | Thought l'd show people the LED Casing for a OFFWORLD prebuilt (top left) & my SidKit Worldcon right below... |
I've often wondered if the Offworld electronics would fit in a Sidkit. IMO, so much more professional... |
|
| Back to top |
|
|
|
|
|
|
|
|
|
|
|
| Author |
Message |
DARKVIEW
Community Member
Joined: 06 Aug 2015
Posts: 51
Location: UK
|
| Posted: Wed Sep 16, 2015 10:48 am Post subject: |
|
|
Yeah!! I've tried & it fits, not perfect but not to shoddy  main difference is the main underside info & detail... (REM222 looks font different & Steyr missing in center logo) and its silky production manufacturing coat but its mainly simple,well done LED systems a plus...still back to soldering & good old fashion messy wiring...erhhh!!! main difference is the main underside info & detail... (REM222 looks font different & Steyr missing in center logo) and its silky production manufacturing coat but its mainly simple,well done LED systems a plus...still back to soldering & good old fashion messy wiring...erhhh!!!
Left: OFFWORLD. Right: Sidkit.
_________________
https://www.facebook.com/darkview
http://twitter.com/darkview
Last edited by DARKVIEW on Wed Sep 16, 2015 5:36 pm; edited 2 times in total |
|
| Back to top |
|
|
|
|
|
|
|
|
|
|
|
| Author |
Message |
Bwood
Community Member
Joined: 20 Sep 2009
Posts: 843
|
| Posted: Wed Sep 16, 2015 11:03 am Post subject: |
|
|
| I was referring to just the electronics fitting into a Sidkit ammo clip.. |
|
| Back to top |
|
|
|
|
|
|
|
|
|
|
|
| Author |
Message |
DARKVIEW
Community Member
Joined: 06 Aug 2015
Posts: 51
Location: UK
|
| Posted: Wed Sep 16, 2015 11:11 am Post subject: |
|
|
I see...I'd hate to strip a perfectly expenise light system from a OFFWORLD to a Sidkit build . But electronics experts should know the parts etc to replicate... A tad out of my jurisdiction... I want more lights....fella;-)
_________________
https://www.facebook.com/darkview
http://twitter.com/darkview |
|
| Back to top |
|
|
|
|
|
|
|
|
|
|
|
| Author |
Message |
racprops
Community Member
Joined: 30 Oct 2006
Posts: 2450
Location: Phoenix AZ
|
|
| Back to top |
|
|
|
|
|
|
|
|
|
|
|
| Author |
Message |
DARKVIEW
Community Member
Joined: 06 Aug 2015
Posts: 51
Location: UK
|
| Posted: Mon Sep 21, 2015 8:09 am Post subject: |
|
|
I'm going to get back to the lighting of this Sidkit later, l want to understand all involved with it first & possible other options like OFFWORLD!!?!!
Wishing I'd titled this build SIDKIT WORLDCON BUILD (pros & cons).
Anyway I've been studying many shots of the Karl Tate shots on RPF gallery... Just to create a few more details to the original movie prop...(thanks to them). I want mine total grunge/knocks/scrapes & possibly rusted like the hero gun...tho I do think the rust is its years since the movie!!. That l build on come the time.
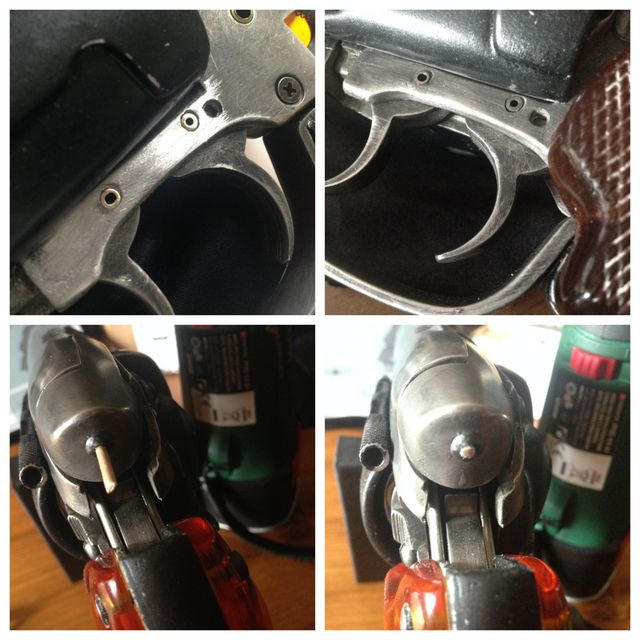
The top 2 show the trigger pins, l sanded the cooper ones down you get and then added with a brush the bluing agent... Now l know the originals look almost faded & none existent but l like them, later should l want l can fill the 'holes'.
Bottom 2 show the curious case of the slight bit of wood (it seems) at the end receiver bolt Alun screw!!! so a tad of cocktail stick recreates that!!
Note:I've to warm up the main bottom arch-sides that hold the back receiver bolt part to fit around it more snug...that's later when near complete!! And to anyone doing the main bluing at 1st be careful of these bottom sides when treating/washing/wool sanding etc as they can bend without you really noticing due to there thin arch sides!!!
_________________
https://www.facebook.com/darkview
http://twitter.com/darkview |
|
| Back to top |
|
|
|
|
|
|
|
|
|
|
|
| Author |
Message |
Staar
Community Member

Joined: 04 Feb 2008
Posts: 757
Location: AUSTRALIA
|
| Posted: Mon Sep 21, 2015 11:22 am Post subject: |
|
|
Very invigorating seeing this build as you're working, cheers for sharing.
I think I used a matchstick for the receiver and also one in the rear of the grip - so great to see your solution.

If I may can I suggest that you replace the hollow trigger tubes with solid rods and round off the head of the screw on your thumb release so that its not so clearly an alien part as it is on the Sid?
Looking forward to seeing how this progresses.
High regards
MARK
_________________
 |
|
| Back to top |
|
|
|
|
|
|
|
|
|
|
|
| Author |
Message |
DARKVIEW
Community Member
Joined: 06 Aug 2015
Posts: 51
Location: UK
|
| Posted: Mon Sep 21, 2015 2:49 pm Post subject: |
|
|
Cheers Staar, going to get some solid rods at some point or fill in mine!!
Wonder what the hell the bit of wood in the alun screw was supposed to be about!!? I reckon a mistake...
_________________
https://www.facebook.com/darkview
http://twitter.com/darkview |
|
| Back to top |
|
|
|
|
|
|
|
|
|
|
|
| Author |
Message |
racprops
Community Member
Joined: 30 Oct 2006
Posts: 2450
Location: Phoenix AZ
|
| Posted: Mon Sep 21, 2015 2:55 pm Post subject: |
|
|
I think it was just mud.
The Blaster as found was dirty.
The grips had mud in the pattern.
Rich
_________________
I never have enough time to do all I want to do! |
|
| Back to top |
|
|
|
|
|
|
|
|
|
|
|
| Author |
Message |
DARKVIEW
Community Member
Joined: 06 Aug 2015
Posts: 51
Location: UK
|
|
| Back to top |
|
|
|
|
|
|
|
|
|
|
|
| Author |
Message |
joberg
Community Member
.jpg)
Joined: 06 Oct 2008
Posts: 9447
|
| Posted: Sat Sep 26, 2015 8:07 am Post subject: |
|
|
TFS your build DARKVIEW. Looking good so far and glad you're putting little details in as to make it closer to the original  |
|
| Back to top |
|
|
|
|
|
|
|
|
|
|
|
| Author |
Message |
DARKVIEW
Community Member
Joined: 06 Aug 2015
Posts: 51
Location: UK
|
|
| Back to top |
|
|
|
|
|
|
|
|
|
|
|
| Author |
Message |
hirohawa
Community Member

Joined: 18 May 2006
Posts: 1067
|
| Posted: Sat Sep 26, 2015 2:44 pm Post subject: |
|
|
| DARKVIEW wrote: | | Now that's funny, looks more wood than mud! But who knows who owned the original all these years then? |
I think Rich is using the word "mud" as a term for plaster as the blaster had a lot of residue from going through the bathroom wall in the Batty chase sequence. |
|
| Back to top |
|
|
|
|
|
|
|
|
|
|
|
|
You cannot post new topics in this forum
You cannot reply to topics in this forum
You cannot edit your posts in this forum
You cannot delete your posts in this forum
You cannot vote in polls in this forum
|
|
|
|
|
|
|
|


