 |
 |
|
 |
|
| Author |
Message |
Anson James
Community Member

Joined: 31 Oct 2006
Posts: 168
Location: Ireland.
|
 Posted: Fri Jul 25, 2008 8:31 pm Post subject: Posted: Fri Jul 25, 2008 8:31 pm Post subject: |
 |
|
I received my kit from Sid today and it's beautiful.
It was given to me because I offered him some help a short while ago.
As it turned out he didn't need my help but he STILL sent me a free kit!
Not only is he a great artist and model maker - he's a gentleman too  |
|
| Back to top |
|
|
|
|
 |
|
 |
|
|
|
|
| Author |
Message |
clutch
Community Member

Joined: 12 Dec 2006
Posts: 548
|
| Posted: Sun Jul 27, 2008 3:05 pm Post subject: |
|
|
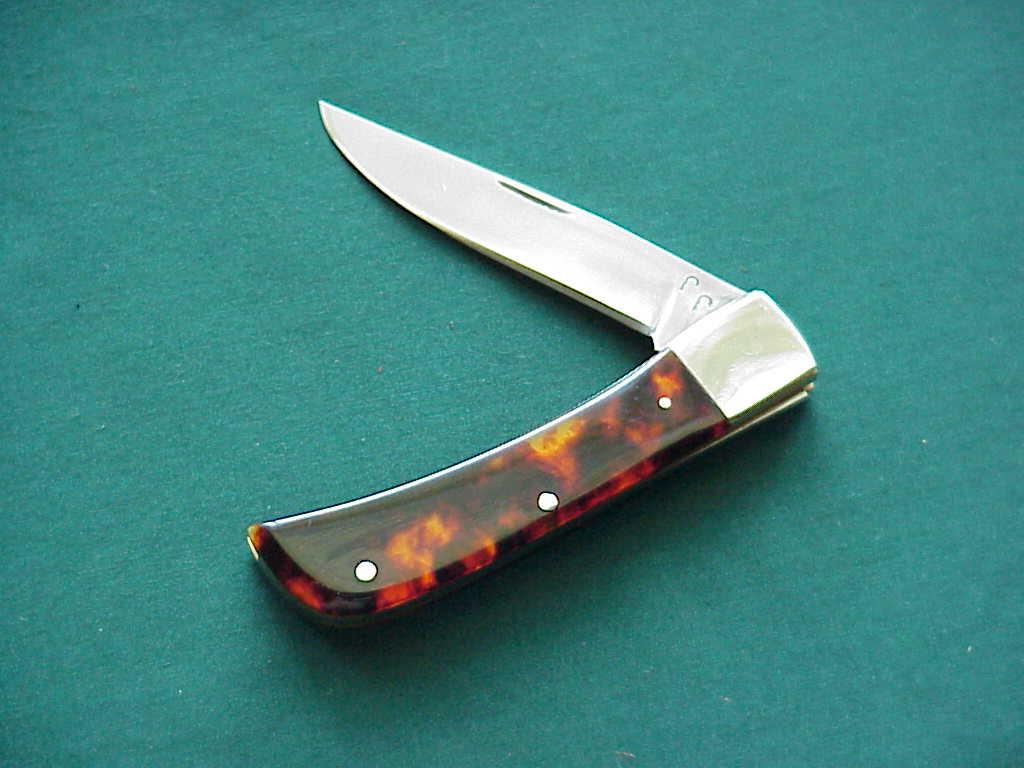
here's a pic of Sid's all polished up.

Just seems to me like the wire brush would be too harsh on the metal, but I guess not. I'll find out soon enough though. |
|
| Back to top |
|
|
|
|
|
|
|
|
|
|
|
| Author |
Message |
clutch
Community Member
Joined: 12 Dec 2006
Posts: 548
|
| Posted: Sun Jul 27, 2008 7:11 pm Post subject: |
|
|
| I'm also wondering why he decided to cast the three screws at the top instead of actually including screws? |
|
| Back to top |
|
|
|
|
|
|
|
|
|
|
|
| Author |
Message |
Anson James
Community Member
Joined: 31 Oct 2006
Posts: 168
Location: Ireland.
|
| Posted: Sun Jul 27, 2008 8:18 pm Post subject: |
|
|
| clutch wrote: | | I'm also wondering why he decided to cast the three screws at the top instead of actually including screws? |
It probably saved the hassle of buying or making the screws - it didn't particularly bother me too much that they were part of the casting.
Incidentally, the brass wire brush isn't half as abrasive as I thought it would be. |
|
| Back to top |
|
|
|
|
|
|
|
|
|
|
|
| Author |
Message |
eltee
Community Member
Joined: 31 Oct 2006
Posts: 437
Location: West Coast USA
|
| Posted: Sun Jul 27, 2008 11:56 pm Post subject: |
|
|
Now you've got me drooling and imagining. We have the "clean" versions and the worn looking "Worldcon" version of the blaster. Now I see the potential to build a "presentation" version of the blaster!!
With real guns, you get "clean" ones out of the box, leave them untended for a while and they look like the "Worldcon" but you can generally buy one that is nickle plated, polished stainless, etc. Might be cool for someone to do a high polish version and not paint any of it, especially since Siderio offers the ammo mag in metal.
On the top screws, it would be possible with a milling machine or good drill press to drill out the molded in screws and replace them with real ones.
On the metal Siderio uses, I suspect you might have to spray it with a protective coat after polishing to keep it from tarnishing.
Beautiful work. |
|
| Back to top |
|
|
|
|
|
|
|
|
|
|
|
| Author |
Message |
amish
Community Guide
Joined: 11 Apr 2006
Posts: 1433
Location: Outside Philadelphia
|
|
| Back to top |
|
|
|
|
|
|
|
|
|
|
|
| Author |
Message |
Batty
Community Member

Joined: 17 Feb 2008
Posts: 15
|
| Posted: Sun Aug 10, 2008 9:57 am Post subject: |
|
|
Well it's been awful quiet around here lately. Everybody hard at work on their Sidkits I suppose.
Well come on, lets see 'em...
_________________
Good evening JF! |
|
| Back to top |
|
|
|
|
|
|
|
|
|
|
|
| Author |
Message |
clutch
Community Member
Joined: 12 Dec 2006
Posts: 548
|
| Posted: Sun Aug 10, 2008 10:50 am Post subject: |
|
|
Just got two of those brass wire bits for the dremel. Just a friendly reminder to those thinking about doing this: wear eye protection! I polished up a batarang with one just to try it out and every now and then, I'd feel something hit me in the face. When I finished, there were tiny little needles all over. They were the wires that had come out of the brush. Some were stuck in my shirt. lol! It's also a bitch to step on these barefoot!
I want to get started soon, but I'm gonna take my time. I'm also thinking about filling some of the screw holes in the handle to make it more accurate and possibly drilling/tapping the top ones, but I've never worked with melting metal or the tapping part. Any suggestions?
I also want to polish it up and assemble it to see what it looks like first. If it looks good, I may just have to get another.  I also want to experiment with handle inserts to make them look more like tortise shell grips: I also want to experiment with handle inserts to make them look more like tortise shell grips:
 |
|
| Back to top |
|
|
|
|
|
|
|
|
|
|
|
| Author |
Message |
The Loyalizer
Community Member

Joined: 08 Oct 2007
Posts: 742
Location: Down in 4th Sector, Chinatown
|
| Posted: Sun Aug 10, 2008 5:36 pm Post subject: |
|
|
On the last blaster I did, I made some tortoise shell patterns, then printed them out on a transparency, then traced the shape of the grips and cut out the transparency. I just laid the transparency on the back of the grips when I screwed them onto the frame and it sort of nailed the look.
If nothing else, if you decide it doesn't look good, you just unscrew the grip and remove the transparency. This way you don't damage the grips. I know there was a post in the PKD show off thread where someone had cast their own grips and had poured color into the resin while it was setting and they had gotten a decent tortoise shell look to it.
EDIT: It was in the Pimped My Gat thread, but unfortunately the pics are no longer showing.
_________________

"We began to recognize in them a strange obsession..."
http://fcomin.cgsociety.org/gallery/ |
|
| Back to top |
|
|
|
|
|
|
|
|
|
|
|
| Author |
Message |
clutch
Community Member
Joined: 12 Dec 2006
Posts: 548
|
| Posted: Mon Aug 11, 2008 9:29 am Post subject: |
|
|
| I have it in pieces now, so it begins... |
|
| Back to top |
|
|
|
|
|
|
|
|
|
|
|
| Author |
Message |
luvsdaheat
Joined: 28 Nov 2007
Posts: 3
Location: Sunny Palm Springs
|
| Posted: Mon Aug 11, 2008 9:34 am Post subject: |
|
|
| clutch wrote: |
I want to get started soon, but I'm gonna take my time. I'm also thinking about filling some of the screw holes in the handle to make it more accurate and possibly drilling/tapping the top ones, but I've never worked with melting metal or the tapping part. Any suggestions?
|
Been doing just that - drilling/tapping the top (actually all the) screws - I used "authentic" #6 set screws - from a gun smith sight mounting kit (but any #6 you can find that's slotted will do, I'm sure, since coarse/fine threads don't matter!).
Working with that metal is easy but at the same time difficult because you can overdo the Dremel even when being careful and ruin a piece. Melting it is the same: easy to melt, but like soldering, takes a LOT of practice and patience.
Since it has no lead it's a little crankier to work with: less flexible than you think it should be, it'll crack when it "should" bend, etc.. It also takes (for me, at least) the right tools - good soldering guns, heaters, torches, mould trays (can be kitchen utensils) - stuff for bullet casting - to handle molten metal (yes, it's low temp, but it can and will splatter!), etc... Oh, and when melting, soldering or just heating up to smooth, or "carve" that metal always use a quality FLUX (I like Ruby brand - red liquid that can go in a small spray bottle).
Often, the more I work with a piece from that kit, the easier it is to total it! Just as I'm thinking "yes, I got it looking right!" something goes haywire - I'll drop it cuz the metal's slippery - or scratch, dent, melt, etc... (p.s., it'll dirty up the hands, gotta have good gloves, too!)
I am not trying to deter you, just the opposite. I enjoy doing this stuff ; a lot, and having fiddled with models and metals like this off and on for many years, sometimes using little more than an alcohol lamp and x-acto, I will say that it can be done with only a few tools. But having the files, taps, correct size drill bits, razor knife, etc.. lets me keep more hair on my head - note that it does not automatically make me a better builder, I just get to make classier mistakes! Seriously, the right tools really do help to bring out one's creative best.
IMHO: Drill press - Dremel or otherwise - is a must if you even think that you want to tackle removing and replacing any of the screws.
(and BTW, the Dremel drill press "frame" is pretty cool - it mounts your Dremel tool, even the bada%$ Li-ion 10v cordless, and turns it into a sturdy and accurate press which isn't built cheaply, but sadly won't mount up my 1st Dremel I got 30yrs ago  ) )
I hope I've help some, especially because I am not a pro, being in the same place you are with your build. If you're a motivated fan like me, and can grab some uninterrupted modeling time, you'll do fine! And now having written all this, I'm somewhat inspired to take in-progress pics which hopefully won't take too long to post  |
|
| Back to top |
|
|
|
|
|
|
|
|
|
|
|
| Author |
Message |
clutch
Community Member
Joined: 12 Dec 2006
Posts: 548
|
| Posted: Mon Aug 11, 2008 11:31 am Post subject: |
|
|
| Awesome post. Thanks. I should just send you my pieces. I am tool-poor at the moment so any mods of this nature scare the heck out of me. What metal do you use? Where can I find set screws? I only see places that sell lots of like 500. Hehe! |
|
| Back to top |
|
|
|
|
|
|
|
|
|
|
|
| Author |
Message |
Mr Hyde
Banned!
Joined: 10 Jun 2008
Posts: 44
|
| Posted: Mon Aug 11, 2008 4:41 pm Post subject: |
|
|
Hey clutch - LOVE that shine - it rivals mine! 
I also have access to a Dremel tool just like yours and a wire brush wheel. Could you please tell me what speed you set it on, and if you applied slight pressure while running the wheel on the surfaces or just let it "float" and barely touch?
And what about steel wool - would that achieve the same polished finish, or would it actually leave deeper scratches?
My biggest gripes with the wet sanding technique I'm using is that it takes forever, leaves my skin and fingernails a mess, and is not feasible for corners and small recesses, like the knurled underside of the lever, the safety and cylinder release levers, triggers, and the front facade of the Steyr receiver.
Thanks!
| clutch wrote: | here's a pic of Sid's all polished up.
Just seems to me like the wire brush would be too harsh on the metal, but I guess not. I'll find out soon enough though. |
|
|
| Back to top |
|
|
|
|
|
|
|
|
|
|
|
| Author |
Message |
clutch
Community Member
Joined: 12 Dec 2006
Posts: 548
|
| Posted: Mon Aug 11, 2008 9:55 pm Post subject: |
|
|
I'm sorry, but that is an image from the online instructions.
I can only hope to achieve this finish.
I would set the brush a low speed. I don't know that wet sanding is necessary, but I'll find out soon enough.
You should go to the drugstore and buy a box of latex gloves. They will save your hands. |
|
| Back to top |
|
|
|
|
|
|
|
|
|
|
|
| Author |
Message |
luvsdaheat
Joined: 28 Nov 2007
Posts: 3
Location: Sunny Palm Springs
|
| Posted: Mon Aug 11, 2008 10:14 pm Post subject: |
|
|
| clutch wrote: | | Awesome post. Thanks. I should just send you my pieces. I am tool-poor at the moment so any mods of this nature scare the heck out of me. What metal do you use? Where can I find set screws? I only see places that sell lots of like 500. Hehe! |
Clutch: I got those set screws in a set from Sportsman's Guide a few years back, and yeah you usually have to buy screws in big #s. I was thinking that if you can't find the correct firearm-style slotted set screw - maybe beg some from the local gun shop, they'd be cool I bet - you can order them from Brownell's or Midway in small amounts. You could also make some pretty easily by cutting a screw up and putting the shaft in the vise and just cut your own slot with a thin emery wheel or jeweler's handsaw. (reminder: firearms screw slots are typically "squared" with 90 degree sides, compared to regular screws that have an upside-down trapezoid slot - like the sides of a cupcake, regular screw sides often taper out as they go up, or are even round like a "U")
I was referring to using pewter, like the Sidkit's which looks like pewter but I don't want to say exactly what his is without knowing. It's fun to use! For example I get my pewter from a company that specializes in casting supplies for guys who use mold-making silicon to cast "tin soldiers"! The pewter melts low enough so it won't burn the RTV silicon molds, making the process pretty nifty. Also, I've used plain old plumber's "no lead" solder to join pieces, or add metal to the kit.
Thinking about my "drill press is a must" comment, I realized that I had used the press for a steel part I made for the blaster, not the screw work! I did that with the Dremel and vise only  Truth is, removing screw heads and drilling/tapping threads for the Blaster is very Do-Able by hand - heck the plastic on some model cars is harder! If you can find some scrap metal to practice on... go for it Truth is, removing screw heads and drilling/tapping threads for the Blaster is very Do-Able by hand - heck the plastic on some model cars is harder! If you can find some scrap metal to practice on... go for it |
|
| Back to top |
|
|
|
|
|
|
|
|
|
|
|
| Author |
Message |
Mr Hyde
Banned!
Joined: 10 Jun 2008
Posts: 44
|
| Posted: Mon Aug 11, 2008 10:22 pm Post subject: wet sanding & gloves |
|
|
Actually, I've been using double-layer latex gloves (see my first post & photo on the "Painting Tips" thread in the main forum), but the sharp part edges and sandpaper always get the better of them and I my fingers get messed up again, lol.
I'll give the wire wheel a try tomorrow on a hidden surface first to see how much metal it removes and also use steel wool and post comparison pics.
The fourth downside with wet sanding (after the mess, inability of getting into nooks and cranies, and massive time consumption) is maintaining a consistent grain - I'm guessing using a wire wheel won't solve that problem, so I'll see about winding some steel wool around a small ball-end mill tip and try that way - especially in the concentric circles of the front receiver facade.
I think I'll also see what results I can get with a buffer wheel! |
|
| Back to top |
|
|
|
|
|
|
|
|
|
|
|
| Author |
Message |
Noeland
Community Guide
Joined: 24 Oct 2006
Posts: 1328
|
| Posted: Tue Aug 19, 2008 1:41 pm Post subject: |
|
|
| clutch wrote: | here's a pic of Sid's all polished up.
Just seems to me like the wire brush would be too harsh on the metal, but I guess not. I'll find out soon enough though. |
YES, YES, YES. Thank you.
I can't wait to see this assembled. I've only ever seen a finish like this done with paints, and I even tried one once to horrible results.
Also, just curious, after it's polished does touching the finish have a drastic effect, or can fingerprints be wiped away easily?
_________________
I don't have enough blasters! |
|
| Back to top |
|
|
|
|
|
|
|
|
|
|
|
| Author |
Message |
SaberFreak
Community Member
Joined: 24 Jun 2007
Posts: 111
Location: Somewhere in the outer-rim planets
|
| Posted: Wed Aug 20, 2008 1:52 am Post subject: |
|
|
| Noeland wrote: | | lso, just curious, after it's polished does touching the finish have a drastic effect, or can fingerprints be wiped away easily? |
Pewter is ferrous (that's why it can be stained by bluing solution), so if your fingers are contaminated with dirt or oil it will stain the polished pewter. But you should also be able to polish it out again easily.
But to be safe, best to handle it with gloved hands after being polished, or apply the bluing solution/paint immediately to seal it. |
|
| Back to top |
|
|
|
|
|
|
|
|
|
|
|
| Author |
Message |
clutch
Community Member
Joined: 12 Dec 2006
Posts: 548
|
| Posted: Sun Aug 24, 2008 9:47 am Post subject: |
|
|
Has anybody tried plumb brown? The results here look pretty good although I don't know how pewter would react.
http://www.hobbygunsmith.com/Archives/Aug03/HowTo.htm
After re-reading it, it looks as though he might be blueing the example instead of browning. Hmmmmm.... |
|
| Back to top |
|
|
|
|
|
|
|
|
|
|
|
| Author |
Message |
spinner44.com
Community Member

Joined: 18 Apr 2006
Posts: 593
Location: Phoenix, AZ
|
| Posted: Sun Aug 24, 2008 10:21 am Post subject: |
|
|
| I've used Plum Brown before. It's more for an antique look. You probably want bluing instead. |
|
| Back to top |
|
|
|
|
|
|
|
|
|
|
|
|
You cannot post new topics in this forum
You cannot reply to topics in this forum
You cannot edit your posts in this forum
You cannot delete your posts in this forum
You cannot vote in polls in this forum
|
|
|
|
|
|
|
|


