 |
 |
|
 |
|
| Author |
Message |
clutch
Community Member

Joined: 12 Dec 2006
Posts: 548
|
 Posted: Sun Aug 24, 2008 11:46 am Post subject: Posted: Sun Aug 24, 2008 11:46 am Post subject: |
 |
|
Gotcha. I didn't want to have to buy even more junk for this gun. I am finding the metal to be unpredictable and unforgiving. It has a lot of pits that aren't visible until you start sanding and that's when you realize it's going to take some elbow grease.
Make sure you use a worn wire dremel brush too. I tried it with a brand new one and it really gouged the metal. The worn one did nicely, but the resulting finish is really 'uneven' and streaked. You have to run the brush across the surface in the same direction and keep it moving.
It's one of those deals where it looks good when the light is reflecting at certain angles. I think the best you could go for is an aged silver look. Because once you have it where you want it, you don't dare touch it or the finish will be marred. Since I plan on blueing mine, I'm not going to worry with a sealer.
I may just rebuild it al silver for kicks and then take it apart again for blueing and painting. |
|
| Back to top |
|
|
|
|
 |
|
 |
|
|
|
|
| Author |
Message |
clutch
Community Member
Joined: 12 Dec 2006
Posts: 548
|
| Posted: Tue Aug 26, 2008 10:11 am Post subject: |
|
|
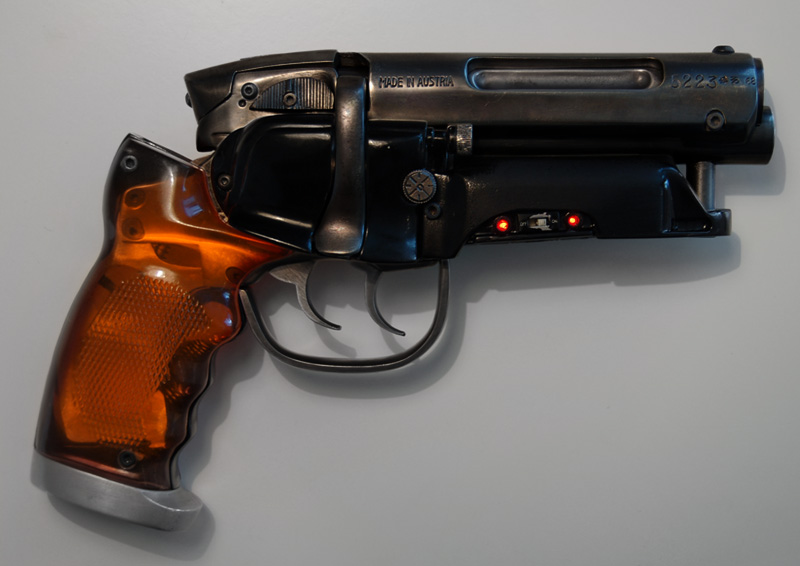
You can't dremel the metal for too long or it get some black 'pitting' or discoloration. It then has to be sanded out again and re-done. Very peculiar. Here is a 'good' shot, but if I move the camera over, it looks like an aged/tarnished silver.
 |
|
| Back to top |
|
|
|
|
|
|
|
|
|
|
|
| Author |
Message |
Anson James
Community Member

Joined: 31 Oct 2006
Posts: 168
Location: Ireland.
|
| Posted: Tue Aug 26, 2008 10:28 am Post subject: |
|
|
Nice job clutch!
Have you tried buffing the metal with Brasso metal cleaner?
It seems to work pretty well as long as you don't use too much. |
|
| Back to top |
|
|
|
|
|
|
|
|
|
|
|
| Author |
Message |
clutch
Community Member
Joined: 12 Dec 2006
Posts: 548
|
| Posted: Tue Aug 26, 2008 1:19 pm Post subject: |
|
|
| I'll have to try that. Thanks. I'm thinking I don't want to put too much into the finish since I am going to weather it anyway, but as I suspected, the clean nickle-plated look is growing on me. lol |
|
| Back to top |
|
|
|
|
|
|
|
|
|
|
|
| Author |
Message |
clutch
Community Member
Joined: 12 Dec 2006
Posts: 548
|
| Posted: Mon Sep 01, 2008 2:27 pm Post subject: |
|
|
Definitely won't be getting a pristine version. The metal has too many imperfections in it.
I never want to sand and polish one of these again! If I had a dollar for every time one of those brass wires hit me in the face and neck, I could take the whole family out for dinner at a nice restaurant! 
The cylinder was probably the toughest to sand and finish due to all the offset mold lines. The barrel probably came out the best out of everything.
I thought I'd throw it together anyway to see what it'd look like and everything that could go wrong did.
The metal is so soft, you feel like you are crossthreading when you are actually not. I thought I'd start with the bottom screw to connect the bulldog frame to the outer one. Simple enough. Well, when it started going into the bulldog frame, it started to push it up away from the outer one! I decided to do the front and back then and the same thing happened in front. Had to bend the frame back to the way it was.
During all of this, I pushed the spring-loaded rod over and the tiny washer shot across the room. Took forever to find that.
I started working on that whole spring-loaded quick ammo release thing and the main pin wasn't fitting in the cylinder very well. Easy enough, I'll just put the pin in the dremel and sand it smooth. Well, I put it in and turned the dremel on, but when it clicked on, it revved up way too fast and the pin slung off the dremel shaft like it was made of rubber. Snapped right off. So now I can't use that feature. Luckily, enough of the pin remains that it will at least hold the cylinder in.
I screw the side cover on and start screwing the top hex bolt in, but it isn't going anywhere. I take the cover off and see that I cut the red wire for the laser sight clean in two!
I finally go to put the amber grips on and they aren't lining up with the holes at all. Took forever pushing and pulling on them to get them on and they don't line up very well with the frame.
Damn I need to take a break from this gun before I up and give it away.
Just kidding.
But I am taking a break. I need to clear my head and figure out what to do next.


 |
|
| Back to top |
|
|
|
|
|
|
|
|
|
|
|
| Author |
Message |
Finbladerunner
Community Member
Joined: 09 May 2008
Posts: 111
Location: Finland
|
| Posted: Mon Sep 01, 2008 3:45 pm Post subject: |
|
|
| clutch wrote: |
I never want to sand and polish one of these again! If I had a dollar for every time one of those brass wires hit me in the face and neck, I could take the whole family out for dinner at a nice restaurant!
|
Soulmate!!
I been having same nightmare during last days. First I sanded parts with ironwool + 600 / 1200 /2000. Then came the Dremel to give finished touch.
Aaaw, those brass wires are everywhere! Got my trousers so completely spiky that have no other choise than trashcan them. 
Parts are now polished and the primer is next step for me. Not sure am I going to paint black all stuff inside handgrip or do I leave them as non-painted.
 |
|
| Back to top |
|
|
|
|
|
|
|
|
|
|
|
| Author |
Message |
clutch
Community Member
Joined: 12 Dec 2006
Posts: 548
|
| Posted: Mon Sep 01, 2008 5:29 pm Post subject: |
|
|
| Hehe. Pray you don't strip one of the hex bolts. I did one of the grip ones. I glued the hex wrench to the bolt in hopes that it will stay put when I turn it. Guess I'll find out tomorrow. |
|
| Back to top |
|
|
|
|
|
|
|
|
|
|
|
| Author |
Message |
Noeland
Community Guide
Joined: 24 Oct 2006
Posts: 1328
|
| Posted: Tue Sep 02, 2008 2:55 pm Post subject: |
|
|
I've never used a wire brush on my dremel, what exactly is it supposed to do to the finish?
Sounds like WAY more trouble than it's worth.
Clutch, did you stop and wonder what the original builder of the hero gun was thinking?

_________________
I don't have enough blasters! |
|
| Back to top |
|
|
|
|
|
|
|
|
|
|
|
| Author |
Message |
Mr Webber
Community Member

Joined: 13 Apr 2008
Posts: 1824
Location: Terra Australis
|
| Posted: Tue Sep 02, 2008 7:41 pm Post subject: |
|
|
Clutch, I had the same issues building my pre-worldcon sidkit. Even had the heartstopping experience of breaking off the side peice of the barell the lever sits over. After staring at it in shock for five minutes, i drilled the smallest, finest hole i could in each peice then used about 5mm of fuse wire to support the join then glued.....it worked.
Youll find that if you handle the blaster alot, the screws that hold the grips
to the frame and the frame itself, work loose and the blasters metal
doesnt cope with constant tightening.
Just place a couple of drops of a product called Locktite into your screwhole before you tighten, it takes about 20 secs to set and will stop screws working loose. The bond can be broken with a liitle extra effort without damaging anything if you needed to remove a screw at a later date. I musta rebuilt my sidkit about four times, even channeled out the metal sight rod to get two working green leds, took forever, loved every second.
_________________
Formerly offworld66 |
|
| Back to top |
|
|
|
|
|
|
|
|
|
|
|
| Author |
Message |
clutch
Community Member
Joined: 12 Dec 2006
Posts: 548
|
| Posted: Wed Sep 03, 2008 9:26 am Post subject: |
|
|
The brass wire brush is actually quite gentle on the metal. It does bring a shine to the metal that sandpaper can't. However, it polishes by removing material, so if you go over something several times, you will eventually lose detail.
I noticed the writing on the left side of the steyr body started becoming shallow so I had to lay off the brush on that side!
Two problems with polishing.
It leaves swirl marks if you brush unevenly. You can't just 'scrub' the piece with the brush.
Some pieces have discolorations in the metal. This cannot be sanded or brushed out. You are 'stuck' with it.
I'll definitely check out the Locktite. With just the little handling I've done, I noticed pieces starting to loosen up. I hate it when you pick it up and it 'clanks' when you move it around. My glued hex wrench didn't work of course, so I jammed a slotted screwdriver into it and it backed out just fine.
I was going to say be careful with that area that you mentioned. That little 'bar' is very fragile. It bent out of shape on me from just holding it.
I've been wondering what to do about the bullets. No way I want to use those plastic ones, so I was playing around with my Coyle blaster the other night and noticed the bullets in it. I had forgotten they were real. I cracked it open (literally, I forgot that the pin pulls out so you can roll the cylinder out, so the bulldog frame snapped in two) and got the real bullets out and put them in the Sidkit. Now the Coyle literally weighs nothing.
How the prop guys came up with this weapon is beyond me. Like someone was sitting around and said, hmmm wonder what this obscure rifle part would look like on top of this pistol? |
|
| Back to top |
|
|
|
|
|
|
|
|
|
|
|
| Author |
Message |
Mr Webber
Community Member
Joined: 13 Apr 2008
Posts: 1824
Location: Terra Australis
|
| Posted: Wed Sep 03, 2008 10:12 am Post subject: |
|
|
Dont the metal slugs come with the worldcon sidkit? I have to leave em out of my old sidkit because it gets to heavy.
_________________
Formerly offworld66 |
|
| Back to top |
|
|
|
|
|
|
|
|
|
|
|
| Author |
Message |
clutch
Community Member
Joined: 12 Dec 2006
Posts: 548
|
| Posted: Wed Sep 03, 2008 11:05 am Post subject: |
|
|
| Nope. Black plastic ones now. |
|
| Back to top |
|
|
|
|
|
|
|
|
|
|
|
| Author |
Message |
Dann
Community Member
Joined: 15 Apr 2008
Posts: 44
|
| Posted: Wed Sep 03, 2008 3:40 pm Post subject: |
|
|
| The loctite really does help. It only just dawned on me to use it recently, dunno why I never thought of it before, I used to use it at work all the time! |
|
| Back to top |
|
|
|
|
|
|
|
|
|
|
|
| Author |
Message |
Mr Webber
Community Member
Joined: 13 Apr 2008
Posts: 1824
Location: Terra Australis
|
| Posted: Wed Sep 03, 2008 7:31 pm Post subject: |
|
|
Its perfect for this kind of project.
_________________
Formerly offworld66 |
|
| Back to top |
|
|
|
|
|
|
|
|
|
|
|
| Author |
Message |
clutch
Community Member
Joined: 12 Dec 2006
Posts: 548
|
| Posted: Tue Sep 09, 2008 4:20 pm Post subject: |
|
|
Yeah, I hate this metal. Thought I'd fill some screwholes with solder. The first one went ok, the second one was almost disasterous.
Untouched:

OMG! WTF!? I noticed the hole starting to get bigger as I tried to get the solder to stick to the frame. Then the corner of the frame gave way! I had to rebuild it with solder.

I then took it to the grinder and got most of it down. After some hand sanding, some holes open up, so I have to go back and put down some more solder.

It doesn't take to the dremel wheel very well either. Kind of turns black, so I had to hand sand it only.
Finished. I can still see some tiny holes but I say F it. lol!

 |
|
| Back to top |
|
|
|
|
|
|
|
|
|
|
|
| Author |
Message |
jfuste
Community Member

Joined: 31 Dec 2007
Posts: 739
Location: Barcelona, Spain
|
| Posted: Wed Sep 10, 2008 1:01 am Post subject: |
|
|
Wow, now I know why I'm not building none of my kits.... 
_________________
 |
|
| Back to top |
|
|
|
|
|
|
|
|
|
|
|
| Author |
Message |
clutch
Community Member
Joined: 12 Dec 2006
Posts: 548
|
| Posted: Wed Sep 10, 2008 9:40 am Post subject: |
|
|
| Hehe. It just takes patience and a little finesse. |
|
| Back to top |
|
|
|
|
|
|
|
|
|
|
|
| Author |
Message |
rudolf
Community Member

Joined: 23 Jun 2008
Posts: 11
Location: Sweden
|
| Posted: Wed Sep 10, 2008 12:49 pm Post subject: |
|
|
This is the result of my blaster
what do you think? 
Last edited by rudolf on Wed Dec 17, 2008 8:05 am; edited 2 times in total |
|
| Back to top |
|
|
|
|
|
|
|
|
|
|
|
| Author |
Message |
Nexus6
Community Member

Joined: 15 May 2006
Posts: 473
Location: Off-World Colonies
|
| Posted: Wed Sep 10, 2008 1:05 pm Post subject: |
|
|
| rudolf wrote: |
This is the result of my blaster
what do you think? |
Link fixx0r3d.
Any tips or tricks you used or thought up during the build that might be of use to the rest of us?
_________________

Last edited by Nexus6 on Wed Sep 10, 2008 8:00 pm; edited 2 times in total |
|
| Back to top |
|
|
|
|
|
|
|
|
|
|
|
| Author |
Message |
clutch
Community Member
Joined: 12 Dec 2006
Posts: 548
|
| Posted: Wed Sep 10, 2008 2:05 pm Post subject: |
|
|
That's what I want mine to look like! Very nice.
|
|
| Back to top |
|
|
|
|
|
|
|
|
|
|
|
|
You cannot post new topics in this forum
You cannot reply to topics in this forum
You cannot edit your posts in this forum
You cannot delete your posts in this forum
You cannot vote in polls in this forum
|
|
|
|
|
|
|
|


