 |
 |
|
 |
|
| Author |
Message |
Mark Sheppard
Community Member

Joined: 18 Apr 2009
Posts: 951
Location: In my office playing golf, pouring drinks, making deals.
|
 Posted: Fri May 22, 2009 11:09 pm Post subject: Posted: Fri May 22, 2009 11:09 pm Post subject: |
 |
|
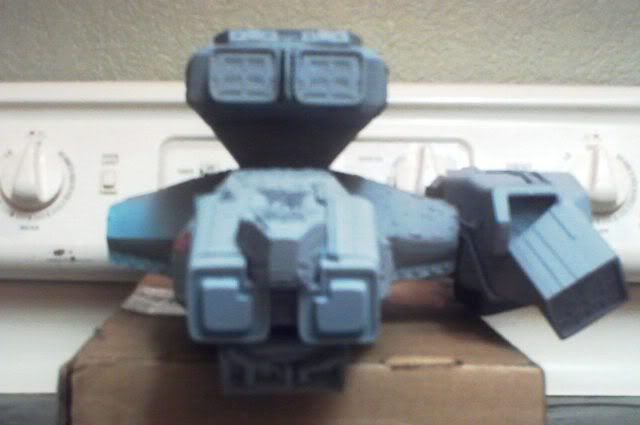
Here is a shot of the finished docking module ready to be attached permanently... The batteries in my cheap camera are about to die here, I put it in the freezer for 10 minutes just to get enough voltage to shoot these...
 |
|
| Back to top |
|
|
|
|
 |
|
 |
|
|
|
|
| Author |
Message |
Mark Sheppard
Community Member
Joined: 18 Apr 2009
Posts: 951
Location: In my office playing golf, pouring drinks, making deals.
|
| Posted: Sun May 24, 2009 11:25 pm Post subject: |
|
|
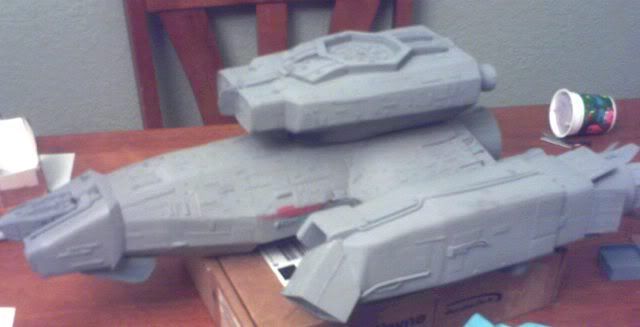
Just a quick update of a little progress on the docking module between working on the new masters for the better molds I have been working on for the front VTOL nacelle parts...
 |
|
| Back to top |
|
|
|
|
|
|
|
|
|
|
|
| Author |
Message |
Mark Sheppard
Community Member
Joined: 18 Apr 2009
Posts: 951
Location: In my office playing golf, pouring drinks, making deals.
|
| Posted: Mon May 25, 2009 1:33 am Post subject: |
|
|
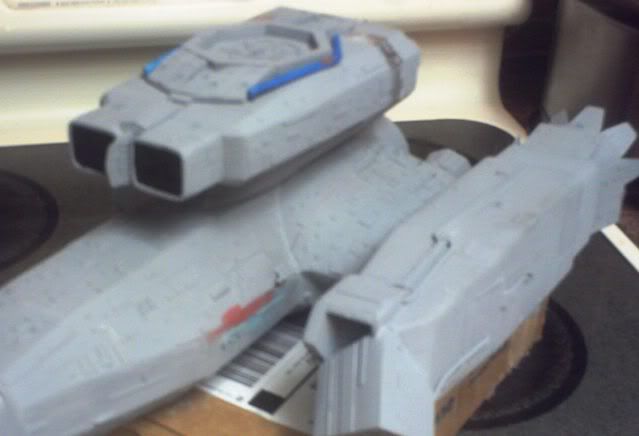
...Next before adding some metal tubing for the umbilicus connector up the front, I lightly sand with very fine grit paper along areas to give the module a better look, basically breaking up the uniformity of the surface... some would call it "weathering" i guess.. but here the primer allows a close color but its surface can be manipulated with different grades of sandpaper....
one only needs to pass the fine grit paper lightly over desired panels, the entire model will be sealed with a dull clearcoat..but thats way down the road
 |
|
| Back to top |
|
|
|
|
|
|
|
|
|
|
|
| Author |
Message |
Mark Sheppard
Community Member
Joined: 18 Apr 2009
Posts: 951
Location: In my office playing golf, pouring drinks, making deals.
|
| Posted: Mon May 25, 2009 9:09 pm Post subject: |
|
|
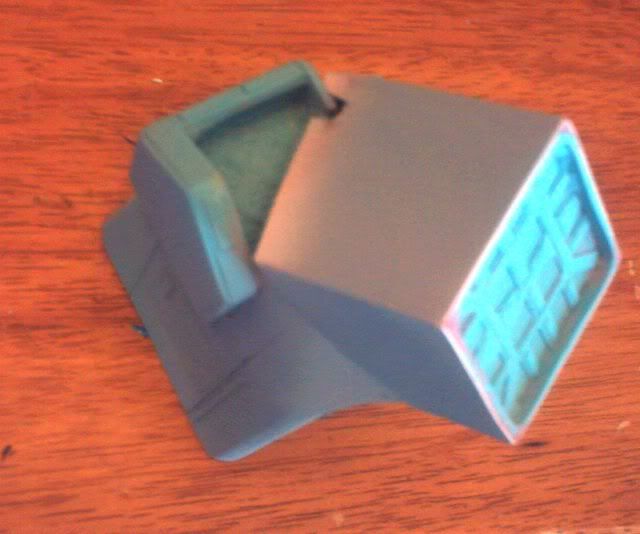
Here is a quick shot of the front engine VTOL thruster assembly I have been working on, almost ready for molding. The angle is dead-on accurate now, and I am adding extra piping on the part for accuracy and to save a small bit of labor for the builder. I will be molding this new part mid-week when my degasser arrives (hooray!) This new mod will be included in Freds kit, as well an new set will be sent out to the PROFESSOR free of charge...
 |
|
| Back to top |
|
|
|
|
|
|
|
|
|
|
|
| Author |
Message |
Mark Sheppard
Community Member
Joined: 18 Apr 2009
Posts: 951
Location: In my office playing golf, pouring drinks, making deals.
|
| Posted: Mon May 25, 2009 9:13 pm Post subject: |
|
|
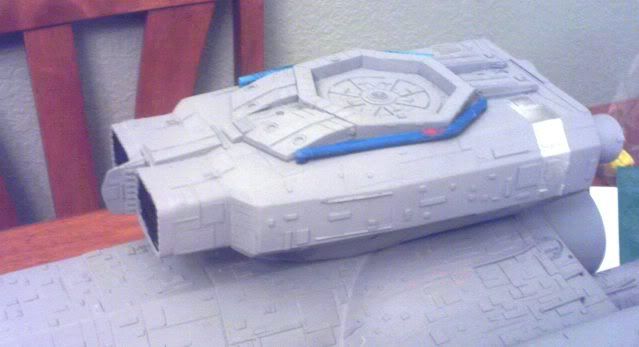
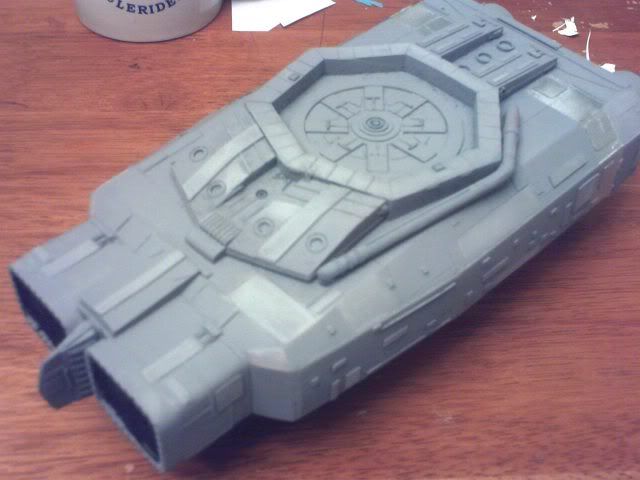
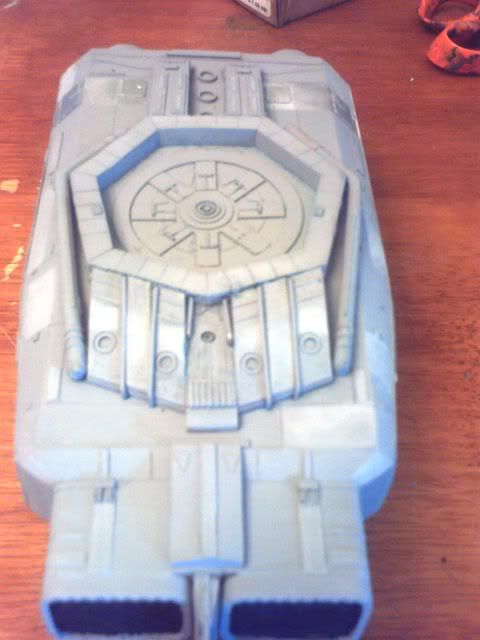
and here is the top of the Docking module completed. I have added on all the extra "plumbing" that is barely visible in the movie...all references are available here on propsummit.com in the Nostromo discussion thread.
By now the module almost looks like it could be its own little ship, or motor pack type thing before it is actually attached to the Nostromo hull...
 |
|
| Back to top |
|
|
|
|
|
|
|
|
|
|
|
| Author |
Message |
andy
Community Guide

Joined: 01 Nov 2006
Posts: 6237
Location: Rochester, NY
|
| Posted: Mon May 25, 2009 10:09 pm Post subject: |
|
|
That is looking really sharp.
Andy |
|
| Back to top |
|
|
|
|
|
|
|
|
|
|
|
| Author |
Message |
Knightjar
Community Member

Joined: 25 Apr 2009
Posts: 14
|
| Posted: Tue May 26, 2009 4:41 am Post subject: |
|
|
| That's looking really great! I love your detail work. Is there a slight twist or warp in it - or is that just the photo (the little tab in front of the ridged section and the rearmost part of the seven-sided docking assembly each look slightly off-centre, suggesting the whole assembly is slightly twisted or rotated on top of the main module)? |
|
| Back to top |
|
|
|
|
|
|
|
|
|
|
|
| Author |
Message |
Mark Sheppard
Community Member
Joined: 18 Apr 2009
Posts: 951
Location: In my office playing golf, pouring drinks, making deals.
|
| Posted: Tue May 26, 2009 8:06 am Post subject: |
|
|
Thank you guys,
Unfortunately my camera is so bad that sometimes the pictures get distorted, I did not notice that until you pointed that out. I guess I need to take another picture of this tonight after I get new batteries.. |
|
| Back to top |
|
|
|
|
|
|
|
|
|
|
|
| Author |
Message |
SKIN JOB 66
Community Member

Joined: 16 Jan 2008
Posts: 2724
Location: FRANCE
|
| Posted: Wed May 27, 2009 11:51 am Post subject: |
|
|
Sorry if I keep repeating the same post after post, but those photos (even blurry) are awesome ! Great work JT !
Fred
_________________
THE FUTURE IS A THING OF THE PAST |
|
| Back to top |
|
|
|
|
|
|
|
|
|
|
|
| Author |
Message |
Gaff87
Community Member

Joined: 05 Oct 2008
Posts: 1727
Location: United Kingdom
|
| Posted: Wed May 27, 2009 4:59 pm Post subject: |
|
|
I'll second that, Fred.
JTP, great work on this. |
|
| Back to top |
|
|
|
|
|
|
|
|
|
|
|
| Author |
Message |
Mark Sheppard
Community Member
Joined: 18 Apr 2009
Posts: 951
Location: In my office playing golf, pouring drinks, making deals.
|
| Posted: Fri May 29, 2009 7:43 pm Post subject: |
|
|
Today My Degassing vacuum chamber came in!!!
I will be remolding 4 parts for higher quality and accuracy, and the new version of the kit will be complete!!!!!!!
 |
|
| Back to top |
|
|
|
|
|
|
|
|
|
|
|
| Author |
Message |
Mark Sheppard
Community Member
Joined: 18 Apr 2009
Posts: 951
Location: In my office playing golf, pouring drinks, making deals.
|
| Posted: Mon Jun 01, 2009 9:42 pm Post subject: |
|
|
Well tonight I pulled plugs from the first silicon molds I made with my new Vacuum degasser, and wow, let me tell you, the difference is incredible!
To those interested in the kit, the reason I havent posted any new ones for sale is because you may as well wait for me to finish the last 2 molds.. These parts are going to be much better! I will post pics of the new VTOL front nacelle parts tomorrow (i need to wait a full 48 hours for mold cure) but the kit is going to be much higher quality. Also I have developed a new foam-core PVC resin hull technique that will be a higher quality hull while still using the same 60 ounces of resin, but it will be a much nicer hull.
The investment of a vacuum chamber (while a bit expensive) is still well worth the investment!!!! and now I can mold parts for other people if they need help on something...  |
|
| Back to top |
|
|
|
|
|
|
|
|
|
|
|
| Author |
Message |
Space Jockey
Community Member

Joined: 13 Apr 2009
Posts: 559
Location: East Tennessee
|
| Posted: Mon Jun 01, 2009 10:44 pm Post subject: |
|
|
| Awesome news! Glad your're getting on okay with it, and look forward to seeing the new parts! |
|
| Back to top |
|
|
|
|
|
|
|
|
|
|
|
| Author |
Message |
Mark Sheppard
Community Member
Joined: 18 Apr 2009
Posts: 951
Location: In my office playing golf, pouring drinks, making deals.
|
| Posted: Mon Jun 01, 2009 11:44 pm Post subject: |
|
|
I will post a completely remolded Starboard nacelle tomorrow pm Front, center section and rear corrugated part., The lines are so much crisper, and I have the correct angle now on the forward VTOL jet... actually I am very pleased with it..and you will be much happier with this redo in your kit  |
|
| Back to top |
|
|
|
|
|
|
|
|
|
|
|
| Author |
Message |
Knightjar
Community Member
Joined: 25 Apr 2009
Posts: 14
|
| Posted: Tue Jun 02, 2009 1:51 am Post subject: |
|
|
| Interesting to know degassing makes such a big difference for you. It's something I've considered trying, particularly having found an enormous improvement when I invested in my pressure tank. |
|
| Back to top |
|
|
|
|
|
|
|
|
|
|
|
| Author |
Message |
Mark Sheppard
Community Member
Joined: 18 Apr 2009
Posts: 951
Location: In my office playing golf, pouring drinks, making deals.
|
| Posted: Tue Jun 02, 2009 12:31 pm Post subject: |
|
|
| Knightjar wrote: | | Interesting to know degassing makes such a big difference for you. It's something I've considered trying, particularly having found an enormous improvement when I invested in my pressure tank. |
Actually I could not believe the difference it makes. I place 40 ounces of Silicon into the chamber, pulled pressure down to -30, the compound suddenly expanded to a huge "boiling" ball, and then collapsed... actually overflowing the large bowl it was in... The result in the mold was a flawless and more rigid silicon mold completely free of any tiny bubbles. They are well worth it if you can find a decent one. Mine is a MARVAC SCIENIFIC, and works just awesome.
My next project is going to be a large original ALIEN DERELICT on the same scale as the Nostromo kit. |
|
| Back to top |
|
|
|
|
|
|
|
|
|
|
|
| Author |
Message |
SKIN JOB 66
Community Member
Joined: 16 Jan 2008
Posts: 2724
Location: FRANCE
|
| Posted: Tue Jun 02, 2009 4:20 pm Post subject: |
|
|
| jtparker wrote: |
My next project is going to be a large original ALIEN DERELICT on the same scale as the Nostromo kit. |
HOLY COW !!! (really would LOVE to see this happening !!!)

Great updates on the Nostromo kit BTW JT, always a pleasure to get fresh news from your amazing project !!!

Fred
_________________
THE FUTURE IS A THING OF THE PAST |
|
| Back to top |
|
|
|
|
|
|
|
|
|
|
|
| Author |
Message |
Knightjar
Community Member
Joined: 25 Apr 2009
Posts: 14
|
| Posted: Tue Jun 02, 2009 6:21 pm Post subject: |
|
|
[quote="jtparker"] | Knightjar wrote: |
My next project is going to be a large original ALIEN DERELICT on the same scale as the Nostromo kit. |
Let me know if you'd like me to take on sculpting the Space Jockey to scale for that project. |
|
| Back to top |
|
|
|
|
|
|
|
|
|
|
|
| Author |
Message |
Mark Sheppard
Community Member
Joined: 18 Apr 2009
Posts: 951
Location: In my office playing golf, pouring drinks, making deals.
|
| Posted: Tue Jun 02, 2009 9:26 pm Post subject: |
|
|
| incoming pm |
|
| Back to top |
|
|
|
|
|
|
|
|
|
|
|
| Author |
Message |
Mark Sheppard
Community Member
Joined: 18 Apr 2009
Posts: 951
Location: In my office playing golf, pouring drinks, making deals.
|
| Posted: Tue Jun 02, 2009 9:31 pm Post subject: |
|
|
Ok guys, here is the new starboard nacelle assembly with the new foamcore technique. The quality of the front VTOL part of the nacelle was the most critical, and let me tell you its quality is perfect. no flash, no bubbles, perfect details, perfect angle and grills on the VTOL and RETRO engines.... as han solo would say, "ya know sometimes I amaze myself" 
sorry about the crummy camera, but I can assure you there are perfect little grill slats that cant really be made out due to the blurriness
But actually its because I actually invested on equipment and spent a lot of time on these parts. These kits will be better than the originals 25 years ago..and way more accurate.
This New Front part is just out of the mold 25 minutes ago before trimming ..


 |
|
| Back to top |
|
|
|
|
|
|
|
|
|
|
|
|
You cannot post new topics in this forum
You cannot reply to topics in this forum
You cannot edit your posts in this forum
You cannot delete your posts in this forum
You cannot vote in polls in this forum
|
|
|
|
|
|
|
|


