 |
 |
|
 |
|
| Author |
Message |
Ki-Djowac
Community Member
Joined: 23 Feb 2012
Posts: 164
Location: Belgium
|
 Posted: Sat Feb 25, 2012 1:53 pm Post subject: Hasbro Boba Fett blaster upgrade/conversion Posted: Sat Feb 25, 2012 1:53 pm Post subject: Hasbro Boba Fett blaster upgrade/conversion |
 |
|
Hi Everyone,
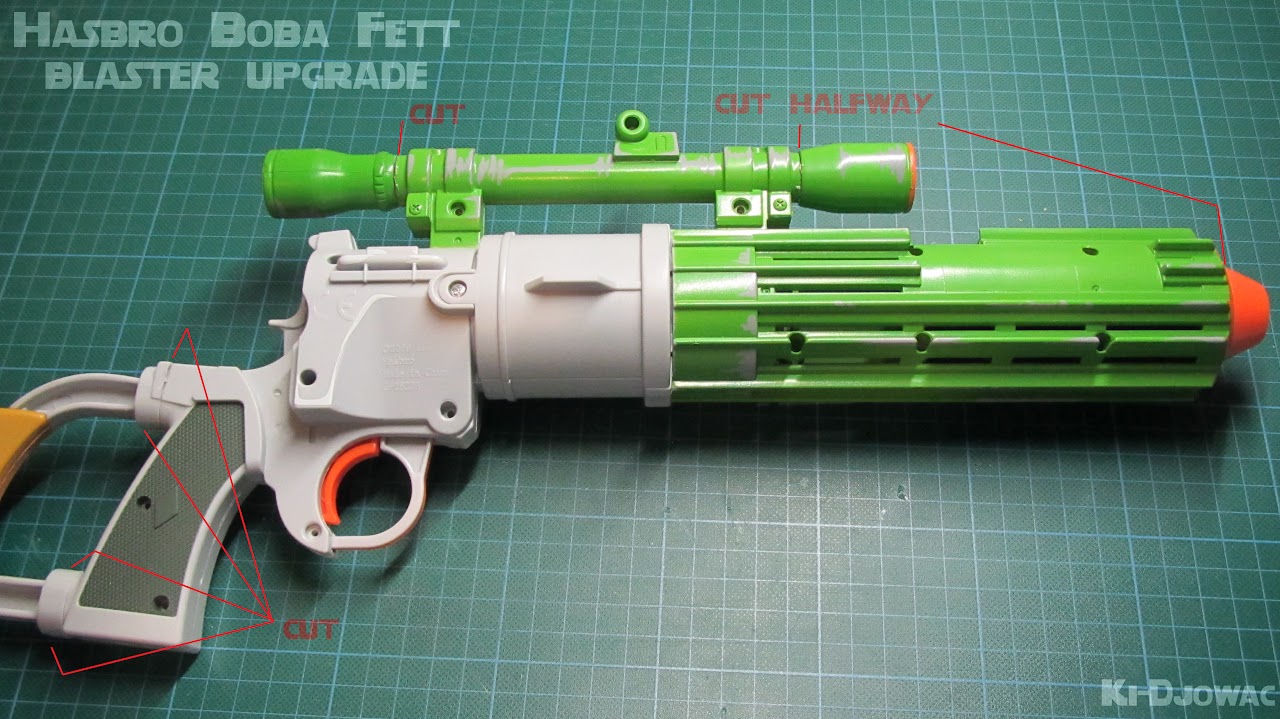
new to the forum here, but i figured that i'd share something i'm currently working on. Going to upgrade a standard Hasbro Boba Fett blaster.
idea :
a new paint job, a new main led upgrade and possibly a rumble motor.
So here it begins, taking the blaster apart :

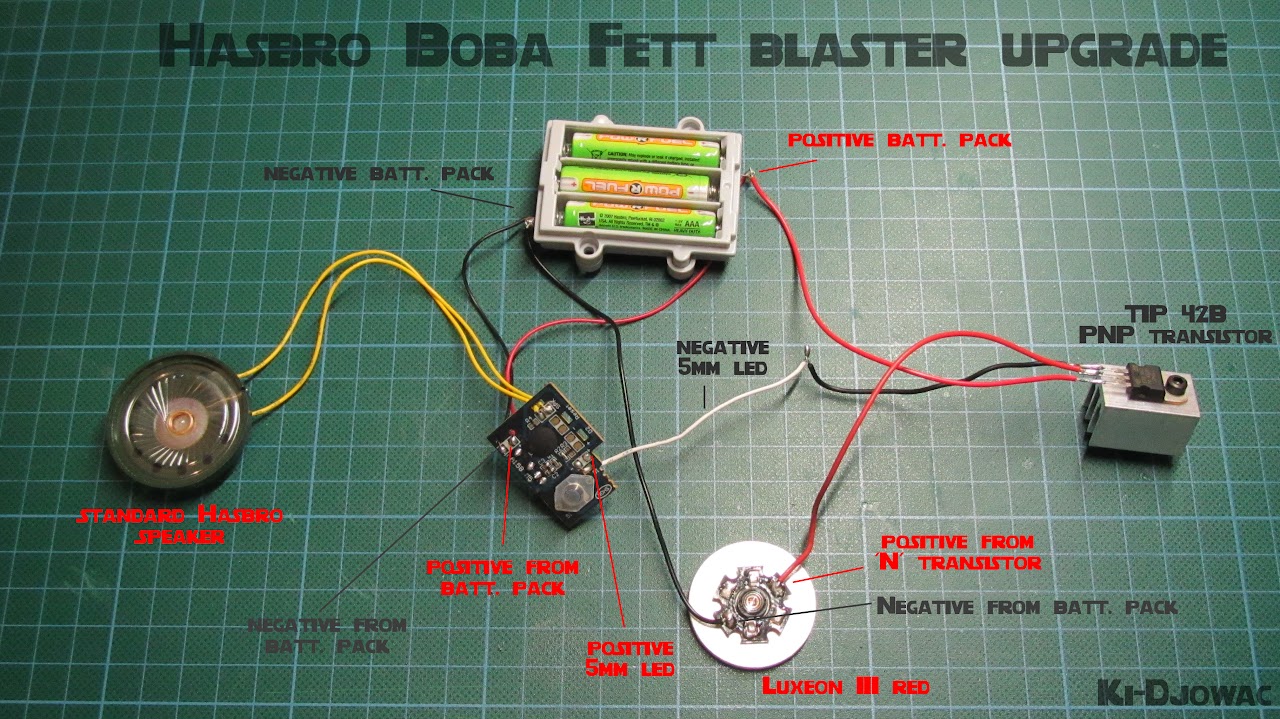
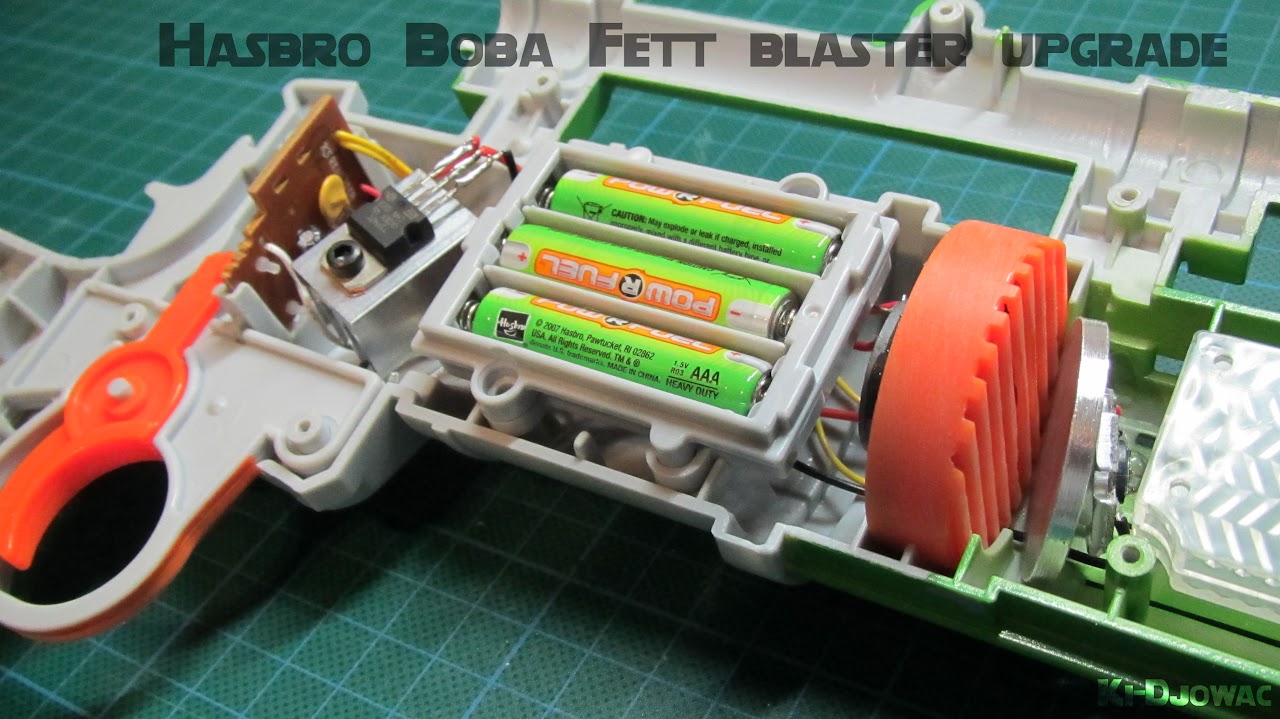
The component overview (rumble motor not included on this picture yet, but i have it in working condition on the workbench) :
I would like to thank Rhyen Skytracker from TCSS forum for the TIP42B transistor tip as this circuit is based on one of his hasbro economy soundboard schematics and he was kind enough to let me know which one he used in those setups. I just used the same solution on this blaster pcb.
Component overview in the blaster :
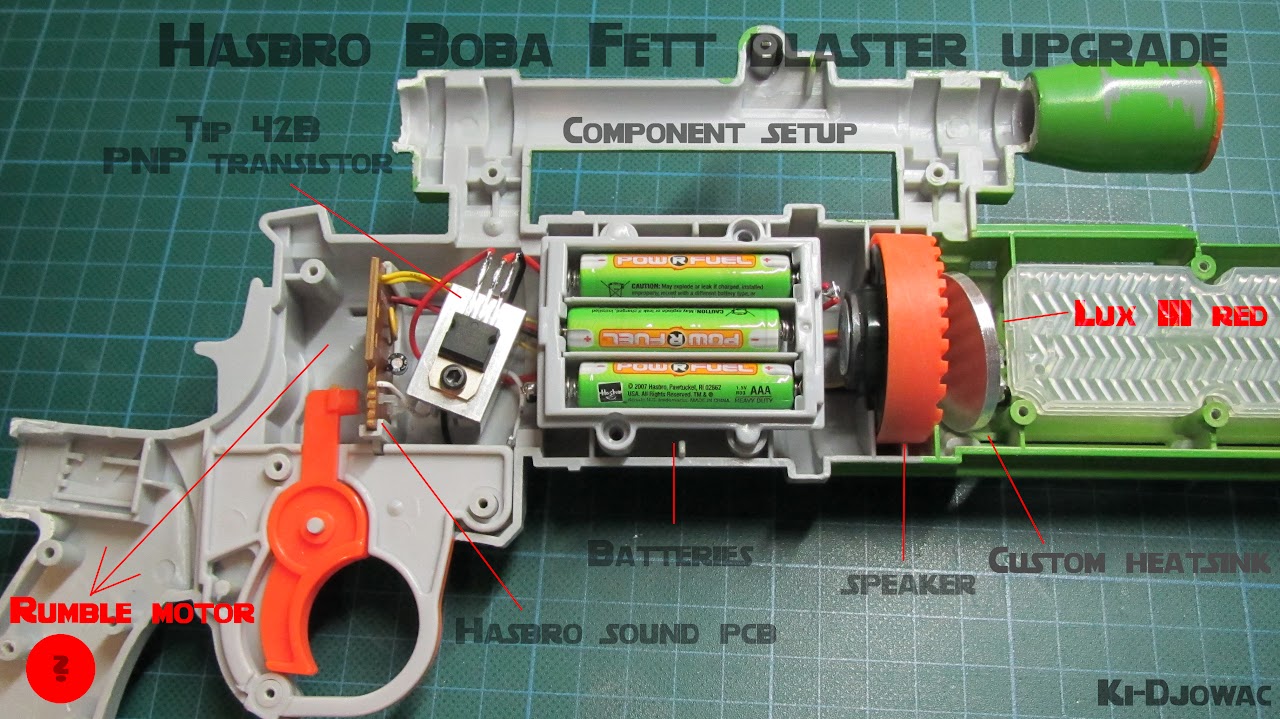

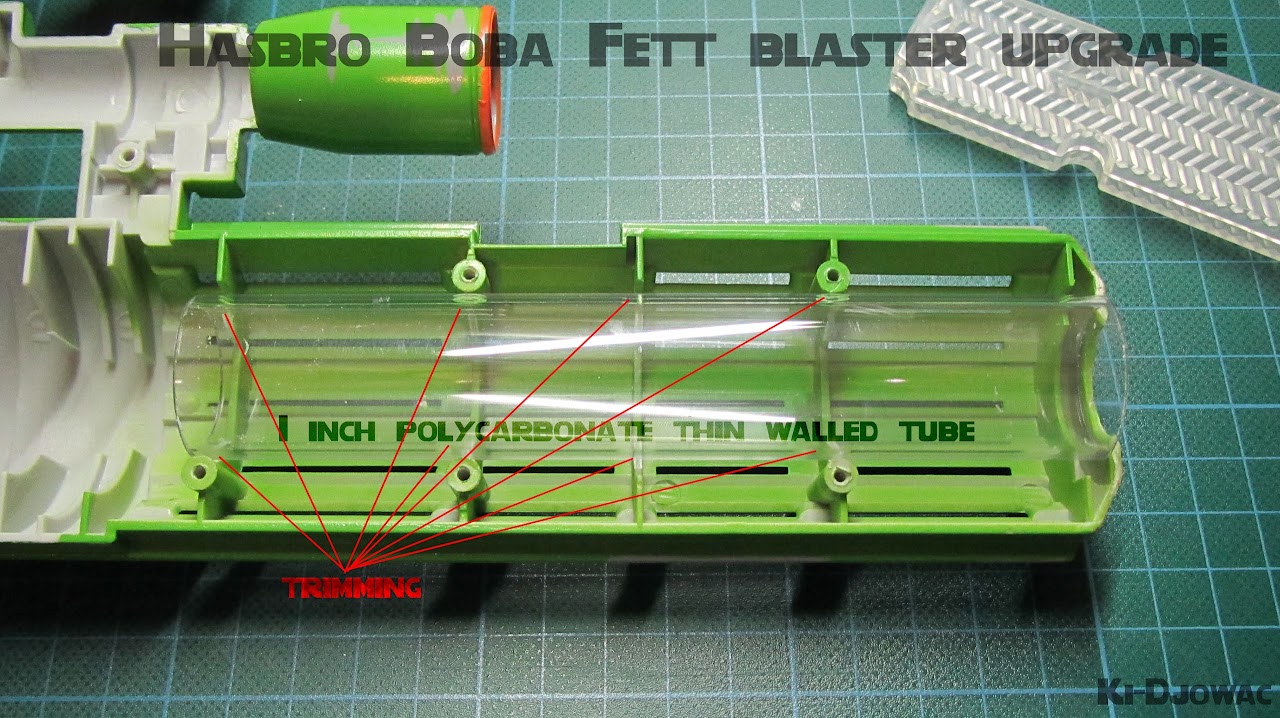
Gonna switch the 5mm led diffusing plastic with a 1 inch thin walled polycarbonate blade (a mini lightsaber  ) )

More updates as i progress through this upgrade/conversion  |
|
| Back to top |
|
|
|
|
 |
|
 |
|
|
|
|
| Author |
Message |
joberg
Community Member
.jpg)
Joined: 06 Oct 2008
Posts: 9471
|
| Posted: Sat Feb 25, 2012 9:21 pm Post subject: |
|
|
Most excellent conversion for sure: love the graphics explaining in details the step-by-step transformations. Looking forward to see more  |
|
| Back to top |
|
|
|
|
|
|
|
|
|
|
|
| Author |
Message |
Ki-Djowac
Community Member
Joined: 23 Feb 2012
Posts: 164
Location: Belgium
|
| Posted: Sun Feb 26, 2012 6:54 am Post subject: |
|
|
Thanks
update :
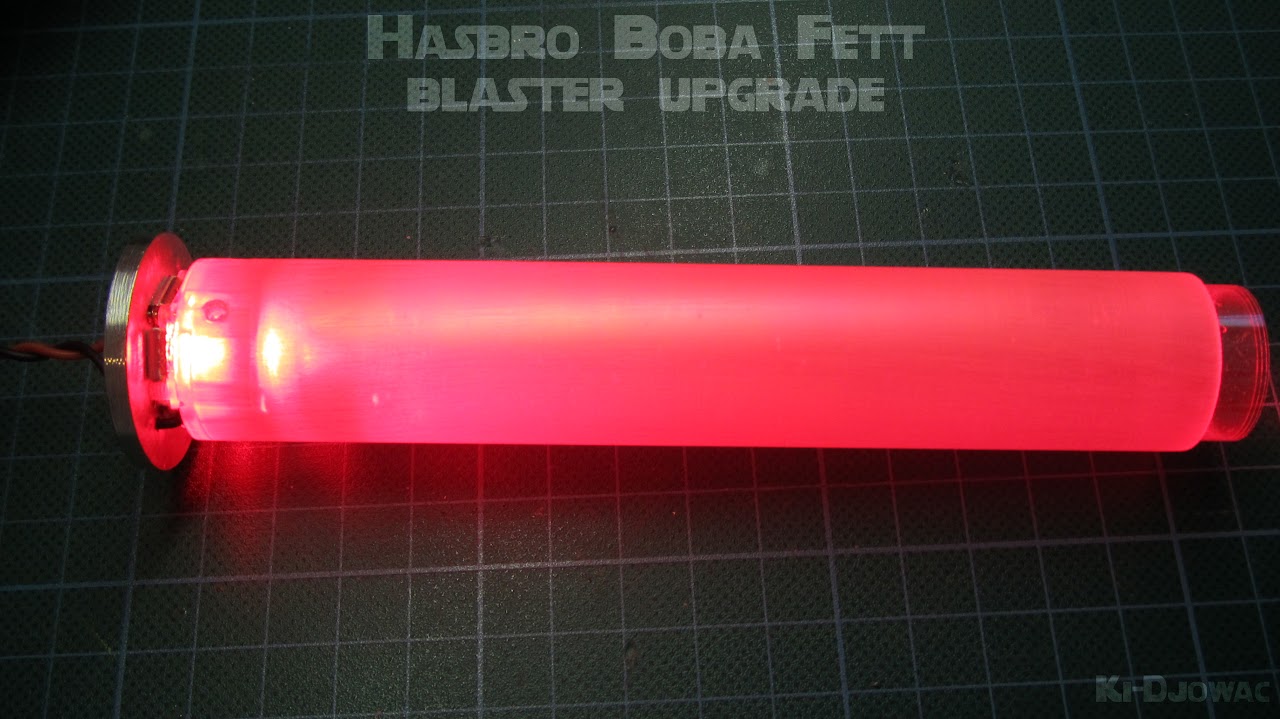
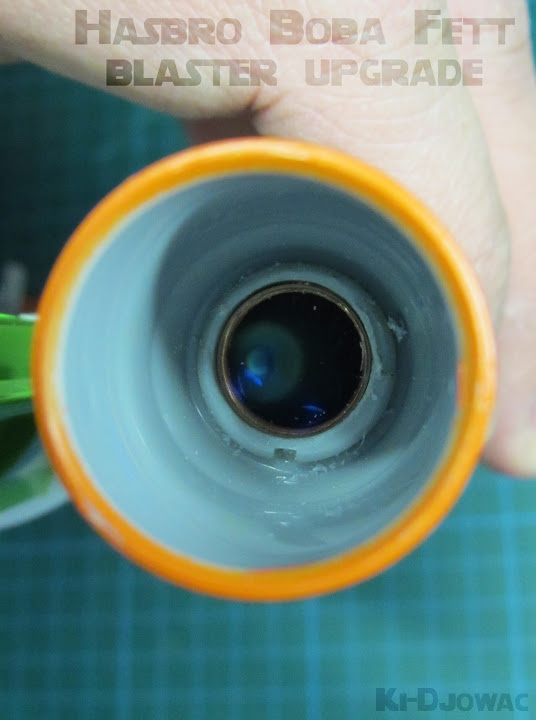
Sanded down the tube to get the light diffused more (a technique from Erv i believe ?) and used some gift wrap i picked up locally. Gift wrap was wrapped about 4 times inside the tube.

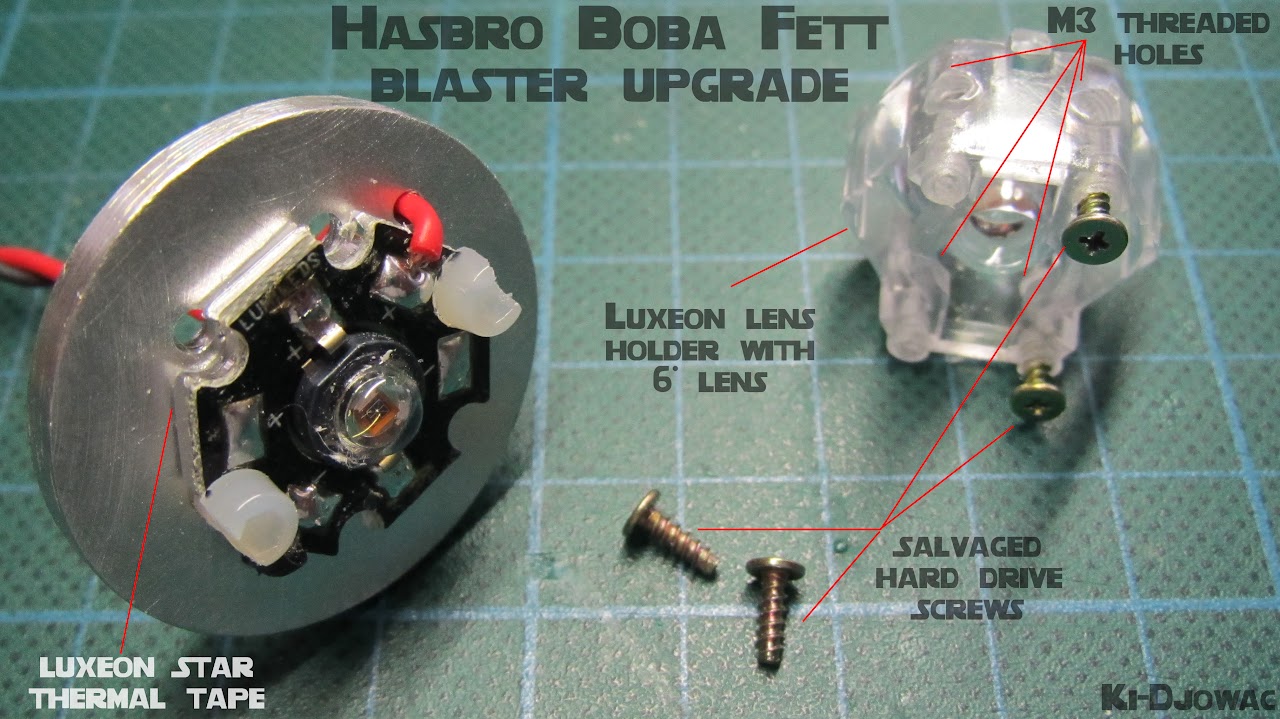
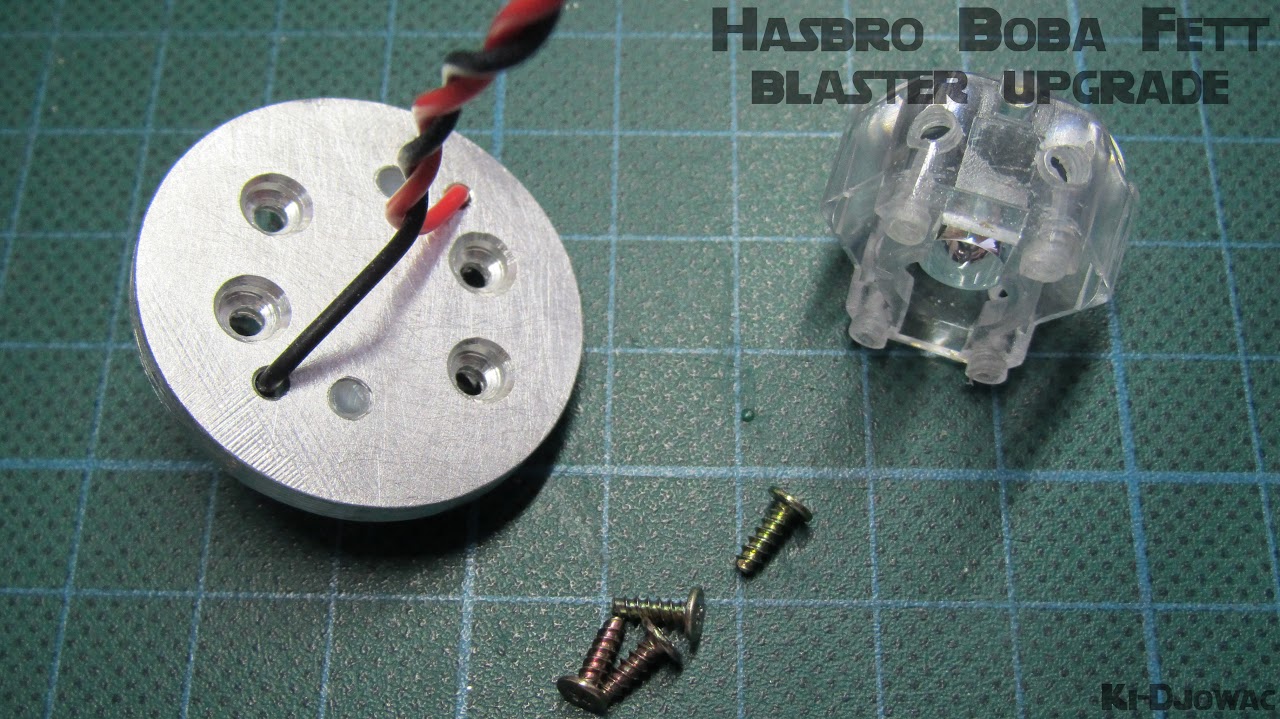
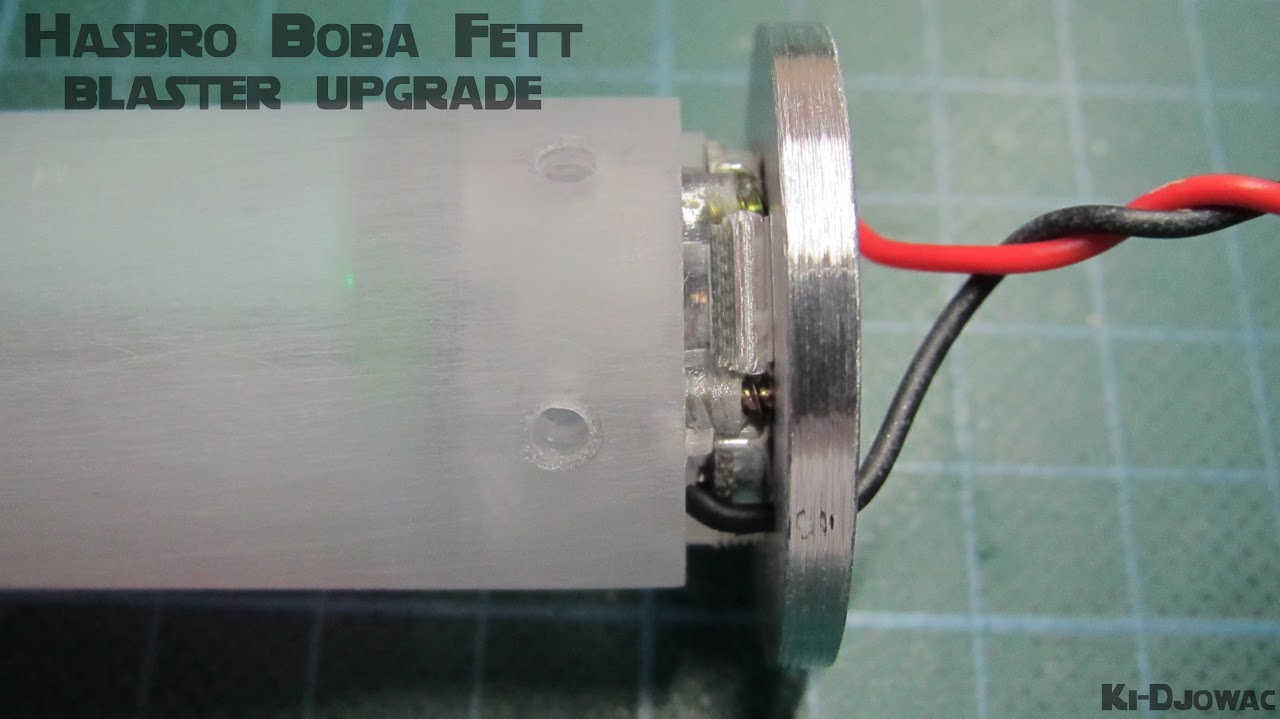
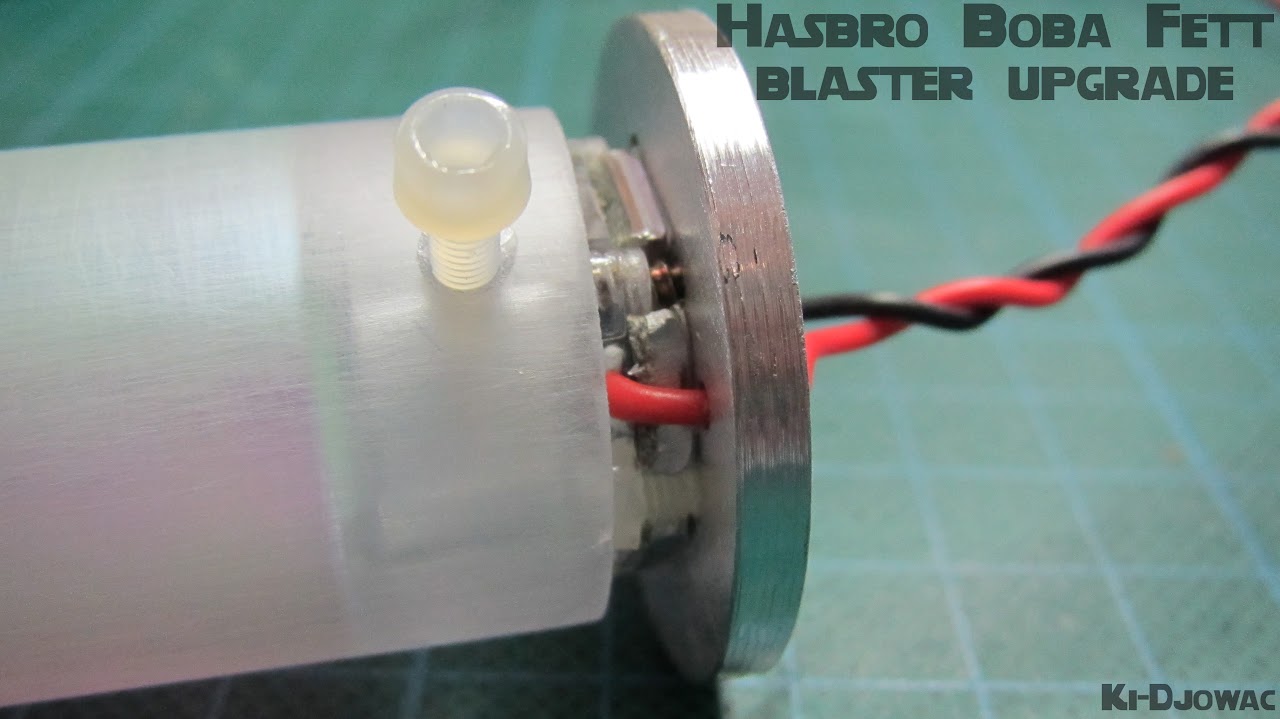
Figured out a way to get the new main LED fixed in the tube. Used some salvaged hard drive screws and some plastic M3 allen screws to fix everything in place. A colleague from work who's brother owns a lathe made the alu disc from an aluminium rod. I used my column drill for all the holes and threaded everything by hand.
Some detailed views :


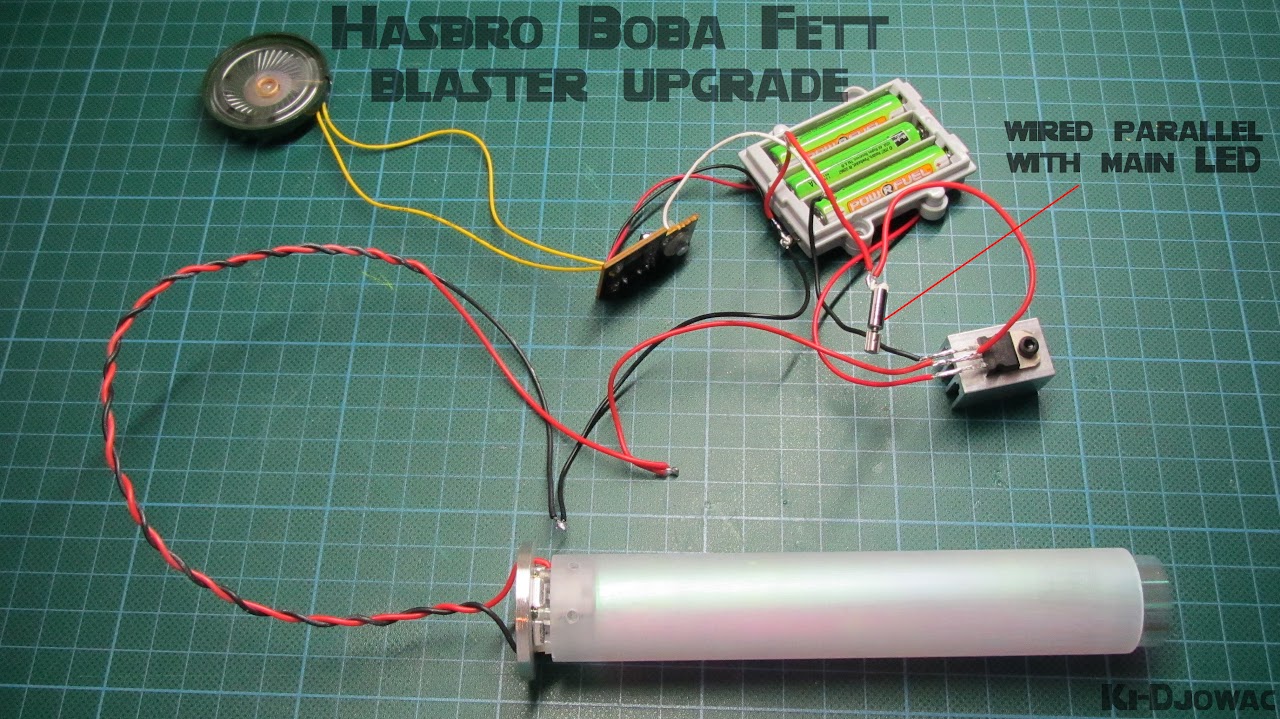
Rumble motor test setup. This one was picked up a couple years back in the sale section on FX-sabers from JudgeSabersmith. They run something in between 1 - 3 Volts. As it turns out i have 2,95V on the main LED and if i wire it parallel with the main led i get a nice running motor at max speed. You can use a resistor of course to tune down the rumble a bit.


next up will be wiring clean up while looking for a way to install the rumble motor. I'm thinking using some apoxie sculpt in the hilt (sourced by Master Jevaho, thx again ) and a 12mm copper tube i have in my inventory to assemble the scope back together. I'll probably be using the apoxie sculpt compound to fix the tube in the barrel too while all this should also add some weight to the blaster. |
|
| Back to top |
|
|
|
|
|
|
|
|
|
|
|
| Author |
Message |
joberg
Community Member
Joined: 06 Oct 2008
Posts: 9471
|
| Posted: Sun Feb 26, 2012 9:46 am Post subject: |
|
|
| Good idea for the diffused light look...I know Erv made a few light sabers that are not too shaby |
|
| Back to top |
|
|
|
|
|
|
|
|
|
|
|
| Author |
Message |
CessnaDriver
Community Member
Joined: 15 Mar 2008
Posts: 97
|
| Posted: Sun Feb 26, 2012 2:35 pm Post subject: |
|
|
Nothing says "toy" then the lightness of plastic.
Whatever you can do to add weight.
Every spare cavity with something heavy |
|
| Back to top |
|
|
|
|
|
|
|
|
|
|
|
| Author |
Message |
Ki-Djowac
Community Member
Joined: 23 Feb 2012
Posts: 164
Location: Belgium
|
| Posted: Sun Feb 26, 2012 4:58 pm Post subject: |
|
|
| joberg wrote: | | Good idea for the diffused light look...I know Erv made a few light sabers that are not too shaby |
Thanks
He sure did. Had the pleasure of seeing his sabers and his E-11 blaster up close and personal during FACTS 2011 and was genuinely impressed
Props to the man for making such a big difference in this great hobby with his electronics and ideas. Also a great person to meet and talk to. |
|
| Back to top |
|
|
|
|
|
|
|
|
|
|
|
| Author |
Message |
Ki-Djowac
Community Member
Joined: 23 Feb 2012
Posts: 164
Location: Belgium
|
| Posted: Sun Feb 26, 2012 5:01 pm Post subject: |
|
|
| CessnaDriver wrote: | Nothing says "toy" then the lightness of plastic.
Whatever you can do to add weight.
Every spare cavity with something heavy |
Will do
I already feel the difference of the added copper tube to put the scope back together. It's unbalanced now though, so i'll be filling up more spaces to add more weight as i go along through this build. |
|
| Back to top |
|
|
|
|
|
|
|
|
|
|
|
| Author |
Message |
Ki-Djowac
Community Member
Joined: 23 Feb 2012
Posts: 164
Location: Belgium
|
| Posted: Tue Feb 28, 2012 4:43 pm Post subject: |
|
|
another small update :
I've cut a 12mm copper tube to the correct length so i can assemble the scope back together. In my parts drawer i've found a 12mm lens of (as far as i can remember that is) a broken DVD player. I usually gut lots of things for parts before they move to the bin  This fits nicely at the front end of the scope so when you look through it, you'll get a nice added scope effect. This fits nicely at the front end of the scope so when you look through it, you'll get a nice added scope effect.

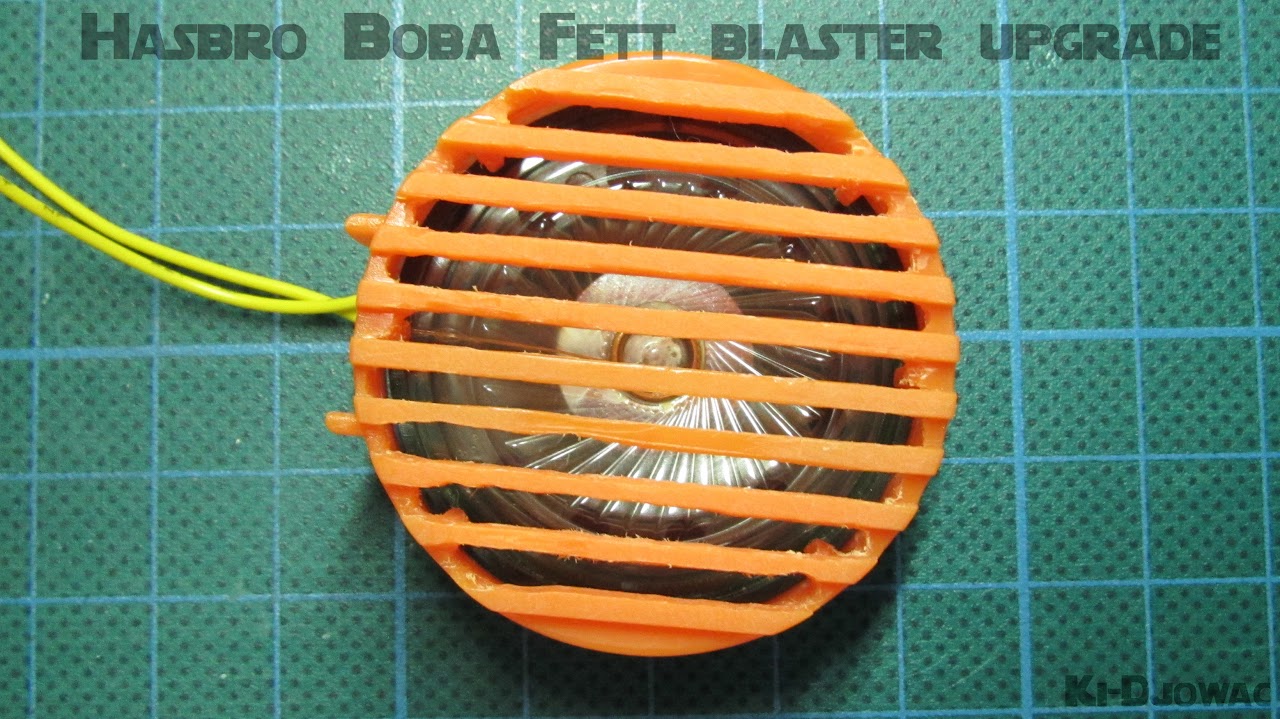
Dremelled out the Hasbro speaker grill with a Dremel grinding disk for some added loudness.
Decided to add some weight to the removable stock with a modeling compound called Apoxie sculpt. Certainly alot heavier now.


The stock is hardening out at this time and i expect to have my plastic allen screws coming in tomorrow so i can move back to the electronics side of things. |
|
| Back to top |
|
|
|
|
|
|
|
|
|
|
|
| Author |
Message |
joberg
Community Member
Joined: 06 Oct 2008
Posts: 9471
|
| Posted: Tue Feb 28, 2012 5:15 pm Post subject: |
|
|
Looking good for sure, that Apoxie will add some heft!
Keep up the good work |
|
| Back to top |
|
|
|
|
|
|
|
|
|
|
|
| Author |
Message |
Fangorn81
Community Member

Joined: 03 May 2009
Posts: 172
Location: Brooklyn, NY
|
| Posted: Tue Feb 28, 2012 9:20 pm Post subject: |
|
|
Apoxie Sculpt is awesome!
_________________
Good against remotes is one thing. Good against the living? That's something else.
Joah Mahan |
|
| Back to top |
|
|
|
|
|
|
|
|
|
|
|
| Author |
Message |
Ki-Djowac
Community Member
Joined: 23 Feb 2012
Posts: 164
Location: Belgium
|
| Posted: Sun Mar 04, 2012 10:51 am Post subject: |
|
|
Very small update :
working on the removable end of the blaster. At the moment primer is drying.
Meanwhile i took some smaller parts to try and get some kind of weathered look going as my resources and experience with this are very limited. Nevertheless i'm giving it a go and see where it leads me. For now i've done the trigger and speaker holder :
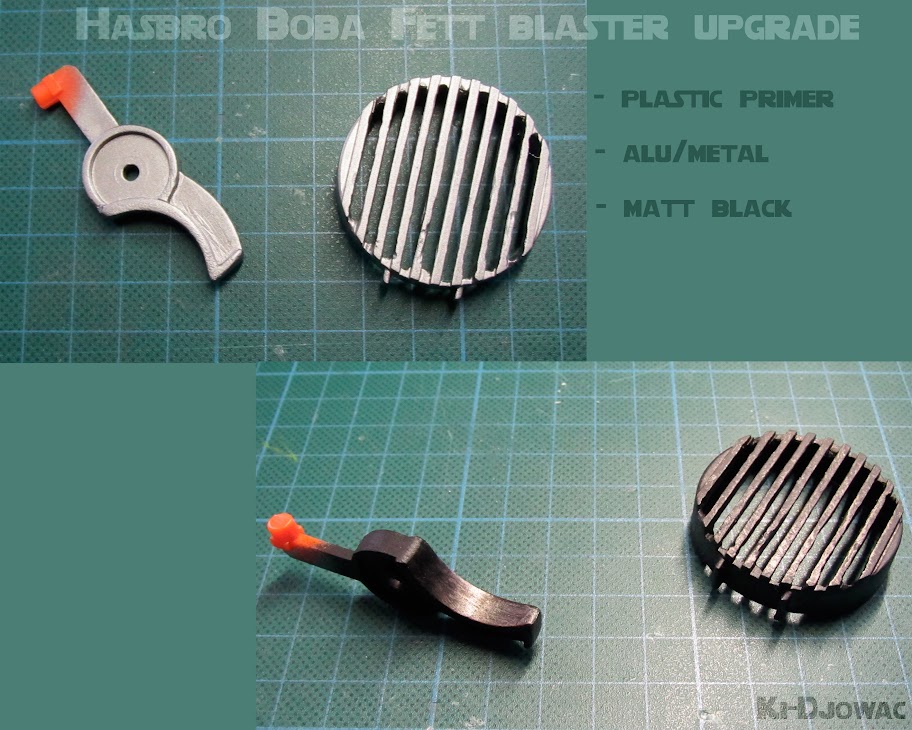
3 layers : primer, alu/metal looking paint and a matt black on top while carefully removing the matt black as it's still wet and some sanding after that to get to a weathered look. |
|
| Back to top |
|
|
|
|
|
|
|
|
|
|
|
| Author |
Message |
joberg
Community Member
Joined: 06 Oct 2008
Posts: 9471
|
| Posted: Sun Mar 04, 2012 2:13 pm Post subject: |
|
|
Eager to see the final product for sure...those updates are great, but they're killing me at the same time  (the anticipation is too much)! (the anticipation is too much)! |
|
| Back to top |
|
|
|
|
|
|
|
|
|
|
|
| Author |
Message |
Ki-Djowac
Community Member
Joined: 23 Feb 2012
Posts: 164
Location: Belgium
|
| Posted: Sun Mar 04, 2012 3:07 pm Post subject: |
|
|
hehe
Thx for the interest. Here's some more intel then :
At the moment i'm sanding the 2 main body parts. Lots of corners and stuff, so one hell of a sanding job. 
I'm also tackling some other issues that may take me a while longer.
The plastic screws have been deliverd for securing the lens in the polycarbonate tube so that's back on track.
However, the front ent of the barrel is way too blinding to be safe so i had a acrylic transparent cap made that will fit my polycarbonate tube at the front end. I expect delivery of my CNC'd part withing the next 2 - 3 weeks. Then i'll use 3 or more layers of a see through mirror foil that i picked up locally on the inside of the cap to still have a powerful light as it's intended, but no longer blinding. The foil will also bounce light back as it's mirrored on one side so the barrel should light up even more.
The barrel itself on the inside : i'll use a chrome spray to have it mirrored for an even more light bouncing effect. This is all theory of course, but i'm gonna give it a go anyways.
Also still in the works : making everything heavier without damping the sound too much as i'm filling the barrel with apoxie sculpt. There lies another problem though : i'm running out of apoxie sculpt and it needs to be ordered again.
Running out of mats is what makes me jump from one thing to another in this build it seems. Gonna keep pushing forward though.  |
|
| Back to top |
|
|
|
|
|
|
|
|
|
|
|
| Author |
Message |
joberg
Community Member
Joined: 06 Oct 2008
Posts: 9471
|
| Posted: Mon Mar 05, 2012 7:59 am Post subject: |
|
|
"Too blinding"  well, it's Boba Fett's weapon for heaven sake's; it's supposed to be blinding and dangerous well, it's Boba Fett's weapon for heaven sake's; it's supposed to be blinding and dangerous |
|
| Back to top |
|
|
|
|
|
|
|
|
|
|
|
| Author |
Message |
Ki-Djowac
Community Member
Joined: 23 Feb 2012
Posts: 164
Location: Belgium
|
| Posted: Mon Mar 05, 2012 11:37 am Post subject: |
|
|
| |
|
| Back to top |
|
|
|
|
|
|
|
|
|
|
|
| Author |
Message |
Ki-Djowac
Community Member
Joined: 23 Feb 2012
Posts: 164
Location: Belgium
|
| Posted: Fri Mar 09, 2012 12:02 pm Post subject: |
|
|
update :
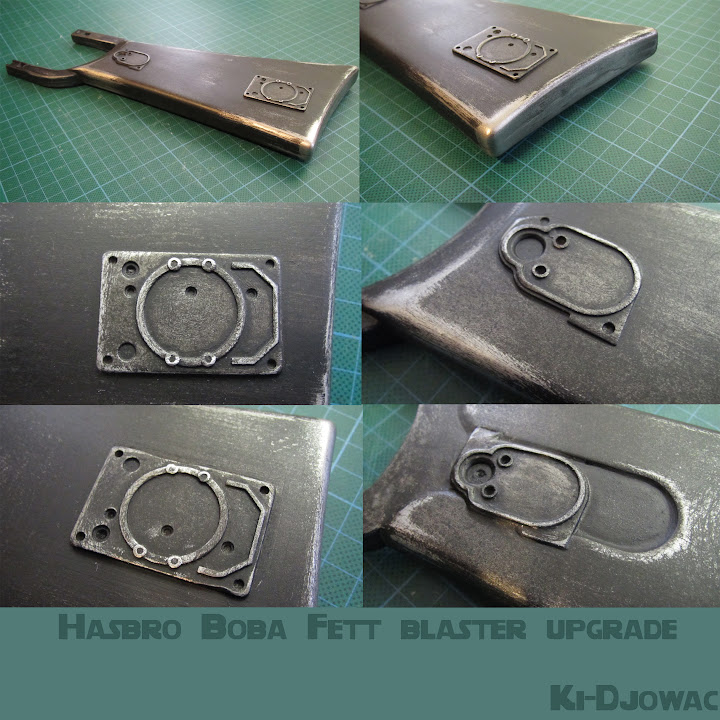
did some work on the removable back-end. After filling up the holes where the screws are i sanded everything down so primer would stick good and i could get a nice finish.
Same layers here as on the trigger/speakerholder : regular primer on the apoxie sculpt and plastic primer on the rest followed by a metallic looking paint and a matt black finish. For the weathering i layed down a good base => metallic paint and then i looked at where it would logically weather the most. The back end for example has almost no more black finish and so on ... For a first try i'm happy with how this turned out

More detailed view :
 |
|
| Back to top |
|
|
|
|
|
|
|
|
|
|
|
| Author |
Message |
joberg
Community Member
Joined: 06 Oct 2008
Posts: 9471
|
| Posted: Fri Mar 09, 2012 6:00 pm Post subject: |
|
|
| Weathering is looking mighty good ...eager to see it come all together |
|
| Back to top |
|
|
|
|
|
|
|
|
|
|
|
| Author |
Message |
Ki-Djowac
Community Member
Joined: 23 Feb 2012
Posts: 164
Location: Belgium
|
| Posted: Wed May 02, 2012 3:24 pm Post subject: |
|
|
Thx
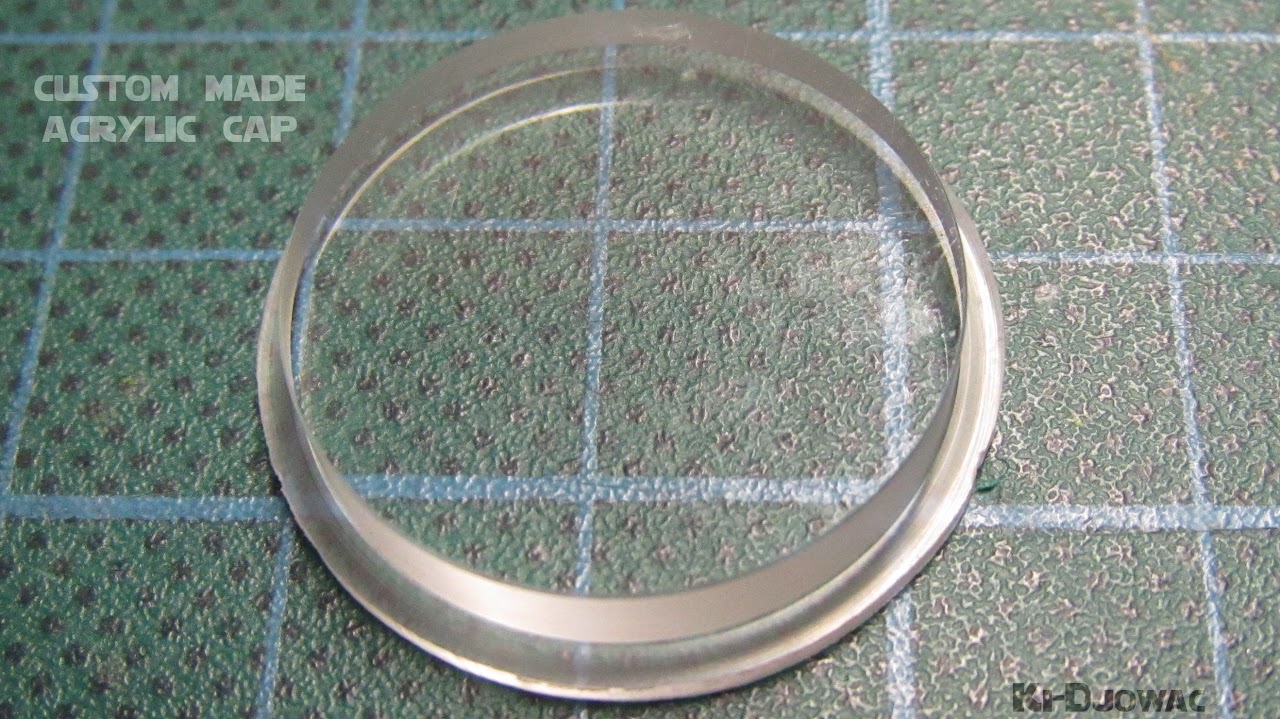
Time for another update as i've made some progress and my end cap came in
This will go at the end of the tube and has 5 layers of mirrored foil attached. This simply to prevent blinding anyone while firing and to bounce light back into the tube.
Then i also made some progress on the paint job/sculpting. Made the barrel end heavier with apoxie sculpt and spraypainted the inside with primer and then chrome to distribute the light a bit more inside the barrel. The battery cap is also filled up with apoxie sculpt, primered and spraypainted metallic. Sanded down the outside of the blaster, primer and then metallic again.

Also in the works as we speak : cleaning up wiring. To be continued ... |
|
| Back to top |
|
|
|
|
|
|
|
|
|
|
|
| Author |
Message |
joberg
Community Member
Joined: 06 Oct 2008
Posts: 9471
|
| Posted: Wed May 02, 2012 5:45 pm Post subject: |
|
|
| Spooky man I was just about to PM you and ask about that Bobba Fett blaster! Lookin' good for sure; I like the fact that you've sprayed the inside of the barrel with silver (great colour to keep the light inside the barrel). Keep up the good work! |
|
| Back to top |
|
|
|
|
|
|
|
|
|
|
|
| Author |
Message |
Ki-Djowac
Community Member
Joined: 23 Feb 2012
Posts: 164
Location: Belgium
|
| Posted: Thu May 03, 2012 11:06 am Post subject: |
|
|
Thx
Yeah, what usually happens is that i get stuck at some point with parts needed to complete whatever i have going. In this case, it was the cap. I have about 10 + projects lying around, waiting to be completed (mostly sabers). This one however, is looking at a fair chance of being finished soon. |
|
| Back to top |
|
|
|
|
|
|
|
|
|
|
|
|
You cannot post new topics in this forum
You cannot reply to topics in this forum
You cannot edit your posts in this forum
You cannot delete your posts in this forum
You cannot vote in polls in this forum
|
|
|
|
|
|
|
|


