 |
 |
|
 |
|
| Author |
Message |
colinfair
Community Member

Joined: 17 Apr 2013
Posts: 20
|
 Posted: Sun Jun 16, 2013 7:18 pm Post subject: Posted: Sun Jun 16, 2013 7:18 pm Post subject: |
 |
|
nice one
thanks oz
colin  |
|
| Back to top |
|
|
|
|
 |
|
 |
|
|
|
|
| Author |
Message |
DaveG
Community Member
Joined: 13 Mar 2011
Posts: 373
Location: Southern Calif.
|
| Posted: Sun Jun 16, 2013 9:19 pm Post subject: |
|
|
A note for anyone thinking of leaving their blaster the natural zinc finish... zinc tarnishes with exposure to oxygen, developing a dull grey appearance. You can mitigate this somewhat with a application of automotive paste wax.Ever better, a product called Renaissance Wax developed for museum preservation.
_________________
Dave
"I just want to say people... Get A Life! Move out of your parent's basement! It's just a movie!" |
|
| Back to top |
|
|
|
|
|
|
|
|
|
|
|
| Author |
Message |
Ozwepaie
Community Member
Joined: 06 Feb 2013
Posts: 114
Location: Trooper, PA.
|
| Posted: Sun Jun 16, 2013 11:48 pm Post subject: |
|
|
| DaveG wrote: | | A note for anyone thinking of leaving their blaster the natural zinc finish... zinc tarnishes with exposure to oxygen, developing a dull grey appearance. You can mitigate this somewhat with a application of automotive paste wax.Ever better, a product called Renaissance Wax developed for museum preservation. |
Great advice! I don't plan to keep this raw. I'm thinking more of a
Lamborghini lime green? LoL
not sure when I get around to finishing it? @ the moment, I'm wrapping
up an anti-rattle bushing kit. This will seat the bolt & cylinder door nice &
snug. W/out interfering w/ the functionality. Thing makes way too much
noise for my taste. W/ my kit (mainly machined delrin & O-rings) I can
violently shake it, & not a sound.
_________________
Que la Force soit avec toi |
|
| Back to top |
|
|
|
|
|
|
|
|
|
|
|
| Author |
Message |
joberg
Community Member
.jpg)
Joined: 06 Oct 2008
Posts: 9471
|
| Posted: Mon Jun 17, 2013 8:46 am Post subject: |
|
|
TFS DaveG. Great to know that there's a product out there that'll take care of that problem  |
|
| Back to top |
|
|
|
|
|
|
|
|
|
|
|
| Author |
Message |
eltee
Community Member
Joined: 31 Oct 2006
Posts: 437
Location: West Coast USA
|
| Posted: Mon Jun 24, 2013 2:52 pm Post subject: |
|
|
I can't tell by the pics, but did you use a .44 magnum round originally instead of a .44 special round? The Bulldog uses .44 special which is smaller than the magnum counterpart.
| colinfair wrote: | hi all
some pics of what i did.
the first is reference to the difference in size of the rounds, and the work on the cylinder.
[img]
you can see the white plastic card added to replace the metal disc you won't see this when fitted to the blaster and the cut lines are very thin you can barely see them.
[/img]
colin  |
|
|
| Back to top |
|
|
|
|
|
|
|
|
|
|
|
| Author |
Message |
VFX Freak
Community Member

Joined: 31 Mar 2013
Posts: 18
Location: Los Angeles
|
| Posted: Mon Jun 24, 2013 8:29 pm Post subject: |
|
|
I've been out of town working and my Blaster kit is waiting for me at home. After seeing all the build tips here I can't wait to get started... in a few months  In the meantime I remember Adam Savage saying he stripped the bluing from his Steyr receiver with white vinegar, and that it looked just like the aged prop when finished. That might work to strip the bluing from the zinc as well. I also read a good tip about using 0000 steel wool to apply the bluing liquid. I did an entire Remington shotgun receiver this way and it worked well. In the meantime I remember Adam Savage saying he stripped the bluing from his Steyr receiver with white vinegar, and that it looked just like the aged prop when finished. That might work to strip the bluing from the zinc as well. I also read a good tip about using 0000 steel wool to apply the bluing liquid. I did an entire Remington shotgun receiver this way and it worked well.
_________________
"I shoot better when I move." - The Sundance Kid |
|
| Back to top |
|
|
|
|
|
|
|
|
|
|
|
| Author |
Message |
colinfair
Community Member
Joined: 17 Apr 2013
Posts: 20
|
| Posted: Thu Jun 27, 2013 5:02 pm Post subject: |
|
|
hi eltee
sorry haven't lodged in in a few days.
that's interesting i never checked that, did it only use the short .44's ?
i might swap the supplied ones back they add some nice weight ,but the longer 44's look better its what ever floats your boat i suppose.
Colin |
|
| Back to top |
|
|
|
|
|
|
|
|
|
|
|
| Author |
Message |
BeastMaster
Community Member

Joined: 19 Jul 2007
Posts: 995
Location: UK
|
| Posted: Sun Jul 21, 2013 5:31 am Post subject: |
|
|
Hey guys, back to this thread again  some questions about the aluminium black dilute dipping technique: After dipping do you need to imediately rinse off the solution to prevent the part getting darker? Also seeing as the chemical used is pretty harmful cancer stuff what would be the proper way disposing it? I'm a bit of an environmentalist and would feel too guilty just pouring it down the drain :S any thoughts? some questions about the aluminium black dilute dipping technique: After dipping do you need to imediately rinse off the solution to prevent the part getting darker? Also seeing as the chemical used is pretty harmful cancer stuff what would be the proper way disposing it? I'm a bit of an environmentalist and would feel too guilty just pouring it down the drain :S any thoughts?
_________________
"F*ck it, it's just a movie. Let him worry about it" Harrison Ford |
|
| Back to top |
|
|
|
|
|
|
|
|
|
|
|
| Author |
Message |
cratercritter
Community Member
Joined: 15 Jul 2009
Posts: 558
|
| Posted: Sun Jul 21, 2013 8:13 am Post subject: |
|
|
Just dump it down the drain.  |
|
| Back to top |
|
|
|
|
|
|
|
|
|
|
|
| Author |
Message |
joberg
Community Member
Joined: 06 Oct 2008
Posts: 9471
|
| Posted: Thu Jul 25, 2013 5:47 pm Post subject: |
|
|
Don't pour it down the drain: pollution at its best  |
|
| Back to top |
|
|
|
|
|
|
|
|
|
|
|
| Author |
Message |
Bucky Cat
Community Member

Joined: 11 Jul 2011
Posts: 53
Location: Los Angeles
|
| Posted: Thu Jul 25, 2013 6:09 pm Post subject: |
|
|
As for disposing of it, I've got a batch in the garage and I'm wondering the same thing.
As to washing it off, I rinsed each piece as soon as I pulled it out of the chemical bath. I do believe it slows / stops the chemical reaction. Not positive but that's how I did it.
Also, I found that polishing it before I started and again after each treatment really helped me get a nice finish.
And DaveG's tip about the Renaissance wax was brilliant. That stuff is wonderful. I bought a very small bottle and have hardly used any but did the entire blaster. It does show finger prints however. I'm really looking forward to getting one of Dave's stands when they become available again. But who among us doesn't pick the blaster up once in a while?
Ted.
_________________
In space no one can hear you scream. But you can always text. |
|
| Back to top |
|
|
|
|
|
|
|
|
|
|
|
| Author |
Message |
Ozwepaie
Community Member
Joined: 06 Feb 2013
Posts: 114
Location: Trooper, PA.
|
| Posted: Mon Jul 29, 2013 7:56 am Post subject: |
|
|
For more detail look here:
http://www.propsummit.com/viewtopic.php?t=4172
This is NOT a quick & easy process. But well worth the effort.
According to the dude @ my local gun store. Zinc needs to be chemically
burnt. Before it will turn blue. If some of you have got a rainbow or
spectrum, type of effect? You're using the correct method. You just didn't
"burn" it yet.
Do not water down the solution.
Do not let the solution in the bottle contact any dirty or used applicator.
Shake the bottle every 20min or so.
You do not have to complete the bluing process in one shot.
If you have specific questions? Please post here.
I'll try and stay on top of this thread as best I can.

Uploaded with ImageShack.us
_________________
Que la Force soit avec toi |
|
| Back to top |
|
|
|
|
|
|
|
|
|
|
|
| Author |
Message |
hirohawa
Community Member

Joined: 18 May 2006
Posts: 1067
|
| Posted: Mon Jul 29, 2013 1:19 pm Post subject: |
|
|
| Looks great! |
|
| Back to top |
|
|
|
|
|
|
|
|
|
|
|
| Author |
Message |
Bucky Cat
Community Member
Joined: 11 Jul 2011
Posts: 53
Location: Los Angeles
|
| Posted: Thu Aug 01, 2013 11:04 am Post subject: |
|
|
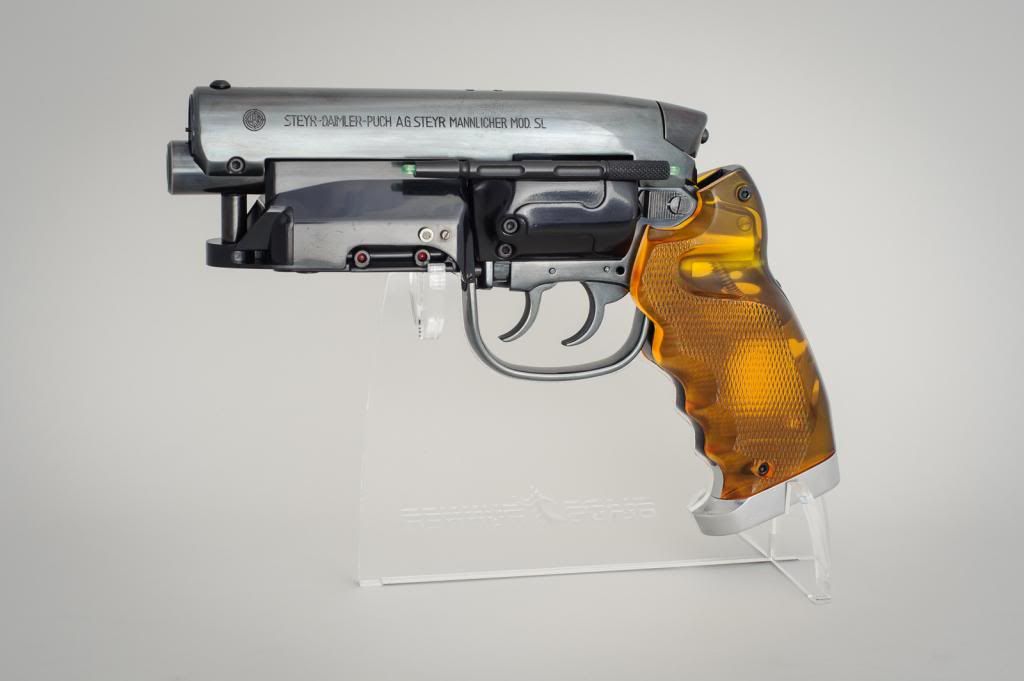
I'm getting a lot of mileage out of this picture today. 
Here is my recently finished Tomenosuke kit. One of the things I've really enjoyed with these kits is seeing the different levels of finish people are doing. I liked the very slightly weathered look myself.
I went with the Birchwood Casey Aluminum Black. LOTS of polishing before I started the process and LOTS of polishing during and afterwards. But I really like the finish. Just wish I had a decent camera. All my money goes to props.
Also added a steel barrel from DaveG (Sorry Tomenosuke but it makes all the difference), photos from Kurtboy and will be looking to adding new amber grips from Proper in the future.
Ted.
[url]<a><img></a>[/url]
_________________
In space no one can hear you scream. But you can always text. |
|
| Back to top |
|
|
|
|
|
|
|
|
|
|
|
| Author |
Message |
clutch
Community Member
Joined: 12 Dec 2006
Posts: 548
|
| Posted: Thu Aug 01, 2013 11:26 am Post subject: |
|
|
| Looks great! |
|
| Back to top |
|
|
|
|
|
|
|
|
|
|
|
| Author |
Message |
spinner 44
Community Member

Joined: 06 Nov 2006
Posts: 202
Location: Madrid, Spain
|
| Posted: Sun Aug 11, 2013 8:23 am Post subject: |
|
|
| BeastMaster wrote: | Cool! Thanks for sharing jakob. Does the black polish up shiney like the gun blue? I want to go for a slightly lighter and more polished up finish like this:
 |
Who made this version? This is the look and feel I want to give to mine! |
|
| Back to top |
|
|
|
|
|
|
|
|
|
|
|
| Author |
Message |
Ozwepaie
Community Member
Joined: 06 Feb 2013
Posts: 114
Location: Trooper, PA.
|
| Posted: Sun Aug 11, 2013 1:25 pm Post subject: |
|
|
I think that is the World-Con pro?? Not the kit.
I could be wrong, but it's a dead ringer for the Pro.
_________________
Que la Force soit avec toi |
|
| Back to top |
|
|
|
|
|
|
|
|
|
|
|
| Author |
Message |
VFX Freak
Community Member
Joined: 31 Mar 2013
Posts: 18
Location: Los Angeles
|
| Posted: Sun Oct 27, 2013 9:29 pm Post subject: |
|
|
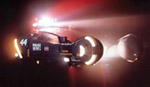
Hmmm... Not much activity here lately. Perhaps there's a better place to post this? I finally finished my Tomenosuke Pro kit (for now. I plan to weather it eventually.) I'm really happy with the results. Have a look. Thanks DaveG for the great barrel and stand.

_________________
"I shoot better when I move." - The Sundance Kid |
|
| Back to top |
|
|
|
|
|
|
|
|
|
|
|
| Author |
Message |
cratercritter
Community Member
Joined: 15 Jul 2009
Posts: 558
|
| Posted: Mon Oct 28, 2013 8:11 am Post subject: |
|
|
Well done VFX.
Looks really professional...bluing looks great. |
|
| Back to top |
|
|
|
|
|
|
|
|
|
|
|
| Author |
Message |
joberg
Community Member
Joined: 06 Oct 2008
Posts: 9471
|
| Posted: Mon Oct 28, 2013 6:03 pm Post subject: |
|
|
Beauty for sure, very crisp: love it  |
|
| Back to top |
|
|
|
|
|
|
|
|
|
|
|
|
You cannot post new topics in this forum
You cannot reply to topics in this forum
You cannot edit your posts in this forum
You cannot delete your posts in this forum
You cannot vote in polls in this forum
|
|
|
|
|
|
|
|


