 |
 |
|
 |
|
| Author |
Message |
joberg
Community Member
.jpg)
Joined: 06 Oct 2008
Posts: 9466
|
 Posted: Mon Sep 05, 2016 1:22 pm Post subject: Posted: Mon Sep 05, 2016 1:22 pm Post subject: |
 |
|
| Looking very good so far! |
|
| Back to top |
|
|
|
|
 |
|
 |
|
|
|
|
| Author |
Message |
veektohr
Community Member
Joined: 26 Feb 2016
Posts: 237
Location: Los Angeles
|
| Posted: Mon Sep 05, 2016 1:33 pm Post subject: |
|
|
| Clean up looks like it's gone well! How much drilling & tapping is left? |
|
| Back to top |
|
|
|
|
|
|
|
|
|
|
|
| Author |
Message |
Buch
Community Member

Joined: 27 Feb 2014
Posts: 1184
Location: Copenhagen, Denmark
|
| Posted: Mon Sep 05, 2016 1:49 pm Post subject: |
|
|
| joberg wrote: | | Looking very good so far! |
Thanks 
| veektohr wrote: | | Clean up looks like it's gone well! How much drilling & tapping is left? |
I still need to do some on the two handles and most exciting: the barrel...
From experience the barrel is a bit tricky to drill and tap... not something you should do late in the evening being tired etc.... so I'll save it for the weekend...
This kit really is much fun working with, you get to know EVERY inch of this prop, which is very cool
_________________
Monsieur, azonnal kövessen engem bitte
Last edited by Buch on Mon Sep 05, 2016 2:40 pm; edited 3 times in total |
|
| Back to top |
|
|
|
|
|
|
|
|
|
|
|
| Author |
Message |
racprops
Community Member

Joined: 30 Oct 2006
Posts: 2450
Location: Phoenix AZ
|
| Posted: Mon Sep 05, 2016 2:26 pm Post subject: |
|
|
On the small side screws, mark the dill points well, then center punch them, THEN START straight get the hole started THEN turn the barrel slowly and watch out for bending the drill bit until you are now drilling at the angle you need..I do the big screw for the ammo housing first and with it in in the barrel turn it until it is level with the dill table...straight out the side..parallel to the dill table.
Hot Tip.
Rich
_________________
I never have enough time to do all I want to do! |
|
| Back to top |
|
|
|
|
|
|
|
|
|
|
|
| Author |
Message |
Buch
Community Member
Joined: 27 Feb 2014
Posts: 1184
Location: Copenhagen, Denmark
|
| Posted: Mon Sep 05, 2016 2:37 pm Post subject: |
|
|
| racprops wrote: | On the small side screws, mark the dill points well, then center punch them, THEN START straight get the hole started THEN turn the barrel slowly and watch out for bending the drill bit until you are now drilling at the angle you need..I do the big screw for the ammo housing first and with it in in the barrel turn it until it is level with the dill table...straight out the side..parallel to the dill table.
Hot Tip.
Rich |
I would never have thought of that! Brilliant! Thanks, Rich
_________________
Monsieur, azonnal kövessen engem bitte |
|
| Back to top |
|
|
|
|
|
|
|
|
|
|
|
| Author |
Message |
racprops
Community Member
Joined: 30 Oct 2006
Posts: 2450
Location: Phoenix AZ
|
| Posted: Mon Sep 05, 2016 2:53 pm Post subject: |
|
|
It is how I do them.
Rich
_________________
I never have enough time to do all I want to do! |
|
| Back to top |
|
|
|
|
|
|
|
|
|
|
|
| Author |
Message |
Buch
Community Member
Joined: 27 Feb 2014
Posts: 1184
Location: Copenhagen, Denmark
|
| Posted: Tue Sep 06, 2016 7:55 am Post subject: |
|
|
There's a tiny little hole on the receiver.... what's the best way to fill it up?
I can't get the damn solder to stick in the hole... any tricks?
I suspect my solder iron is too weak, it's only 15W...
Any ideas?

_________________
Monsieur, azonnal kövessen engem bitte |
|
| Back to top |
|
|
|
|
|
|
|
|
|
|
|
| Author |
Message |
racprops
Community Member
Joined: 30 Oct 2006
Posts: 2450
Location: Phoenix AZ
|
| Posted: Tue Sep 06, 2016 8:46 am Post subject: |
|
|
I use a mini-welding torch...
You need a very hot soldering iron..or soldering gun and some pure flux to clean the metal as you melt in the repair.
Didn't you request some extra metal for these??
You really need to use the same metal to repair that/any part that will remain metal.
On any painted part any body filler like bondo or glassing putty will work great.
_________________
I never have enough time to do all I want to do! |
|
| Back to top |
|
|
|
|
|
|
|
|
|
|
|
| Author |
Message |
Buch
Community Member
Joined: 27 Feb 2014
Posts: 1184
Location: Copenhagen, Denmark
|
| Posted: Tue Sep 06, 2016 9:36 am Post subject: |
|
|
Thanks for a really quick reply, Rich!
So if I melt some pewter with a torch...... how do I get it in the hole? Pour it? Or let it drip melt over the hole?
No, I didn't request extra metal, I think that was someone else. I have a lot of pewter (95% tin 4% antimony 1% copper)... think that will do?
| racprops wrote: | I use a mini-welding torch...
You need a very hot soldering iron..or soldering gun and some pure flux to clean the metal as you melt in the repair.
Didn't you request some extra metal for these??
You really need to use the same metal to repair that/any part that will remain metal.
On any painted part any body filler like bondo or glassing putty will work great. |
_________________
Monsieur, azonnal kövessen engem bitte |
|
| Back to top |
|
|
|
|
|
|
|
|
|
|
|
| Author |
Message |
racprops
Community Member
Joined: 30 Oct 2006
Posts: 2450
Location: Phoenix AZ
|
| Posted: Tue Sep 06, 2016 9:51 am Post subject: |
|
|
You need to heat the main body and melt the metal into it and both the new and old metal needs to melt together.
Can you work around this long enough for me to mail you some filler metal??
I find for a good matching finish you really need repair metal of the same maker and batch.
Other wise there is a good chance it will look different and show.
Rich
_________________
I never have enough time to do all I want to do! |
|
| Back to top |
|
|
|
|
|
|
|
|
|
|
|
| Author |
Message |
Buch
Community Member
Joined: 27 Feb 2014
Posts: 1184
Location: Copenhagen, Denmark
|
| Posted: Tue Sep 06, 2016 10:39 am Post subject: |
|
|
| racprops wrote: | You need to heat the main body and melt the metal into it and both the new and old metal needs to melt together.
Can you work around this long enough for me to mail you some filler metal??
I find for a good matching finish you really need repair metal of the same maker and batch.
Other wise there is a good chance it will look different and show.
Rich |
Ahh! I see... Yes, of course! Just PM me about shipping costs, address etc. I really don't need much extra metal, it's a tiny little hole...
Then I'll practice this technique on some other pewter scraps in the mean time...
Thanks again, Rich!
_________________
Monsieur, azonnal kövessen engem bitte |
|
| Back to top |
|
|
|
|
|
|
|
|
|
|
|
| Author |
Message |
racprops
Community Member
Joined: 30 Oct 2006
Posts: 2450
Location: Phoenix AZ
|
| Posted: Tue Sep 06, 2016 11:42 am Post subject: |
|
|
Resend me you mailing address a couple pieces should go into envelope AOK.
_________________
I never have enough time to do all I want to do! |
|
| Back to top |
|
|
|
|
|
|
|
|
|
|
|
| Author |
Message |
Buch
Community Member
Joined: 27 Feb 2014
Posts: 1184
Location: Copenhagen, Denmark
|
| Posted: Thu Sep 08, 2016 9:56 am Post subject: |
|
|
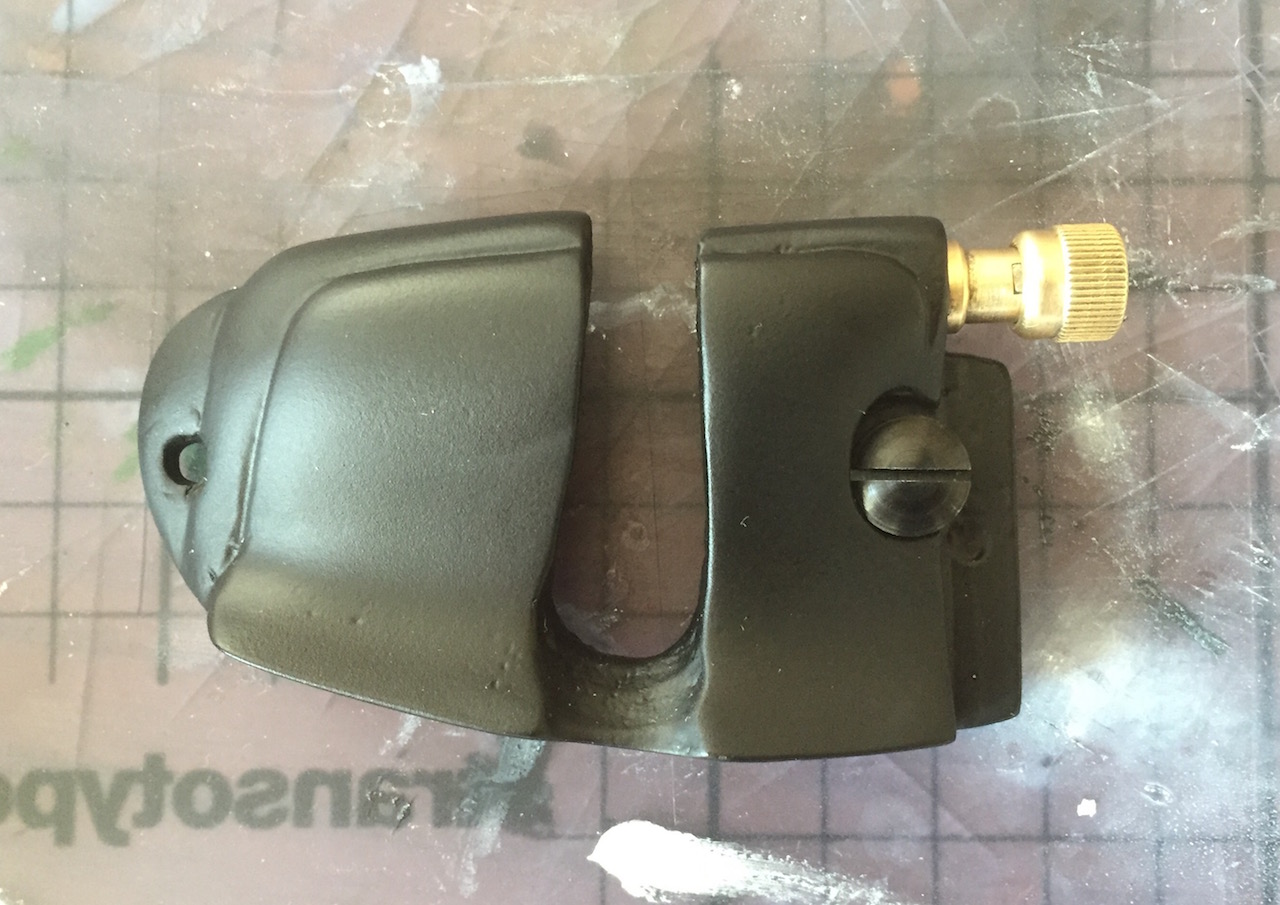
Test fitting slotted screw and binding post on side cover... the brass colored binding post looks so amazing! It's almost a shame painting it!
_________________
Monsieur, azonnal kövessen engem bitte |
|
| Back to top |
|
|
|
|
|
|
|
|
|
|
|
| Author |
Message |
racprops
Community Member
Joined: 30 Oct 2006
Posts: 2450
Location: Phoenix AZ
|
| Posted: Thu Sep 08, 2016 10:00 am Post subject: |
|
|
Nice, you need to cut two slots near the ribs to make it accurate.
Look at the cast version I included with the kit.
Rich
_________________
I never have enough time to do all I want to do! |
|
| Back to top |
|
|
|
|
|
|
|
|
|
|
|
| Author |
Message |
Buch
Community Member
Joined: 27 Feb 2014
Posts: 1184
Location: Copenhagen, Denmark
|
| Posted: Thu Sep 08, 2016 10:12 am Post subject: |
|
|
| racprops wrote: | Nice, you need to cut two slots near the ribs to make it accurate.
Look at the cast version I included with the kit.
Rich |
Thank you, Rich!
This is why I love this hobby... I've looked at the pictures of this blaster for hours and hours; this is my third build and fourth blaster all together, and I still never noticed that detail!!!!!
_________________
Monsieur, azonnal kövessen engem bitte |
|
| Back to top |
|
|
|
|
|
|
|
|
|
|
|
| Author |
Message |
Kokanee
Community Member
Joined: 14 Jul 2016
Posts: 32
|
| Posted: Thu Sep 08, 2016 10:25 am Post subject: |
|
|
| Yes, I've discovered that building one of these blasters is a journey more than a destination... |
|
| Back to top |
|
|
|
|
|
|
|
|
|
|
|
| Author |
Message |
racprops
Community Member
Joined: 30 Oct 2006
Posts: 2450
Location: Phoenix AZ
|
| Posted: Thu Sep 08, 2016 10:26 am Post subject: |
|
|
I know it is insane, it looks like you use a little open end wrench to tighten it.
_________________
I never have enough time to do all I want to do! |
|
| Back to top |
|
|
|
|
|
|
|
|
|
|
|
| Author |
Message |
racprops
Community Member
Joined: 30 Oct 2006
Posts: 2450
Location: Phoenix AZ
|
| Posted: Thu Sep 08, 2016 10:28 am Post subject: |
|
|
Go slow you can cut thought the thin shell and it looks crappy then, I cut about 10 of them and lost three...
_________________
I never have enough time to do all I want to do! |
|
| Back to top |
|
|
|
|
|
|
|
|
|
|
|
| Author |
Message |
Buch
Community Member
Joined: 27 Feb 2014
Posts: 1184
Location: Copenhagen, Denmark
|
| Posted: Thu Sep 08, 2016 11:10 am Post subject: |
|
|
| Kokanee wrote: | | Yes, I've discovered that building one of these blasters is a journey more than a destination... |
Yes, precisely
| racprops wrote: | | Go slow you can cut thought the thin shell and it looks crappy then, I cut about 10 of them and lost three... |
Good advice! Sounds a bit tricky... Thanks
_________________
Monsieur, azonnal kövessen engem bitte |
|
| Back to top |
|
|
|
|
|
|
|
|
|
|
|
| Author |
Message |
joberg
Community Member
Joined: 06 Oct 2008
Posts: 9466
|
| Posted: Fri Sep 09, 2016 6:14 am Post subject: |
|
|
Looking good Anders: yes, it's all worth it and damn...do I love that slotted screw  |
|
| Back to top |
|
|
|
|
|
|
|
|
|
|
|
|
You cannot post new topics in this forum
You cannot reply to topics in this forum
You cannot edit your posts in this forum
You cannot delete your posts in this forum
You cannot vote in polls in this forum
|
|
|
|
|
|
|
|


